In this note I will describe the process of calling C functions from assembler.
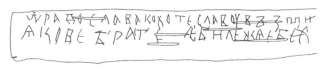
Let’s try calling printf(“Hello World!\n”); and exit(0);
    message: db "Hello, world!", 10, 0

section .text
    extern printf
    extern exit
    global main

main:
    xor	rax, rax
    mov	rdi, message
    call printf
    xor rdi, rdi
    call exit
Everything is much simpler than it seems, in the .rodata section we will describe static data, in this case the string “Hello, world!”, 10 is the newline character, also do not forget to zero it.
In the code section, we will declare external functions printf, exit of the stdio, stdlib libraries, and also declare the entry function main:
    extern printf
    extern exit
    global main
We pass 0 to the return register from the rax function, you can use mov rax, 0; but to speed it up, use xor rax, rax; Next, we pass a pointer to a string to the first argument:
Далее вызываем внешнюю функцию Си printf:
    xor	rax, rax
    mov	rdi, message
    call printf
    xor rdi, rdi
    call exit


By analogy, we pass 0 to the first argument and call exit:

    call exit


As Americans say:
Who doesn't listen to anyone
That pilaf is eaten by @ Alexander Pelevin
Sources
https://www.devdungeon. com/content/how-mix-c-and-assembly
https://nekosecurity.com/x86-64-assembly/part-3-nasm-anatomy-syscall-passing-argument

https://www.cs.uaf.edu/2017/fall/cs301/reference/x86_64.html
Source code
https://gitlab.com/demensdeum/assembly-playground
Hello World x86_64 assembler
In this note I will describe the process of setting up the IDE, writing the first Hello World in x86_64 assembler for the Ubuntu Linux operating system.
Let’s start with installing the SASM IDE, nasm assembler:
Далее запустим SASM и напишем Hello World:
section .text
main:
mov rbp, rsp ; for correct debugging
mov rax, 1 ; write(
mov rdi, 1 ; STDOUT_FILENO,
mov rsi, msg ; "Hello, world!\n",
mov rdx, msglen ; sizeof("Hello, world!\n")
syscall ; );
mov rax, 60 ; exit(
mov rdi, 0 ; EXIT_SUCCESS
syscall ; );
section .rodata
msg: db "Hello, world!"
msglen: equ $-msg
The Hello World code is taken from James Fisher's blog, adapted for assembly and debugging in SASM. The SASM documentation states that the entry point must be a function named main, otherwise debugging and compilation of the code will be incorrect.
What did we do in this code? We made a syscall call - an appeal to the Linux operating system kernel with the correct arguments in the registers, a pointer to a string in the data section.
Under the magnifying glass
Let's look at the code in more detail:
global – директива ассемблера позволяющая задавать глобальные символы со строковыми именами. Хорошая аналогия – интерфейсы заголовочных файлов языков C/C++. В данном случае мы задаем символ main для функции входа.
section – директива ассемблера позволяющая задавать секции (сегменты) кода. Директивы section или segment равнозначны. В секции .text помещается код программы.
Обьявляем начало функции main. В ассемблере функции называются подпрограммами (subroutine)
Первая машинная команда mov – помещает значение из аргумента 1 в аргумент 2. В данном случае мы переносим значение регистра rbp в rsp. Из комментария можно понять что эту строку добавил SASM для упрощения отладки. Видимо это личные дела между SASM и дебаггером gdb.
Далее посмотрим на код до сегмента данных .rodata, два вызова syscall, первый выводит строку Hello World, второй обеспечивает выход из приложения с корректным кодом 0.
Представим себе что регистры это переменные с именами rax, rdi, rsi, rdx, r10, r8, r9. По аналогии с высокоуровневыми языками, перевернем вертикальное представление ассемблера в горизонтальное, тогда вызов syscall будет выглядеть так:
Тогда вызов печати текста:
Вызов exit с корректным кодом 0:
Рассмотрим аргументы подробнее, в заголовочном файле asm/unistd_64.h находим номер функции __NR_write – 1, далее в документации смотрим аргументы для write:
ssize_t write(int fd, const void *buf, size_t count);
Первый аргумент – файловый дескриптор, второй – буфер с данными, третий – счетчик байт для записи в дескриптор. Ищем номер файлового дескриптора для стандартного вывода, в мануале по stdout находим код 1. Далее дело за малым, передать указатель на буфер строки Hello World из секции данных .rodata – msg, счетчик байт – msglen, передать в регистры rax, rdi, rsi, rdx корректные аргументы и вызвать syscall.
Обозначение константных строк и длины описывается в мануале nasm:
msglen equ $-message
Достаточно просто да?
Источники
https://github.com/Dman95/SASM
https://www.nasm.us/xdoc/2.15.05/html/nasmdoc0.html
http://acm.mipt.ru/twiki/bin/view/Asm/HelloNasm
https://jameshfisher.com/2018/03/10/linux-assembly-hello-world/
http://www.ece.uah.edu/~milenka/cpe323-10S/labs/lab3.pdf
https://c9x.me/x86/html/file_module_x86_id_176.html
https://www.recurse.com/blog/7-understanding-c-by-learning-assembly
https://ru.wikipedia.org/wiki/%D0%9F%D1%80%D0%BE%D0%BB%D0%BE%D0%B3_%D0%BF%D1%80%D0%BE%D1%86%D0%B5%D0%B4%D1%83%D1%80%D1%8B
https://www.tutorialspoint.com/assembly_programming/assembly_basic_syntax.html
https://nekosecurity.com/x86-64-assembly/part-3-nasm-anatomy-syscall-passing-argument
https://man7.org/linux/man-pages/man2/syscall.2.html
https://en.wikipedia.org/wiki/Write_(system_call)
Исходный код
https://gitlab.com/demensdeum/assembly-playground
DemensPlay #7 Blazing Chrome
Characteristics in Space Jaguar Action RPG
The first article about the game in development Space Jaguar Action RPG. In this article I will describe the gameplay feature of the Jaguar – Characteristics.
Many RPGs use a static system of character stats, such as those from DnD (Strength, Constitution, Dexterity, Intelligence, Wisdom, Charisma), or Fallout’s S.P.E.C.I.A.L (Strength, Perception, Endurance, Charisma, Intelligence, Dexterity, Luck).
In Space Jaguar, I plan to implement a dynamic system of characteristics, for example, the main character of the game, Jag, at the start has only three characteristics – Blade mastery (half-sabre), shadow operations (making deals in the criminal world), rogue abilities (picking locks, stealing). During the game, characters will be given and deprived of dynamic characteristics within the game module, all checks will be made based on the level of certain characteristics necessary for a given game situation. For example, Jag will not be able to win a game of chess if he does not have the chess game characteristic, or does not have a sufficient level to pass the check.
To simplify the logic of checks, each characteristic is given a 6-digit code in English letters, a name, a description. For example, for blade ownership:
bladeFightingAbility.name = "BLADFG";
bladeFightingAbility.description = "Blade fighting ability";
bladeFightingAbility.points = 3;
Перед стартом игрового модуля можно будет просмотреть список публичных проверок необходимых для прохождения, также создатель может скрыть часть проверок для создания интересных игровых ситуаций.
Ноу-хау? Будет ли интересно? Лично я нахожу такую систему интересной, позволяющей одновременно обеспечить свободу творчества создателям игровых модулей, и возможность переноса персонажей из разных, но похожих по характеристикам, модулей для игроков.
Hash table
A hash table allows you to implement an associative array (dictionary) data structure, with an average performance of O(1) for insert, delete, and search operations.
Below is an example of the simplest implementation of a hash map on nodeJS:
How does it work? Let’s watch the hands:
- There is an array inside the hash map
- Inside the array element is a pointer to the first node of the linked list
- Memory is allocated for an array of pointers (for example 65535 elements)
- Implement a hash function, the input is a dictionary key, and the output can do anything, but in the end it returns the index of the array element
How does the recording work:
- The input is a key – value pair
- The hash function returns an index by key
- Get a linked list node from an array by index
- We check if it matches the key
- If it matches, then replace the value
- If it doesn’t match, then we move on to the next node until we either find a node with the required key.
- If the node is not found, then we create it at the end of the linked list
How does keyword search work:
- The input is a key – value pair
- The hash function returns an index by key
- Get a linked list node from an array by index
- We check if it matches the key
- If it matches, then return the value
- If it doesn’t match, then we move on to the next node until we either find a node with the required key.
Why do we need a linked list inside an array? Because of possible collisions when calculating the hash function. In this case, several different key-value pairs will be located at the same index in the array, in which case the linked list is traversed to find the required key.
Sources
https://ru.wikipedia.org/wiki/Hash table
https://www.youtube.com/watch?v=wg8hZxMRwcw
Source code
https://gitlab.com/demensdeum/datastructures
Working with Resources in Android C++
There are several options for working with resources in Android via ndk – C++:
- Use access to resources from an apk file using AssetManager
- Download resources from the Internet and unpack them into the application directory, use them using standard C++ methods
- Combined method – get access to the archive with resources in apk via AssetManager, unpack them into the application directory, then use them using standard C++ methods
Next I will describe the combined access method used in the Flame Steel Engine.
When using SDL, you can simplify access to resources from apk, the library wraps calls to AssetManager, offering interfaces similar to stdio (fopen, fread, fclose, etc.)
SDL_RWops *io = SDL_RWFromFile("files.fschest", "r");
After loading the archive from apk to the buffer, you need to change the current working directory to the application directory, it is available for the application without obtaining additional permissions. To do this, we will use a wrapper on SDL:
chdir(SDL_AndroidGetInternalStoragePath());
Next, we write the archive from the buffer to the current working directory using fopen, fwrite, fclose. After the archive is in a directory accessible to C++, we unpack it. Zip archives can be unpacked using a combination of two libraries – minizip and zlib, the first one can work with the archive structure, while the second one unpacks the data.
For more control, ease of porting, I have implemented my own zero-compression archive format called FSChest (Flame Steel Chest). This format supports archiving a directory with files, and unpacking; There is no support for folder hierarchy, only files can be worked with.
We connect the FSChest library header, unpack the archive:
#include "fschest.h"
FSCHEST_extractChestToDirectory(archivePath, SDL_AndroidGetInternalStoragePath());
After unpacking, the C/C++ interfaces will have access to the files from the archive. Thus, I did not have to rewrite all the work with files in the engine, but only add file unpacking at the startup stage.
Sources
https://developer.android.com/ndk/ reference/group/asset
Source Code
https://gitlab.com/demensdeum/space- jaguar-action-rpg
https://gitlab.com/demensdeum/fschest
Stack Machine and RPN
Let’s say we need to implement a simple bytecode interpreter. What approach should we choose to implement this task?
The Stack data structure provides the ability to implement the simplest bytecode machine. Features and implementations of stack machines are described in many articles on the Western and domestic Internet, I will only mention that the Java virtual machine is an example of a stack machine.
The principle of the machine is simple: a program containing data and operation codes (opcodes) is fed to the input, and the necessary operations are implemented using stack manipulations. Let’s look at an example of a bytecode program for my stack machine:
пMVkcatS olleHП
The output will be the string “Hello StackVM”. The stack machine reads the program from left to right, loading the data into the stack symbol by symbol, and when the opcode appears in the – symbol, it implements the command using the stack.
Example of stack machine implementation on nodejs:
Reverse Polish Notation (RPN)
Stack machines are also easy to use for implementing calculators, using Reverse Polish Notation (postfix notation).
Example of a normal infix notation:
2*2+3*4
Converts to RPN:
22*34*+
To calculate the postfix notation we use a stack machine:
2 – to top of stack (stack: 2)
2 – to top of stack (stack: 2,2)
* – get the top of the stack twice, multiply the result, push to the top of the stack (stack: 4)
3 – to top of stack (stack: 4, 3)
4 – on top of stack (stack: 4, 3, 4)
* – get the top of the stack twice, multiply the result, push to the top of the stack (stack: 4, 12)
+ – get the top of the stack twice, add the result, push to the top of the stack (stack: 16)
As you can see, the result of operations 16 remains on the stack, it can be printed by implementing stack printing opcodes, for example:
p22*34*+P
П – opcode to start printing the stack, п – opcode to finish printing the stack and sending the final line for rendering.
To convert arithmetic operations from infix to postfix, Edsger Dijkstra’s algorithm called “Sorting Yard” is used. An example of the implementation can be seen above, or in the repository of the stack machine project on nodejs below.
Sources
https://tech.badoo.com/ru/article/579/interpretatory-bajt-kodov-svoimi-rukami/
https://ru.wikipedia.org/wiki/Обратная_польская_запись
Source code
https://gitlab.com/demensdeum/stackvm/< /p>
Skeletal Animation (Part 2 – Node Hierarchy, Interpolation)
I continue to describe the skeletal animation algorithm as it is implemented in the Flame Steel Engine.
Since this is the most complex algorithm I’ve ever implemented, there may be errors in the development notes. In the previous article about this algorithm, I made a mistake: the bone array is passed to the shader for each mesh separately, not for the entire model.
Hierarchy of nodes
For the algorithm to work correctly, the model must contain a connection between the bones (graph). Let’s imagine a situation in which two animations are played simultaneously – a jump and raising the right hand. The jump animation must raise the model along the Y axis, while the animation of raising the hand must take this into account and rise together with the model in the jump, otherwise the hand will remain in place on its own.
Let’s describe the node connection for this case – the body contains a hand. When the algorithm is processed, the bone graph will be read, all animations will be taken into account with correct connections. In the model’s memory, the graph is stored separately from all animations, only to reflect the connectivity of the model’s bones.
Interpolation on CPU
In the previous article I described the principle of rendering skeletal animation – “transformation matrices are passed from the CPU to the shader at each rendering frame.”
Each rendering frame is processed on the CPU, for each bone of the mesh the engine gets the final transformation matrix using interpolation of position, rotation, magnification. During the interpolation of the final bone matrix, the node tree is traversed for all active node animations, the final matrix is multiplied with the parents, then sent to the vertex shader for rendering.
Vectors are used for position interpolation and magnification, quaternions are used for rotation, since they are very easy to interpolate (SLERP) unlike Euler angles, and they are also very easy to represent as a transformation matrix.
How to Simplify Implementation
To simplify debugging of vertex shader operation, I added simulation of vertex shader operation on CPU using macro FSGLOGLNEWAGERENDERER_CPU_BASED_VERTEX_MODS_ENABLED. Video card manufacturer NVIDIA has a utility for debugging shader code Nsight, perhaps it can also simplify development of complex algorithms of vertex/pixel shaders, however I never had a chance to check its functionality, simulation on CPU was enough.
In the next article I plan to describe mixing several animations, fill in the remaining gaps.
Sources
https://www.youtube.com/watch?v= f3Cr8Yx3GGA
DemensPlay #6 Streets of Rage 4
DemensPlay Doom Eternal
Adding JavaScript Scripting Support to C++
In this note I will describe a way to add support for JavaScript scripts to a C++ application using the Tiny-JS library.
Tiny-JS is a library for embedding in C++, providing execution of JavaScript code, with support for bindings (the ability to call C++ code from scripts)
At first I wanted to use popular libraries ChaiScript, Duktape or connect Lua, but due to dependencies and possible difficulties in portability to different platforms, it was decided to find a simple, minimal, but powerful MIT JS lib, Tiny-JS meets these criteria. The only downside of this library is the lack of support/development by the author, but its code is simple enough that you can take on the support yourself if necessary.
Download Tiny-JS from the repository:
https://github.com/gfwilliams/tiny-js
Next, add Tiny-JS headers to the code that is responsible for scripts:
#include "tiny-js/TinyJS.h"
#include "tiny-js/TinyJS_Functions.h"
Add TinyJS .cpp files to the build stage, then you can start writing scripts to load and run.
An example of using the library is available in the repository:
https://github.com/gfwilliams/tiny-js/blob/master/Script.cpp
https://github.com/gfwilliams/tiny-js/blob/wiki/CodeExamples.md
An example of the implementation of the handler class can be found in the SpaceJaguar project:
https://gitlab.com/demensdeum/space-jaguar-action-rpg/-/blob/master/project/src/Controllers/SpaceJaguarScriptController/SpaceJaguarScriptController.h
https://gitlab.com/demensdeum/space-jaguar-action-rpg/-/blob/master/project/src/Controllers/SpaceJaguarScriptController/SpaceJaguarScriptController.cpp
Example of a game script added to the application:
https://gitlab.com/demensdeum/space-jaguar-action-rpg/-/blob/master/project/resources/com.demensdeum.spacejaguaractionrpg.scripts.sceneController.js
Sources
https://github.com/gfwilliams/tiny-js
https://github.com/dbohdan/embedded-scripting-languages
https://github.com/AlexKotik/embeddable-scripting-languages
Building C++ SDL iOS App on Linux
In this note I will describe the procedure for building a C++ SDL application for iOS on Linux, signing an ipa archive without a paid Apple Developer subscription and installing it on a clean device (iPad) using macOS without Jailbreak.
First, let’s install the toolchain build for Linux:
https://github.com/tpoechtrager/cctools-port
The toolchain needs to be downloaded from the repository, then follow the instructions on the Godot Engine website to complete the installation:
https://docs.godotengine.org/ru/latest/development/compiling/cross-compiling_for_ios_on_linux.html
At the moment, you need to download Xcode dmg and copy the sdk from there to build cctools-port. This step is easier to complete on macOS, it is enough to copy the necessary sdk files from the installed Xcode. After successful assembly, the terminal will contain the path to the cross-compiler toolchain.
Next, you can start building the SDL application for iOS. Open cmake and add the necessary changes to build the C++ code:
SET(CMAKE_SYSTEM_NAME Darwin)
SET(CMAKE_C_COMPILER arm-apple-darwin11-clang)
SET(CMAKE_CXX_COMPILER arm-apple-darwin11-clang++)
SET(CMAKE_LINKER arm-apple-darwin11-ld)
Now you can build using cmake and make, but don’t forget to set $PATH to the cross-compiler toolchain:
PATH=$PATH:~/Sources/cctools-port/usage_examples/ios_toolchain/target/bin
For correct linking with frameworks and SDL, we register them in cmake, dependencies of the Space Jaguar game for example:
target_link_libraries(
${FSEGT_PROJECT_NAME}
${FLAME_STEEL_PROJECT_ROOT_DIRECTORY}/scripts/buildScripts/ios/resources/libs/libclang_rt.ios.a
${FLAME_STEEL_PROJECT_ROOT_DIRECTORY}/scripts/buildScripts/ios/resources/libs/libSDL2.a
${FLAME_STEEL_PROJECT_ROOT_DIRECTORY}/scripts/buildScripts/ios/resources/libs/libSDL2_mixer.a
${FLAME_STEEL_PROJECT_ROOT_DIRECTORY}/scripts/buildScripts/ios/resources/libs/libSDL2_image.a
"${FLAME_STEEL_PROJECT_ROOT_DIRECTORY}/scripts/buildScripts/ios/resources/libs/CoreServices.framework"
"${FLAME_STEEL_PROJECT_ROOT_DIRECTORY}/scripts/buildScripts/ios/resources/libs/ImageIO.framework"
"${FLAME_STEEL_PROJECT_ROOT_DIRECTORY}/scripts/buildScripts/ios/resources/libs/Metal.framework"
"${FLAME_STEEL_PROJECT_ROOT_DIRECTORY}/scripts/buildScripts/ios/resources/libs/AVFoundation.framework"
"${FLAME_STEEL_PROJECT_ROOT_DIRECTORY}/scripts/buildScripts/ios/resources/libs/GameController.framework"
"${FLAME_STEEL_PROJECT_ROOT_DIRECTORY}/scripts/buildScripts/ios/resources/libs/CoreMotion.framework"
"${FLAME_STEEL_PROJECT_ROOT_DIRECTORY}/scripts/buildScripts/ios/resources/libs/CoreGraphics.framework"
"${FLAME_STEEL_PROJECT_ROOT_DIRECTORY}/scripts/buildScripts/ios/resources/libs/AudioToolbox.framework"
"${FLAME_STEEL_PROJECT_ROOT_DIRECTORY}/scripts/buildScripts/ios/resources/libs/CoreAudio.framework"
"${FLAME_STEEL_PROJECT_ROOT_DIRECTORY}/scripts/buildScripts/ios/resources/libs/QuartzCore.framework"
"${FLAME_STEEL_PROJECT_ROOT_DIRECTORY}/scripts/buildScripts/ios/resources/libs/OpenGLES.framework"
"${FLAME_STEEL_PROJECT_ROOT_DIRECTORY}/scripts/buildScripts/ios/resources/libs/UIKit.framework"
"${FLAME_STEEL_PROJECT_ROOT_DIRECTORY}/scripts/buildScripts/ios/resources/libs/Foundation.framework"
)
In my case, the SDL, SDL_Image, SDL_mixer libraries are compiled in Xcode on macOS in advance for static linking; Frameworks are copied from Xcode. Also added is the libclang_rt.ios.a library, which includes specific iOS runtime calls, such as isOSVersionAtLeast. Enabled macro for working with OpenGL ES, disabling unsupported functions in the mobile version, similar to Android.
After solving all the build issues, you should get a built binary for arm. Next, let’s look at running the built binary on a device without Jailbreak.
On macOS, install Xcode, register on the Apple portal, without paying for the developer program. Add an account in Xcode -> Preferences -> Accounts, create an empty application and build on a real device. During the build, the device will be added to the free developer account. After building and running, you need to build the archive, for this, select Generic iOS Device and Product -> Archive. After the archive is built, extract the embedded.mobileprovision, PkgInfo files from it. From the build log on the device, find the codesign line with the correct signature key, the path to the entitlements file with the app.xcent extension, copy it.
Copy the .app folder from the archive, replace the binary in the archive with the one compiled by a cross compiler in Linux (for example, SpaceJaguar.app/SpaceJaguar), then add the necessary resources to .app, check the safety of the PkgInfo and embedded.mobileprovision files in .app from the archive, copy again if necessary. Re-sign .app using the codesign command – codesign requires a key for sign, the path to the entitlements file (can be renamed with the .plist extension)
After re-signing, create a Payload folder, move the folder with the .app extension there, create a zip archive with Payload in the root, rename the archive with the .ipa extension. After that, open the list of devices in Xcode and Drag’n’Drop the new ipa to the list of device applications; Installation via Apple Configurator 2 does not work for this method. If re-signing is done correctly, the application with the new binary will be installed on the iOS device (for example, iPad) with a 7-day certificate, this is enough for the testing period.
Sources
https://github.com/tpoechtrager/cctools-port
https://docs.godotengine.org/ru/latest/development/compiling/cross-compiling_for_ios_on_linux.html
https://jonnyzzz.com/blog/2018/06/13/link-error-3/
https://stackoverflow.com/questions/6896029/re-sign-ipa-iphone
https://developer.apple.com/library/archive/documentation/Security/Conceptual/CodeSigningGuide/Procedures/Procedures.html
Games Vision #4
The fourth issue of the very fickle Games Vision column about games.
World Of Horror (cross-platform, panstasz) – roguelike early access game in the style of uh what? Text horror adventure with RPG elements? Graphically reminiscent of games of the 80s, a choice of 1-bit or 2-bit palette with variations is available.
The controls seem strange at first, but you get used to them over time, because that’s what roguelike is for – to surprise and be original in every aspect. Amazing chiptune music, late 80s Japanese aesthetics, visuals inspired by the works of Junji Ito, strange stories in the style of Lovecraft, almost infinite replayability.
What else do you need?
Rating: 9/10
Eternal Castle [REMASTERED] (PC, Daniele Vicinanzo, Giulio Perrone, Leonard Menchiari) – a modern game in the style of Another World, Flashback. The palette is specially reduced to CGA colors. The description of this game should begin with the legend of its creation: around 1987, one of the children of the Eternal Castle developers saw the game and remembered it for life, as a result, the game was never released, but the source code was found and restored in 2019, releasing an improved version. However, the description on Steam contains information that this is a remaster of the 1987 bestseller, but that year the game with that name was not released, what is true and what is not is up to you to decide.
The graphics and gameplay are clearly aimed at those who like to feel nostalgic for the good old days, there are often moments when it seems that the game has frozen, but in fact you just need to press the movement or action buttons to see what is happening on the screen. This trick creates a feeling of awkwardness and loss of control, which was often used in older games, which was completely abandoned in modern ones.
Rating: 8/10
Death & Taxes (PC, Placeholder Gameworks) – have you ever dreamed of working as a judge and executioner in one person? Do you like long black robes, metal scythes, and cracking knuckles? Then this is the perfect game for you, because “There are only two things you can’t avoid – death and taxes.”
This is a one-of-a-kind simulator of the angel of death, you have to choose who will live and who will die. In addition to killing or giving life, you can read the news feed on your smartphone, see how the choice affects the world of the earth. You also need to communicate with your immediate superior named Faith (Fate), buy items and all sorts of utensils for the table, for example, I bought myself a brutal cactus. Do not forget to talk to the mirror, very exciting. Of the minuses, it is worth noting the general intimacy of what is happening, after a few game days the game becomes a little monotonous.
Rating: 8/10
Fixing Slow HDD Performance in Windows 10
This note is dedicated to all hard drive users who are not giving up their positions.
After 1.5 years of using the HP Pavilion laptop in dualboot HDD (Windows 10) and SSD (Ubuntu), I began to notice very long loading of applications, general unresponsiveness of the interface, freezing on the simplest operations in Windows 10. The problem was minimized to the extent that it became possible to use the laptop again. Below I will describe the actions that I took to eliminate the problem.
Diagnostics
To begin the study, we need to eliminate any kind of mystification, first we will determine the main reasons for hard drive failures. What can go wrong when working with a hard drive? Problems can arise at the physical level of electronics and at the logical, software level of data.
Electronics problems include things like: a non-working computer/laptop power supply, problems with the laptop battery; wear and tear of hard drive components, problems with the circuits and chips of the internal components of the drive, software errors in the firmware, consequences of impacts/falls of the drive, or similar problems with other devices that affect its operation.
Critical wear of a hard drive is considered to be the moment when a number of bad sectors (bad block) appears, at which further operation of the drive is impossible. These blocks are blocked by the firmware of the hard drive, the data is transferred to other sectors automatically and should not affect the operation of the drive until a certain critical moment.
Software logic problems include errors in the file system due to incorrect operation of applications, user actions: hot-switching off the device, terminating recording processes without correctly stopping applications, errors in drivers, operating system services.
Without specialized electronic diagnostic tools, we can only check the correctness of the software level, electronic malfunctions may be detected in the process, which are usually eliminated by block repair (replacement of components/chips); Next, we will consider software diagnostic methods using diagnostic utilities. It is worth noting that all utilities should be launched on the system with maximum priority, since other applications can interfere with performance measurements, block the disk for reading/writing, which will lead to incorrect diagnostic results.
SMART
S.M.A.R.T. is a system for monitoring the state of data storage devices – HDD, SDD, eMMC, etc. Allows you to assess the wear of the device, view the number of bad blocks (bad block), and take further action based on the data. You can view SMART in different applications for working with disks, I prefer to use utilities from the manufacturer. For my Seagate hard drive, I used the SeaTools utility, for it the state was displayed as GOOD, that is, the disk firmware thinks that everything is fine.
Manufacturer Utilities
The disk manufacturer’s utilities provide tests to check its operation. SeaTools has several types of tests, you can use all of them to localize the problem. Quick and simple tests may not reveal any problems, so prefer long tests. In my case, only Long Test found errors.
Slowride
To check the correctness of reading, finding slow or dead blocks, I wrote the application slowride, it works on a very simple principle – it opens a block device descriptor, with the specified user settings, reads data from the entire device, with time measurements, and displays slow blocks. The program stops at the first error, in which case you will have to move on to more serious utilities for reading data, since it is not possible to read disk data using simple methods.
In my case, the entire disk was read correctly, with a small drop in speed – 90 MB/sec (5400 rpm) per second, in some areas of the disk. From which it could be concluded that I was dealing with a software problem.
Acoustic Analysis
This method does not apply to software diagnostic methods, but is quite important for troubleshooting. For example, with a partially working power supply, the hard drive may hang/freeze, making a loud click.
In my case, when working with a disk in Windows 10, I heard a loud crack familiar to all HDD owners of the disk head running back and forth when trying to do something in the operating system, but the sound was almost constant, this led me to think about too much disk fragmentation, disk overload with background services.
Fixing
No electronics problems were detected during software diagnostics, block-by-block reading of the entire disk was completed correctly, however SeaTools showed errors during the Long Test check.
Manufacturer Utilities
The disk manufacturer’s software, in addition to diagnostics, provides error correction procedures. In SeaTools, the Fix All button is responsible for this; after confirming your consent to potential data loss, the correction process will start. Did this fix help in my case? No, the disk continued to work just as loudly and slowly, but Long Test no longer showed errors.
CHKDSK
CHKSDK is a Microsoft utility for eliminating software errors for Windows file systems. Over time, such errors accumulate on the disk and can greatly interfere with work, including the inability to read / write any data at all. You can find instructions for using the utility on the Microsoft website, but I recommend using all possible flags to fix errors (at the time of writing this note, this is /r /b /f); You need to run the check with administrator rights through the Windows terminal (cmd), for the system partition it will take place during system boot, it can take a very long time, in my case it took 12 hours.
Did this fix help in my case? No.
Disk defragmentation
Working with data on the disk is carried out in blocks, large files are usually written in several blocks/fragments. Over time, many deleted files create empty blocks that are not adjacent, because of this, when writing files fill these voids, and the disk head has to physically overcome large distances. This problem is called fragmentation, and only hard drive users encounter it. At the time of several fixes, fragmentation of my hard drive was 41%, visually it looked like this:

That is, everything is bad. You can see fragmentation and defragment using the Defragger utility or the built-in defragmenter. You can also enable the “Optimize drives” service in Windows 10, set up defragmentation on a schedule in the control panel. Only HDD disks need defragmentation, it is not advisable to enable it for SSD disks, since this will lead to accelerated wear of the disk, apparently for this reason background defragmentation is disabled by default.
An alternative defragmentation option is also known – moving data to another disk, formatting the disk, and copying the data back. In this case, the data will be written to completely empty sectors, while maintaining the correct logical structure for the system to operate. This option is fraught with problems of resetting potentially critical metadata, which may not be moved during normal copying.
Disabling services
With the help of Mark Russinovich’s utility Process Monitor you can track the processes that load the hard drive with their business, it is enough to enable the IO Write/Read columns. After examining this column, I disabled the Xbox Game Bar service, the well-known background acceleration service Superfetch under the new name SysMain, through the services panel of the control panel. Superfetch should constantly analyze the applications that the user uses and speed up their launch by caching in RAM, in my case this led to background loading of the entire disk and the impossibility of work.
Cleaning the disk
I also removed old applications, unnecessary files, thus freeing up sectors for correct fragmentation, simplifying the work of the operating system, reducing the number of useless, heavy services and programs.
Result
What helped the most? A noticeable difference in performance was achieved after defragmenting the disk, spontaneous freezes were eliminated by disabling the Xbox and Superfetch services. Would these problems not have occurred if I had used an SSD? There would definitely have been no problems with slow operation due to fragmentation, problems with services would have had to be eliminated in any case, and software errors do not depend on the type of drive. In the near future, I plan to completely switch to SSD, but for now, “Long live pancakes, pancakes forever!”
Links
http://www.outsidethebox.ms/why-windows-8-defragments-your-ssd-and-how-you-can-avoid-this/
https://channel9.msdn.com/Shows/The-Defrag-Show
https://www.seagate.com/ru/ru/support/downloads/seatools/
https://www.ccleaner.com/defraggler/download
https://docs.microsoft.com/en-us/windows-server/administration/windows-commands/chkdsk
https://gitlab.com/demensdeum/slowride/
Slowride Block Devices Benchmark
Slowride is a utility for testing the read speed of block devices for POSIX compliant operating systems with root access to /dev/sd*. You can test the read performance of block devices using a time threshold to diagnose read performance.
Command to read 100mb blocks on the entire device with output of blocks above the threshold of 2 seconds:
sudo ./slowride /dev/sda 100 2000
Source code
https://gitlab.com/demensdeum/slowride
Space Jaguar 3D Action RPG
I haven’t announced new projects for a long time) The next project I’m starting to work on is a 3D action RPG called Space Jaguar. The story is in a sci-fi setting about a cool guy named Jag and his difficult adventure in search of his missing father. There will be 3D graphics on the Flame Steel Engine (or perhaps any other popular one), using the developments of past projects (Death Mask, Cube Art Project), a comedy plot with many references, arcade battles and bosses. I’m not ready to talk about the release dates of the full version, I plan to release the game in parts.
Project repository:
https://gitlab.com/demensdeum/space-jaguar-action-rpg
Writing a backend server in C++ FCGI
A short note on how I wrote the server part for the 3D editor Cube Art Project, the server should save and display the work of users of the web version, giving them short URLs by the save button. At first I wanted to use Swift/PHP/Ruby/JS or some similar modern language for the backend, but after looking at the characteristics of my VPS, it was decided to write the server in C/C++.
First you need to install libfcgi on the server and the fcgi support module for your web server, example for Ubuntu and Apache:
sudo apt install libfcgi libapache2-mod-fcgid
Next, we configure the module in the config:
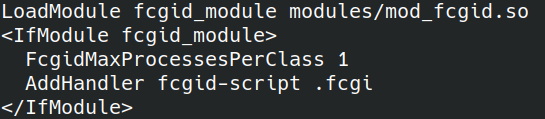
FcgidMaxProcessesPerClass – maximum number of processes per class, I set it to 1 process because I don’t expect a heavy load.
AddHandler fcgid-script .fcgi – the extension of the file with which the fcgi module should start.
Add to the config the folder from which cgi applications will be launched:

Next, we write an application in C/C++ with fcgi support, compile it, and copy it to the /var/www/html/cgi-bin folder.
Examples of code and build script:
https://gitlab.com/demensdeum/cube-art-project-server/-/blob/master/src/cubeArtProjectServer.cpp
https://gitlab.com/demensdeum/cube-art-project-server/-/blob/master/src/build.sh
After this you will need to restart your web server:
systemctl restart apache2
Next, set the necessary rights to execute the cgi-bin folder via chmod.
After that, your cgi program should work through the browser via the link, an example for the Cube Art Project server:
http://192.243.103.70/cgi-bin/cubeArtProject/cubeArtProjectServer.fcgi
If something doesn’t work, then look at the web server logs, or connect to the running process with a debugger, the debugging process should not differ from the debugging process of a regular client application.
Sources
https://habr.com/ru/post/154187/
http://chriswu.me/blog/writing-hello-world-in-fcgi-with-c-plus-plus/
Source code
https://gitlab.com/demensdeum/cube-art -project-server
Cube Art Project
Cube Art Project – cubic 3D editor.
You have an amazing opportunity to move around the scene, build and remove cubes with the WSAD + E keys, scroll the mouse wheel to change the color of the cube. At the moment, only 16 colors are supported, but many improvements are planned in the future.
Web version
https://demensdeum.com/games/CubeArtProjectWEB/
Windows
https://demensdeum.com/games/CubeArtProjectReleases/CubeArtProjectWin32.zip
macOS
https://demensdeum.com/games/CubeArtProjectReleases/CubeArtProjectMacOS.zip
Linux (x86-64)
https://demensdeum.com/games/CubeArtProjectReleases/CubeArtProjectLinux86_64.zip
Android
(Concept, requires USB mouse)
https://demensdeum.com/games/CubeArtProjectReleases/CubeArtProject.apk
Source code
https://gitlab.com/demensdeum/cube-art-project-bootstrap
https://gitlab.com/demensdeum/cube-art-project-server
Technologies: SDL, Emscripten, MinGW, Glew, GLM, Cpp-JSON
Porting a C++ SDL application to Android
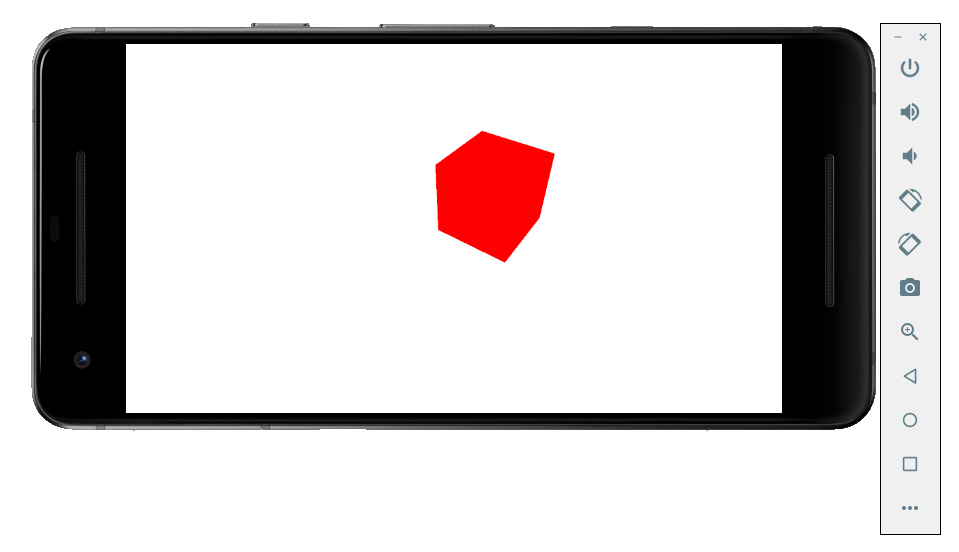
In this note I will describe my experience of porting the prototype of the 3D editor Cube Art Project to Android.
First, let’s look at the result, the emulator runs an editor with a red 3D cube cursor:
For a successful build, you had to do the following:
- Install the latest Android SDK and NDK (the newer the NDK version, the better).
- Download the SDL2 source code, take from there a template for building an android application.
- Add SDL Image, SDL Mixer to the build.
- Add my game engine and toolkit libraries, their dependencies (GLM, JSON for Modern C++)
- Adapt build files for Gradle.
- Adapt C++ code for compatibility with Android, changes affected platform-dependent components (OpenGL ES, initialization of the graphics context)
- Build and test the project on the emulator.
Project template
Download SDL, SDL Image, SDL Mixer sources:
https://www.libsdl.org/download-2.0.php
The docs folder contains detailed instructions on working with the android project template; copy the android-project directory to a separate folder, make a symlink or copy the SDL folder to android-project/app/jni.
We substitute the correct identifier for the avd flag, launch the android emulator from the Sdk directory:
cd ~/Android/Sdk/emulator
./emulator -avd Pixel_2_API_24
We specify the paths in the script, build the project:
rm -rf app/build || true
export ANDROID_HOME=/home/demensdeum/Android/Sdk/
export ANDROID_NDK_HOME=/home/demensdeum/Android/android-ndk-r21-beta2/
./gradlew clean build
./gradlew installDebug
The SDL project template should build with the C code from the file
android-sdl-test-app/cube-art-project-android/app/jni/src/YourSourceHere.c
Dependencies
Download the source code in the archives for SDL_image, SDL_mixer:
https://www.libsdl.org/projects/SDL_image/
https://www.libsdl.org/projects/SDL_mixer/
Load your project’s dependencies, for example my shared libraries:
https://gitlab.com/demensdeum/FlameSteelCore/
https://gitlab.com/demensdeum/FlameSteelCommonTraits
https://gitlab.com/demensdeum/FlameSteelBattleHorn
https://gitlab.com/demensdeum/FlameSteelEngineGameToolkit/
https://gitlab.com/demensdeum/FlameSteelEngineGameToolkitFSGL
https://gitlab.com/demensdeum/FSGL
https://gitlab.com/demensdeum/cube-art-project
We unload all this into app/jni, each “module” into a separate folder, for example app/jni/FSGL. Next, you have the option of finding working generators for the Application.mk and Android.mk files, I did not find any, but perhaps there is a simple solution based on CMake. Follow the links and begin to get acquainted with the build file format for Android NDK:
https://developer.android.com/ndk/guides/application_mk
https://developer.android.com/ndk/guides/android_mk
You should also read about the different APP_STL implementations in the NDK:
https://developer.android.com/ndk/guides/cpp-support.html
After reviewing, we create an Android.mk file for each “module”, then an example of a shared library assembly file Cube-Art-Project:
LOCAL_PATH := $(call my-dir)
include $(CLEAR_VARS)
APP_STL := c++_static
APP_CPPFLAGS := -fexceptions
LOCAL_MODULE := CubeArtProject
LOCAL_C_INCLUDES := $(LOCAL_PATH)/src $(LOCAL_PATH)/../include $(LOCAL_PATH)/../include/FlameSteelCommonTraits/src/FlameSteelCommonTraits
LOCAL_EXPORT_C_INCLUDES = $(LOCAL_PATH)/src/
define walk
$(wildcard $(1)) $(foreach e, $(wildcard $(1)/*), $(call walk, $(e)))
endef
ALLFILES = $(call walk, $(LOCAL_PATH)/src)
FILE_LIST := $(filter %.cpp, $(ALLFILES))
$(info CubeArtProject source code files list)
$(info $(FILE_LIST))
LOCAL_SRC_FILES := $(FILE_LIST:$(LOCAL_PATH)/%=%)
LOCAL_SHARED_LIBRARIES += FlameSteelCore
LOCAL_SHARED_LIBRARIES += FlameSteelBattleHorn
LOCAL_SHARED_LIBRARIES += FlameSteelCommonTraits
LOCAL_SHARED_LIBRARIES += FlameSteelEngineGameToolkit
LOCAL_SHARED_LIBRARIES += FlameSteelEngineGameToolkitFSGL
LOCAL_SHARED_LIBRARIES += FSGL
LOCAL_SHARED_LIBRARIES += SDL2
LOCAL_SHARED_LIBRARIES += SDL2_image
LOCAL_LDFLAGS := -static-libstdc++
include $(BUILD_SHARED_LIBRARY)
Any experienced CMake user will understand this config from the first lines, the formats are very similar, Android.mk lacks GLOB_RECURSIVE, so you have to recursively search for source files using the walk function.
Change Application.mk, Android.mk so-but for building C++ and not C code:
APP_ABI := armeabi-v7a arm64-v8a x86 x86_64
APP_PLATFORM=android-16
APP_STL := c++_static
APP_CPPFLAGS := -fexceptions
Rename YourSourceHere.c -> YourSourceHere.cpp, grep for occurrences, change the path in the assembly, for example:
app/jni/src/Android.mk:LOCAL_SRC_FILES := YourSourceHere.cpp
Then try to build the project, if you see errors from the compiler about the absence of headers, then check the correctness of the paths in Android.mk; if there are errors from the linker of the type “undefined reference”, then check the correctness of the source code files in the assemblies, you can trace the lists by specifying $(info $(FILE_LIST)) in the Android.mk file. Do not forget about the dual linking mechanism, using modules in the LOCAL_SHARED_LIBRARIES key and correct linking via LD, for example for FSGL:
LOCAL_LDLIBS := -lEGL -lGLESv2
Adaptation and launch
I had to change some things, for example remove GLEW from the iOS and Android builds, rename some OpenGL calls, adding the EOS postfix (glGenVertexArrays -> glGenVertexArraysOES), include a macro for missing modern debug functions, the cherry on the cake is the implicit inclusion of GLES2 headers with the GL_GLEXT_PROTOTYPES 1: macro.
#define GL_GLEXT_PROTOTYPES 1
#include "SDL_opengles2.h"
I also observed a black screen on the first launches with an error like “E/libEGL: validate_display:255 error 3008 (EGL_BAD_DISPLAY)”, I changed the initialization of the SDL window, the OpenGL profile and everything worked:
SDL_DisplayMode mode;
SDL_GetDisplayMode(0,0,&mode);
int width = mode.w;
int height = mode.h;
window = SDL_CreateWindow(
title,
0,
0,
width,
height,
SDL_WINDOW_OPENGL | SDL_WINDOW_FULLSCREEN | SDL_WINDOW_RESIZABLE
);
SDL_GL_SetAttribute( SDL_GL_CONTEXT_PROFILE_MASK, SDL_GL_CONTEXT_PROFILE_ES );
On the emulator, the application is installed by default with the SDL icon and the name “Game”.
I’m left to explore the possibility of automatically generating build files based on CMake, or migrating builds for all platforms to Gradle; however, CMake remains the de facto choice for current C++ development.
Source code
https://gitlab.com/demensdeum/android- sdl-test-app
https://gitlab.com/demensdeum/android-sdl-test-app/tree/master/cube-art-project-android
Sources
https://developer.android.com/ ndk/guides/cpp-support.html
https://developer.android.com/ndk/guides/application_mk
https://developer.android.com/ndk/guides/android_mk
https://lazyfoo.net/tutorials/SDL/52_hello_mobile/android_windows/index.php
https://medium.com/androiddevelopers/getting-started-with-c-and-android-native-activities-2213b402ffff
LazyFoo Productions website
Perhaps it is worth mentioning the website from which my projects and new developments almost always begin, this is the LazyFoo Productions website, where you can find answers to fairly hardcore topics: examples of using complex APIs, learn how to combine seemingly incompatible systems (Android/C++) with a detailed explanation of the principles of operation, working code examples.
The world upside down
To develop the new project, Cube Art Project adopted the Test Driven Development methodology. In this approach, a test is first implemented for a specific functionality of the application, and then the specific functionality is implemented. I consider the big advantage of this approach to be the implementation of the final interfaces, as uninitiated as possible into the details of the implementation, before the development of the functionality begins. With this approach, the test dictates further implementation, all the advantages of contract programming are added, when interfaces are contracts for a specific implementation.
Cube Art Project – 3D editor in which the user builds figures from cubes, not so long ago this genre was very popular. Since this is a graphic application, I decided to add tests with screenshot validation.
To validate screenshots, you need to get them from the OpenGL context, this is done using the glReadPixels function. The description of the function arguments is very simple – initial position, width, height, format (RGB/RGBA/etc.), pointer to the output buffer, anyone who has worked with SDL or has experience with data buffers in C will be able to simply substitute the necessary arguments. However, I think it is necessary to describe an interesting feature of the glReadPixels output buffer, pixels in it are stored from bottom to top, and in SDL_Surface all basic operations occur from top to bottom.
That is, having loaded a reference screenshot from a png file, I was unable to compare the two buffers head-on, since one of them was upside down.
To flip the output buffer from OpenGL you need to fill it by subtracting the height of the screenshot for the Y coordinate. However, it is worth considering that there is a chance of going beyond the buffer if you do not subtract one during filling, which will lead to memory corruption.
Since I try to use the OOP paradigm of “interface programming” everywhere, instead of direct C-like access to memory by pointer, then when I tried to write data beyond the buffer, the object informed me about it thanks to the bounds validation in the method.
The final code for the method to get a screenshot in top-down style:
auto width = params->width;
auto height = params->height;
auto colorComponentsCount = 3;
GLubyte *bytes = (GLubyte *)malloc(colorComponentsCount * width * height);
glReadPixels(0, 0, width, height, GL_RGB, GL_UNSIGNED_BYTE, bytes);
auto screenshot = make_shared(width, height);
for (auto y = 0; y < height; y++) {
for (auto x = 0; x < width; x++) {
auto byteX = x * colorComponentsCount;
auto byteIndex = byteX + (y * (width * colorComponentsCount));
auto redColorByte = bytes[byteIndex];
auto greenColorByte = bytes[byteIndex + 1];
auto blueColorByte = bytes[byteIndex + 2];
auto color = make_shared(redColorByte, greenColorByte, blueColorByte, 255);
screenshot->setColorAtXY(color, x, height - y - 1);
}
}
free(bytes);
Sources
https://community.khronos.org/ t/glreadpixels-fliped-image/26561
https://stackoverflow.com/questions/8346115/why-are-bmps-stored-upside-down
Source code
https://gitlab.com/demensdeum/cube- art-project-bootstrap
Longest Common Substring
In this note I will describe an algorithm for solving the longest common substring problem. Let’s say we are trying to decrypt encrypted binary data, let’s first try to find common patterns using the longest substring search.
Input string for example:
adasDATAHEADER??jpjjwerthhkjbcvkDATAHEADER??kkasdf
We are looking for a string that is repeated twice:
DATAHEADER??
Prefixes
First, let’s write a method for comparing the prefixes of two strings, let it return the resulting string in which the characters of the left prefix are equal to the characters of the right prefix.
For example, for the lines:
val lhs = "asdfWUKI"
val rhs = "asdfIKUW"
The resulting string is – asdf
Example in Kotlin:
fun longestPrefix(lhs: String, rhs: String): String {
val maximalLength = min(lhs.length-1, rhs.length -1)
for (i in 0..maximalLength) {
val xChar = lhs.take(i)
val yChar = rhs.take(i)
if (xChar != yChar) {
return lhs.substring(0, i-1)
}
}
return lhs.substring(0,maximalLength)
}
Brute Force
When it doesn’t work out the good way, it’s worth resorting to brute force. Using the longestPrefix method, we’ll go through the string in two loops, the first one takes the string from i to the end, the second one from i + 1 to the end, and passes them to the search for the largest prefix. The time complexity of this algorithm is approximately O(n^2) ~ O(n*^3).
Example in Kotlin:
fun searchLongestRepeatedSubstring(searchString: String): String {
var longestRepeatedSubstring = ""
for (x in 0..searchString.length-1) {
val lhs = searchString.substring(x)
for (y in x+1..searchString.length-1) {
val rhs = searchString.substring(y)
val longestPrefix = longestPrefix(lhs, rhs)
if (longestRepeatedSubstring.length < longestPrefix.length) {
longestRepeatedSubstring = longestPrefix
}
}
}
return longestRepeatedSubstring
}
Suffix array
For a more elegant solution, we need a tool - a data structure called "Suffix Array". This data structure is an array of substrings filled in a loop, where each substring starts from the next character of the string to the end.
For example for the line:
adasDATAHEADER??
The suffix array looks like this:
adasDATAHEADER??
dasDATAHEADER??
asDATAHEADER??
sDATAHEADER??
DATAHEADER??
ATAHEADER??
TAHEADER??
AHEADER??
HEADER??
EADER??
ADER??
DER??
ER??
R??
??
?
Solving by sorting
We sort the suffix array, then we go through all the elements in a loop where the left hand (lhs) contains the current element, the right hand (rhs) contains the next one, and we calculate the longest prefix using the longestPrefix method.
Example in Kotlin:
fun searchLongestRepeatedSubstring(searchString: String): String {
val suffixTree = suffixArray(searchString)
val sortedSuffixTree = suffixTree.sorted()
var longestRepeatedSubstring = ""
for (i in 0..sortedSuffixTree.count() - 2) {
val lhs = sortedSuffixTree[i]
val rhs = sortedSuffixTree[i+1]
val longestPrefix = longestPrefix(lhs, rhs)
if (longestRepeatedSubstring.length < longestPrefix.length) {
longestRepeatedSubstring = longestPrefix
}
}
return longestRepeatedSubstring
}
The time complexity of the algorithm is O(N log N), which is much better than a brute-force solution.
Sources
https://en.wikipedia.org/wiki/Longest_common_substring_problem
Source code
https://gitlab.com/demensdeum/algorithms
Insertion Sort, Merge Sort
Insertion Sort
Insertion Sort – each element is compared to the previous ones in the list and the element is swapped with the larger one if there is one, otherwise the inner comparison loop stops. Since the elements are sorted from first to last, each element is compared to the already sorted list, which *may* reduce the overall running time. The time complexity of the algorithm is O(n^2), i.e. identical to bubble sort.
Merge Sort
Merge sort – the list is divided into groups of one element, then the groups are “merged” in pairs with simultaneous comparison. In my implementation, when merging pairs, the elements on the left are compared with the elements on the right, then moved to the resulting list, if there are no more elements on the left, then all the elements on the right are added to the resulting list (their additional comparison is unnecessary, since all elements in the groups undergo sorting iterations)
The operation of this algorithm is very easy to parallelize, the pair merging stage can be performed in threads, waiting for the end of iterations in the dispatcher.
Output of the algorithm for single-threaded execution:
["John", "Alice", "Mike", "#1", "Артем", "20", "60", "60", "DoubleTrouble"]
[["John"], ["Alice"], ["Mike"], ["#1"], ["Артем"], ["20"], ["60"], ["60"], ["DoubleTrouble"]]
[["Alice", "John"], ["#1", "Mike"], ["20", "Артем"], ["60", "60"], ["DoubleTrouble"]]
[["#1", "Alice", "John", "Mike"], ["20", "60", "60", "Артем"], ["DoubleTrouble"]]
[["#1", "20", "60", "60", "Alice", "John", "Mike", "Артем"], ["DoubleTrouble"]]
["#1", "20", "60", "60", "Alice", "DoubleTrouble", "John", "Mike", "Артем"]
Output of the algorithm for multithreaded execution:
["John", "Alice", "Mike", "#1", "Артем", "20", "60", "60", "DoubleTrouble"]
[["John"], ["Alice"], ["Mike"], ["#1"], ["Артем"], ["20"], ["60"], ["60"], ["DoubleTrouble"]]
[["20", "Артем"], ["Alice", "John"], ["60", "60"], ["#1", "Mike"], ["DoubleTrouble"]]
[["#1", "60", "60", "Mike"], ["20", "Alice", "John", "Артем"], ["DoubleTrouble"]]
[["DoubleTrouble"], ["#1", "20", "60", "60", "Alice", "John", "Mike", "Артем"]]
["#1", "20", "60", "60", "Alice", "DoubleTrouble", "John", "Mike", "Артем"]
The time complexity of the algorithm is O(n*log(n)), which is slightly better than O(n^2)
Sources
https://en.wikipedia.org/wiki/Insertion_sort
https://en.wikipedia.org/wiki/Merge_sort
Source code
https://gitlab.com/demensdeum /algorithms/-/tree/master/sortAlgorithms/insertionSort
https://gitlab.com/demensdeum/algorithms/-/tree/master/sortAlgorithms/mergeSort
Bubble Sort in Erlang
Bubble sort is pretty boring, but it becomes more interesting if you try to implement it in a functional language for telecom – Erlang.
We have a list of numbers, we need to sort it. The bubble sort algorithm goes through the entire list, iterating and comparing numbers in pairs. During the check, the following happens: the smaller number is added to the output list, or the numbers are swapped in the current list; if there is less on the right, the iteration continues with the next number in the iteration. This iteration is repeated until there are no more replacements in the list.
In practice, it is not worth using because of the high time complexity of the algorithm – O(n^2); I implemented it in Erlang, in an imperative style, but if you are interested, you can look for better options:
-module(bubbleSort).
-export([main/1]).
startBubbleSort([CurrentHead|Tail]) ->
compareHeads(CurrentHead, Tail, [], [CurrentHead|Tail]).
compareHeads(CurrentHead, [NextHead|Tail], [], OriginalList) ->
if
CurrentHead < NextHead ->
compareHeads(NextHead, Tail, [CurrentHead], OriginalList);
true ->
compareHeads(CurrentHead, Tail, [NextHead], OriginalList)
end;
compareHeads(CurrentHead, [NextHead|Tail], OriginalOutputList, OriginalList) ->
if
CurrentHead < NextHead ->
OutputList = OriginalOutputList ++ [CurrentHead],
compareHeads(NextHead, Tail, OutputList, OriginalList);
true ->
OutputList = OriginalOutputList ++ [NextHead],
compareHeads(CurrentHead, Tail, OutputList, OriginalList)
end;
compareHeads(CurrentHead, [], OriginalOutputList, OriginalList) ->
OutputList = OriginalOutputList ++ [CurrentHead],
if
OriginalList == OutputList ->
io:format("OutputList: ~w~n", [OutputList]);
true ->
startBubbleSort(OutputList)
end.
main(_) ->
UnsortedList = [69,7,4,44,2,9,10,6,26,1],
startBubbleSort(UnsortedList).
Installation and launch
In Ubuntu, Erlang is very easy to install, just type sudo apt install erlang in the terminal. In this language, each file must be a module, with a list of functions that can be used from the outside – export. Interesting features of the language include the absence of variables, only constants, the absence of standard syntax for OOP (which does not prevent the use of OOP techniques), and of course parallel computations without locks based on the actor model.
You can launch the module either through the interactive console erl, running one command after another, or more simply through escript bubbleSort.erl; The file will look different for different cases, for example, for escript you need to make a main function from which it will start.
Sources
https://www.erlang.org/
https://habr.com/ru/post/197364/
Source code
https://gitlab.com/ demensdeum/algorithms/blob/master/bubbleSort/bubbleSort.erl
Lexicographic comparison algorithm
The lexicographic string comparison algorithm works very simply, in a loop the character codes are compared and the result is returned if the characters are not equal.
An example for the C language can be found here:
https://github.com/gcc-mirror/gcc/blob/master/libiberty/memcmp.c
It should be taken into account that the characters need to be compared in a single static encoding, for example, in Swift I used character-by-character comparison on UTF-32. The option of sorting an array using memcmp will work exactly for single-byte characters, in other cases (variable-length encodings) the order may be incorrect. I do not exclude the possibility of implementation based on variable-length encodings, but most likely it will be an order of magnitude more complicated.
Time complexity of the algorithm is O(1) in the best case, O(n) in the average and worst case
Sources
https://ru.wikipedia.org/wiki/Лексикографические_порядок
Sources
https://gitlab.com/demensdeum /algorithms/blob/master/lexiCompare/lexiCompare.swift
ZX Spectrum Game Development in C
This is a silly post about developing a game for an old ZX Spectrum computer in C. Let’s take a look at the beauty:
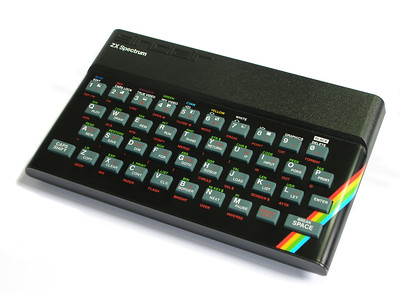
It began production in 1982 and was produced until 1992. Technical characteristics of the machine: 8-bit Z80 processor, 16-128 KB of memory and other extensions, such as the AY-3-8910 sound chip.
As part of the Yandex Retro Games Battle 2019 competition, I wrote a game called Interceptor 2020 for this machine. Since I didn’t have time to learn assembler for the Z80, I decided to develop it in C. As a toolchain, I chose the ready-made set – z88dk, which contains C compilers and many auxiliary libraries to speed up the implementation of applications for the Spectrum. It also supports many other Z80 machines, such as MSX, Texas Instruments calculators.
Next I will describe my superficial flight over the computer architecture, the z88dk toolchain, and show how I managed to implement the OOP approach and use design patterns.
Installation Features
Installation of z88dk should be carried out according to the manual from the repository, however for Ubuntu users I would like to note a feature – if you already have compilers for Z80 installed from deb packages, then you should remove them, since z88dk will access them from the bin folder by default, due to incompatibility of the toolchain compiler versions you most likely will not be able to build anything.
Hello World
Writing Hello World is very simple:
#include
void main()
{
printf("Hello World");
}
It’s even easier to assemble a tap file:
zcc +zx -lndos -create-app -o helloworld helloworld.c
To run, use any ZX Spectrum emulator with tap file support, for example online:
http://jsspeccy.zxdemo.org/
Draw on the picture on the whole screen
tl;dr Pictures are drawn in tiles, tiles of size 8×8 pixels, the tiles themselves are embedded in the spectrum font, then the picture is printed in a line of indices.
The sprite and tile output library sp1 outputs tiles using UDG. The image is translated into a set of individual UDGs (tiles), then assembled on the screen using indices. It should be remembered that UDG is used to output text, and if your image contains a very large set of tiles (for example, more than 128 tiles), then you will have to go beyond the set boundaries and erase the default Spectrum font. To get around this limitation, I used a base of 128 – 255 by simplifying the images, leaving the original font in place. About simplifying the images below.
To draw full-screen images, you need to arm yourself with three utilities:
Gimp
img2spec
png2c-z88dk
There is a way for real ZX men, real retro warriors: open a graphic editor using the spectrum palette, knowing the features of image output, prepare it manually and upload it using png2c-z88dk or png2scr.
The simpler way is to take a 32-bit image, switch the number of colors to 3-4 in Gimp, edit it a little, then import it into img2spec so as not to work with color restrictions manually, export png and convert it to a C array using png2c-z88dk.
Please remember that for successful export each tile cannot contain more than two colors.
As a result, you will receive an h file that contains the number of unique tiles. If there are more than ~128, then simplify the image in Gimp (increase the repeatability) and perform the export procedure again.
After exporting, you literally load the “font” from the tiles and print the “text” from the tile indices on the screen. Here is an example from the render “class”:
// грузим шрифт в память
unsigned char *pt = fullscreenImage->tiles;
for (i = 0; i < fullscreenImage->tilesLength; i++, pt += 8) {
sp1_TileEntry(fullscreenImage->tilesBase + i, pt);
}
// ставим курсор в 0,0
sp1_SetPrintPos(&ps0, 0, 0);
// печатаем строку
sp1_PrintString(&ps0, fullscreenImage->ptiles);
Drawing sprites on the screen
Next I will describe the method of drawing 16-16 pixel sprites on the screen. I did not get to animation and color changes, because at this stage, as I suppose, I simply ran out of memory. Therefore, the game contains only transparent monochrome sprites.
Draw a monochrome png image 16×16 in Gimp, then use png2sp1sprite to translate it into an asm assembler file, declare arrays from the assembler file in C code, and add the file at the build stage.
After the stage of declaring the sprite resource, it must be added to the screen in the desired position, here is an example of the code for the “class” of the game object:
struct sp1_ss *bubble_sprite = sp1_CreateSpr(SP1_DRAW_MASK2LB, SP1_TYPE_2BYTE, 3, 0, 0);
sp1_AddColSpr(bubble_sprite, SP1_DRAW_MASK2, SP1_TYPE_2BYTE, col2-col1, 0);
sp1_AddColSpr(bubble_sprite, SP1_DRAW_MASK2RB, SP1_TYPE_2BYTE, 0, 0);
sp1_IterateSprChar(bubble_sprite, initialiseColour);
From the names of the functions you can roughly understand the meaning – we allocate memory for the sprite, add two columns 8-8, add color for the sprite.
In each frame the position of the sprite is set:
sp1_MoveSprPix(gameObject->gameObjectSprite, Renderer_fullScreenRect, gameObject->sprite_col, gameObject->x, gameObject->y);
Emulating OOP
There is no syntax for OOP in C, what to do if you still really want it? You need to connect your mind and be enlightened by the thought that such a thing as OOP equipment does not exist, everything ultimately comes to one of the machine architectures, in which there is simply no concept of an object and other related abstractions.
This fact for a long time prevented me from understanding why OOP is needed at all, why it should be used if in the end everything comes to machine code.
However, having worked in product development, I discovered the charms of this programming paradigm, mainly, of course, the flexibility of development, protective mechanisms of the code, with the right approach, reducing entropy, simplifying work in a team. All the listed advantages follow from the three pillars – polymorphism, encapsulation, inheritance.
It is also worth noting the simplification of solving issues related to application architecture, because 80% of architectural problems were solved by computer scientists in the last century and described in the literature on design patterns. Next, I will describe ways to add OOP-like syntax to C.
It is more convenient to use C structures as a basis for storing class instance data. Of course, you can use a byte buffer, create your own structure for classes, methods, but why reinvent the wheel? After all, we are already reinventing the syntax.
Class data
Example of GameObject “class” data fields:
struct GameObjectStruct {
struct sp1_ss *gameObjectSprite;
unsigned char *sprite_col;
unsigned char x;
unsigned char y;
unsigned char referenceCount;
unsigned char beforeHideX;
unsigned char beforeHideY;
};
typedef struct GameObjectStruct GameObject;
We save our class as “GameObject.h”, #include “GameObject.h” in the right place and use it.
Class Methods
Let’s take the experience of Objective-C language developers into account, the class method signature will be functions in the global scope, the first argument will always be the data structure, then the method arguments. Below is an example of a “method” of the “class” GameObject:
void GameObject_hide(GameObject *gameObject) {
gameObject->beforeHideX = gameObject->x;
gameObject->beforeHideY = gameObject->y;
gameObject->y = 200;
}
The method call looks like this:
GameObject_hide(gameObject);
Constructors and destructors are implemented in the same way. It is possible to implement a constructor as an allocator and field initializer, but I prefer to control object allocation and initialization separately.
Working with memory
Manual memory management of the form using malloc and free wrapped in new and delete macros to match C++:
#define new(X) (X*)malloc(sizeof(X))
#define delete(X) free(X)
For objects that are used by several classes at once, semi-manual memory management is implemented based on reference counting, in the image and likeness of the old Objective-C Runtime ARC mechanism:
void GameObject_retain(GameObject *gameObject) {
gameObject->referenceCount++;
}
void GameObject_release(GameObject *gameObject) {
gameObject->referenceCount--;
if (gameObject->referenceCount < 1) { sp1_MoveSprAbs(gameObject->gameObjectSprite, &Renderer_fullScreenRect, NULL, 0, 34, 0, 0);
sp1_DeleteSpr(gameObject->gameObjectSprite);
delete(gameObject);
}
}
Thus, each class must declare the use of a shared object with retain, and release ownership with release. Modern ARC uses automatic placement of retain/release calls.
We’re making noise!
The Spectrum has a tweeter capable of playing 1-bit music; composers of that time were able to play up to 4 sound channels on it simultaneously.
Spectrum 128k contains a separate sound chip AY-3-8910, which can play tracker music.
A library is provided for using the buzzer in z88dk
What is yet to be discovered
I was interested in getting acquainted with the Spectrum, implementing the game using z88dk, learning many interesting things. I still have a lot to learn, for example, the Z80 assembler, since it allows you to use the full power of the Spectrum, working with memory banks, working with the AY-3-8910 sound chip. I hope to participate in the contest next year!
Links
https://rgb.yandex
https://vk.com/sinc_lair
https://www.z88dk.org/forum/
Source code
https://gitlab.com/demensdeum/ zx-projects/tree/master/interceptor2020
Binary search
Let’s say we need to find out whether the email address “demensdeum@gmail.com” is on the list of email addresses allowed to receive emails.
We’ll go through the entire list from the first to the last element, checking whether the element is equal to the specified address – we’ll implement a linear search algorithm. But it will take a long time, won’t it?
To answer this question, we use the “Time complexity of algorithms”, “O” notation. The worst-case linear search time is equal to the n-th number of array elements, we write this in “O” notation – O(n). Next, we need to explain that for any known algorithm, there are three performance indicators – the best-case, worst-case, and average-case execution time. For example, the email address “demensdeum@gmail.com” is in the first index of the array, then it will be found in the first step of the algorithm, which means that the best-case execution time is – O(1); and if it is at the end of the list, then this is the worst case – O(n)

But what about the software implementation details, hardware performance, they should influence big O, right? Now take a deep breath and imagine that the calculation of time complexity is calculated for some abstract ideal machine, which has only this algorithm and nothing else.
Algorithm
Okay, it turns out that linear search is quite slow, let’s try using Binary Search. First, it should be explained that we will not be working with binary data, this name was given to this method due to the peculiarities of its operation. Initially, we sort the array in lexicographic order, then the algorithm takes the range of the entire array, gets the middle element of the range, compares it lexicographically, and depending on the comparison result decides which range to take for further search – the upper half of the current one or the lower one. That is, at each step of the search a decision is made from two possible ones – binary logic. This step is repeated until either the word is found or not found (the lower and upper indices of the range intersect).
The performance of this algorithm is – the best case when an element in the middle of the array is immediately found is O(1), the worst case of enumeration is O(log n)
Pitfalls
When implementing binary search, I encountered not only an interesting problem of lack of standardization of lexicographic comparison in programming language libraries, but even discovered the absence of a single standard for implementing localeCompare within JavaScript. The ECMAScript standard allows for different implementations of this function, which is why when sorting using localeCompare, completely different results can be observed on different JavaScript engines.
Therefore, for the algorithm to work correctly, it is necessary to sort and use only the same lexicographic comparison algorithm in the work, otherwise nothing will work. But if, for example, you try to sort an array in Scala, and search using nodejs, without implementing your own sorting/sorting of one implementation, then nothing awaits you except disappointment in humanity.
Sources
What is lexicographic comparison and what does it represent?
Почему для вычисления сложности алгоритмов используется log N вместо lb N?
Двоичный поиск
Знай сложности алгоритмов
https://stackoverflow.com/questions/52941016/sorting-in-localecompare-in-javascript
Source code
https://gitlab.com/demensdeum/algorithms
Pattern Facade

Facade is a structural design pattern. It provides a single interface to work with complex systems, allowing clients to not have implementation details about these systems, thus simplifying their code, implementing weak coupling between clients and lower-level systems. GoF has a good example of Facade – a compiler of programming languages, providing different clients pursuing different goals with the ability to build code through a single facade-compiler interface.
Sources
https://refactoring.guru/ru/design-patterns/facade
https://www.amazon.com/Design-Patterns-Elements-Reusable-Object-Oriented/dp/0201633612
Abstract Factory Pattern

Abstract factory– provides an interface for creating related objects without specifying specific classes.
I really like the alternative name of this pattern – Kit
It is very similar to Factory Method, however Abstract Factories must describe the relationship between the objects being created, otherwise it is simply an anti-pattern God Object, which creates everything in a row in a haphazard manner.
Let’s imagine developing an AR framework for glasses, we display indoor navigation arrows, icons of stores, interesting places, windows and buttons with information about a place where the user is currently located on the screen.
At the same time, we need the ability to customize the appearance and behavior of AR environment controls. This is exactly the case where we need to use the Set pattern.
Let’s write the interface of the Abstract Factory and Abstract Products – parent protocols, elements of the AR environment:
protocol ARFactory {
func arrow() -> ARArrow
func icon() -> ARIcon
func button() -> ARButton
func window() -> ARWindow
}
protocol ARArrow {
var image: { get }
func handleSelection()
}
protocol ARIcon {
var image: { get }
var title: String
}
protocol ARButton {
var title: String
func handleSelection()
}
protocol ARWindow {
var title: String
var draw(canvas: Canvas)
}
Now, set developers will need to implement a Concrete Factory based on the Abstract Factory interface, and all elements will have to be implemented together; other parts of the application will be able to work with the factory without changing their code.
Sources
https://refactoring.guru/ru/design-patterns /abstract-factory
https://www.amazon.com/Design-Patterns-Elements-Reusable-Object-Oriented/dp/0201633612
Factory Method

The Factory Method pattern is a creational design pattern.
This pattern describes the creation of an interface for creating an object of a specific class. Seems simple, right?
In theory
Let’s say we are developing a framework for working with AR glasses. When tilting the head to the side, a menu of available applications should appear before the user’s eyes. Applications will be developed by third-party companies, clients of our framework. Naturally, we do not know which applications, icons, names should appear, so we must provide an interface for implementing the icon and related information about the application. Let’s call it Product:
protocol Product {
var name: String { get }
var image: Image { get }
var executablePath: String { get }
}
Next, we need to provide an interface for our clients to implement the issuance of an array of applications of their Specific Product – an array of application icons with names, which we will already draw in the framework.
Let’s write this interface – a Creator interface containing a Factory Method that returns an array of Products.
protocol Creator {
func factoryMethod() -> [Product]
}
In practice
The first client of our AR framework was 7B, a leading supplier of coffee maker software in Honduras. They want to sell augmented reality glasses with the ability to brew coffee, check the water/beans level, and show the way to their nearest coffee maker in indoor map mode.
They take on the development of the software, all we need to do is provide documentation on the Creator and Product interfaces, for the correct display of the list of applications and their subsequent launch.
After the documentation is transferred, the 7B company, using the Creator interface, implements the Concrete Creator class that returns an array of icon applications. The icon applications themselves are Concrete Product classes implementing the Product interface.
Example Code Specific Products:
class CoffeeMachineLocator: implements Product {
let name = “7B Coffee Machine Locator v.3000”
let image = Image.atPath(“images/locator.tga”)
let executablePath = “CoffeeMachineLocator.wasm”
}
class iPuchinno: implements Product {
let name = “iPuchinno 1.0.3”
let image = Image.atPath(“images/puchino.pvrtc”)
let executablePath = “neutron/ipuchBugFixFinalNoFreezeFixAlpha4.js”
}
A Concrete Creator class that returns an array of two applications:
class 7BAppsCreator: implements Creator {
func factoryMethod() -> [Product] {
return [CoffeeMachineLocator(), iPuchinno()]
}
}
After that, the 7B company compiles the library of Specific Products, Specific Creator and combines it with our framework, starts selling AR glasses for their coffee makers, no modifications are required on our part.
Sources
https://refactoring.guru/ru/design-patterns/command
https://www.amazon.com/Design-Patterns-Elements-Reusable-Object-Oriented/dp/0201633612
