Skeletal Animation (Part 1 – Shader)

In this article I will describe my understanding of skeletal animation, which is used in all modern 3D engines for animating characters, game environments, etc.
I’ll start the description with the most tangible part – the vertex shader, because the entire calculation path, no matter how complex it is, ends with the transfer of prepared data for display in the vertex shader.

After calculation on the CPU, skeletal animation goes into the vertex shader.
Let me remind you of the vertex formula without skeletal animation:
gl_Position = projectionMatrix * viewMatrix * modelMatrix * vertex;
For those who do not understand how this formula came about, you can read my article describing the principle of working with matrices for displaying 3D content in the context of OpenGL.
For the rest – the formula for implementing skeletal animation:
” vec4 animatedVertex = bone0matrix * vertex * bone0weight +”
“bone1matrix * vertex * bone1weight +”
“bone2matrix * vertex * bone2weight +”
“bone3matrix * vertex * bone3weight;\n”
” gl_Position = projectionMatrix * viewMatrix * modelMatrix * animatedVertex;\n”

That is, we multiply the final matrix of bone transformation by the vertex and by the weight of this matrix relative to the vertex. Each vertex can be animated by 4 bones, the force of the impact is regulated by the bone weight parameter, the sum of the impacts must be equal to one.
What to do if the vertex is affected by less than 4 bones? You need to divide the weight between them, and make the impact of the rest equal to zero.
Mathematically, multiplying a weight by a matrix is ​​called “Matrix-Scalar Multiplication”. Multiplying by a scalar allows you to sum the effects of matrices on the resulting vertex.

The bone transformation matrices themselves are transmitted as an array.Moreover, the array contains matrices for the entire model as a whole, and not for each mesh separately.

But for each vertex the following information is transmitted separately:
– Index of the matrix that affects the vertex
–The weight of the matrix that acts on the vertex
It is not just one bone that is transmitted, usually the effect of 4 bones on the vertex is used.
Also, the sum of the weights of 4 dice must always be equal to one.
Next, let’s look at how this looks in the shader.
Array of matrices:
“uniform mat4 bonesMatrices[kMaxBones];”

Information about the impact of the 4 bones on each vertex:
“attribute vec2 bone0info;”
“attribute vec2 bone1info;”
“attribute vec2 bone2info;”
“attribute vec2 bone3info;”

vec2 – in the X coordinate we store the bone index (and convert it to int in the shader), in the Y coordinate the weight of the bone’s impact on the vertex. Why do we have to pass this data in a two-dimensional vector? Because GLSL does not support passing readable C structures with correct fields to the shader.

Below is an example of obtaining the necessary information from a vector for further substitution into the animatedVertex formula:

“int bone0Index = int(bone0info.x);”
“float bone0weight = bone0info.y;”
“mat4 bone0matrix = bonesMatrices[bone0Index];”

“int bone1Index = int(bone1info.x);”
“float bone1weight = bone1info.y;”
“mat4 bone1matrix = bonesMatrices[bone1Index];”

“int bone2Index = int(bone2info.x);”
“float bone2weight = bone2info.y;”
“mat4 bone2matrix = bonesMatrices[bone2Index];”

“int bone3Index = int(bone3info.x);”
“float bone3weight = bone3info.y;”
“mat4 bone3matrix = bonesMatrices[bone3Index];”

Now the vertex structure that is filled on the CPU should look like this:
x, y, z, u, v, bone0index, bone0weight, bone1index, bone1weight, bone2index, bone2weight, bone3index, bone3weight

The vertex buffer structure is filled once during model loading, but the transformation matrices are transferred from the CPU to the shader at each rendering frame.

In the remaining parts I will describe the principle of calculating animation on the CPU, before passing it to the vertex shader, I will describe the tree of bone nodes, the passage through the hierarchy animation-model-nodes-mesh, matrix interpolation.

Sources

http://ogldev.atspace.co. uk/www/tutorial38/tutorial38.html

Source code

https://gitlab.com/demensdeum/skeletal-animation

Template method

The template method is a behavioral design pattern. The pattern describes a way to replace part of a class’s logic on demand, while leaving the common part unchanged for descendants.

Cuban Cars

Let’s say we are developing a bank client, let’s consider the task of developing an authorization module – the user should be able to log in to the application using abstract login data.
The authorization module must be cross-platform, support different authorization technologies and storage of encrypted data of different platforms. To implement the module, we choose the cross-platform language Kotlin, using the abstract class (protocol) of the authorization module, we will write an implementation for the MyPhone phone:

class MyPhoneSuperDuperSecretMyPhoneAuthorizationStorage {
    fun loginAndPassword() : Pair {
        return Pair("admin", "qwerty65435")
    }
}

class ServerApiClient {
    fun authorize(authorizationData: AuthorizationData) : Unit {
        println(authorizationData.login)
        println(authorizationData.password)
        println("Authorized")
    }
}

class AuthorizationData {
    var login: String? = null
    var password: String? = null
}

interface AuthorizationModule {
    abstract fun fetchAuthorizationData() : AuthorizationData
    abstract fun authorize(authorizationData: AuthorizationData)
}

class MyPhoneAuthorizationModule: AuthorizationModule {
    
    override fun fetchAuthorizationData() : AuthorizationData {
        val loginAndPassword = MyPhoneSuperDuperSecretMyPhoneAuthorizationStorage().loginAndPassword()
        val authorizationData = AuthorizationData()
        authorizationData.login = loginAndPassword.first
        authorizationData.password = loginAndPassword.second
        
        return authorizationData
    }
    
    override fun authorize(authorizationData: AuthorizationData) {
        ServerApiClient().authorize(authorizationData)
    }
    
}

fun main() {
    val authorizationModule = MyPhoneAuthorizationModule()
    val authorizationData = authorizationModule.fetchAuthorizationData()
    authorizationModule.authorize(authorizationData)
}

Now for each phone/platform we will have to duplicate the code for sending authorization to the server, there is a violation of the DRY principle. The example above is very simple, in more complex classes there will be even more duplication. To eliminate code duplication, you should use the Template Method pattern.
We will move the common parts of the module into immutable methods, and transfer the functionality of transmitting encrypted data to specific platform classes:

class MyPhoneSuperDuperSecretMyPhoneAuthorizationStorage {
    fun loginAndPassword() : Pair {
        return Pair("admin", "qwerty65435")
    }
}

class ServerApiClient {
    fun authorize(authorizationData: AuthorizationData) : Unit {
        println(authorizationData.login)
        println(authorizationData.password)
        println("Authorized")
    }
}

class AuthorizationData {
    var login: String? = null
    var password: String? = null
}

interface AuthorizationModule {
    abstract fun fetchAuthorizationData() : AuthorizationData
    
    fun authorize(authorizationData: AuthorizationData) {
        ServerApiClient().authorize(authorizationData)
    }
}

class MyPhoneAuthorizationModule: AuthorizationModule {
    
    override fun fetchAuthorizationData() : AuthorizationData {
        val loginAndPassword = MyPhoneSuperDuperSecretMyPhoneAuthorizationStorage().loginAndPassword()
        val authorizationData = AuthorizationData()
        authorizationData.login = loginAndPassword.first
        authorizationData.password = loginAndPassword.second
        
        return authorizationData
    }
    
}

fun main() {
    val authorizationModule = MyPhoneAuthorizationModule()
    val authorizationData = authorizationModule.fetchAuthorizationData()
    authorizationModule.authorize(authorizationData)
}

Sources

https://refactoring.guru/ru/design- patterns/template-method

Source code

https://gitlab.com/demensdeum/patterns/< /p>

Pattern Bridge

The Bridge pattern is a structural design pattern. It allows you to abstract the implementation of class logic by moving the logic into a separate abstract class. Sounds simple, right?

Let’s say we are implementing a spam bot that should be able to send messages to different types of messengers.
We implement it using a common protocol:

protocol User {
    let token: String
    let username: String
}

protocol Messenger {
    var authorize(login: String, password: String)
    var send(message: String, to user: User)
}

class iSeekUUser: User {
    let token: String
    let username: String
}

class iSeekU: Messenger {

    var authorizedUser: User?
    var requestSender: RequestSender?
    var requestFactory: RequestFactory?

    func authorize(login: String, password: String) {
        authorizedUser = requestSender?.perform(requestFactory.loginRequest(login: login, password: password))
    }
    
    func send(message: String, to user: User) {
        requestSender?.perform(requestFactory.messageRequest(message: message, to: user)
    }
}

class SpamBot {
    func start(usersList: [User]) {
        let iSeekUMessenger = iSeekU()
        iSeekUMessenger.authorize(login: "SpamBot", password: "SpamPassword")
        
        for user in usersList {
            iSeekUMessennger.send(message: "Hey checkout demensdeum blog! http://demensdeum.com", to: user)
        }
    }
}

Now let’s imagine a situation where a new, faster messaging protocol for the iSekU messenger is released. To add a new protocol, you will need to duplicate the iSekU bot implementation, changing only a small part of it. It is unclear why this should be done if only a small part of the class logic has changed. This approach violates the DRY principle; with further development of the product, the lack of flexibility will make itself known through errors and delays in the implementation of new features.
Let’s move the protocol logic into an abstract class, thus implementing the Bridge pattern:

protocol User {
    let token: String
    let username: String
}

protocol Messenger {
    var authorize(login: String, password: String)
    var send(message: String, to user: User)
}

protocol MessagesSender {
    func send(message: String, to user: User)
}

class iSeekUUser: User {
    let token: String
    let username: String
}

class iSeekUFastMessengerSender: MessagesSender {
    func send(message: String, to user: User) {
        requestSender?.perform(requestFactory.messageRequest(message: message, to: user)
    }
}

class iSeekU: Messenger {

    var authorizedUser: User?
    var requestSender: RequestSender?
    var requestFactory: RequestFactory?
    var messagesSender: MessengerMessagesSender?

    func authorize(login: String, password: String) {
        authorizedUser = requestSender?.perform(requestFactory.loginRequest(login: login, password: password))
    }
    
    func send(message: String, to user: User) {
        messagesSender?.send(message: message, to: user)
    }
}

class SpamBot {

    var messagesSender: MessagesSender?

    func start(usersList: [User]) {
        let iSeekUMessenger = iSeekU()
        iSeekUMessenger.authorize(login: "SpamBot", password: "SpamPassword")
        
        for user in usersList {
            messagesSender.send(message: "Hey checkout demensdeum blog! http://demensdeum.com", to: user)
        }
    }
}

One of the advantages of this approach is undoubtedly the ability to expand the functionality of the application by writing plugins/libraries that implement abstracted logic without changing the code of the main application.
What’s the difference with the Strategy pattern? Both patterns are very similar, but Strategy describes switching *algorithms*, while Bridge allows switching large parts of *any logic, no matter how complex*.

Sources

https://refactoring.guru/ru/design-patterns/bridge

Source code

https://gitlab.com/demensdeum/patterns/ p>

Chain of Responsibilities Pattern

Chain of responsibility refers to behavioral design patterns.


Ganna Dolbieva

The film company Ja-pictures shot a documentary about communist Rastafarians from Liberia called “Red Dawn of Marley”. The film is very long (8 hours), interesting, but before sending it to distribution, it turned out that in some countries, frames and phrases from the film may be considered heresy and not give a distribution license. The producers of the film decide to cut out moments containing questionable phrases from the film, manually and automatically. Double checking is necessary so that the distributor’s representatives are not simply shot in some countries, in case of an error during manual viewing and editing.
Countries are divided into four groups – countries without censorship, with moderate, medium and very strict censorship. A decision is made to use neural networks to classify the level of heresy in the review fragment of the film. Very expensive state-of-art neural networks trained for different levels of censorship are purchased for the project, the developer’s task is to break the film into fragments and pass them along a chain of neural networks, from free to strict, until one of them detects heresy, then the fragment is transferred for manual review for further editing. It is impossible to go through all the neural networks, since too much computing power is spent on their work (we still have to pay for electricity), it is enough to stop at the first one that worked.
Naive pseudocode implementation:

import StateOfArtCensorshipHLNNClassifiers

protocol MovieCensorshipClassifier {
    func shouldBeCensored(movieChunk: MovieChunk) -> Bool
}

class CensorshipClassifier: MovieCensorshipClassifier {

    let hnnclassifier: StateOfArtCensorshipHLNNClassifier

    init(_ hnnclassifier: StateOfArtCensorshipHLNNClassifier) {
        self.hnnclassifier = hnnclassifier
    }
    
    func shouldBeCensored(_ movieChunk: MovieChunk) -> Bool {
        return hnnclassifier.shouldBeCensored(movieChunk)
    }
}

let lightCensorshipClassifier = CensorshipClassifier(StateOfArtCensorshipHLNNClassifier("light"))
let normalCensorshipClassifier = CensorshipClassifier(StateOfArtCensorshipHLNNClassifier("normal"))
let hardCensorshipClassifier = CensorshipClassifier(StateOfArtCensorshipHLNNClassifier("hard"))

let classifiers = [lightCensorshipClassifier, normalCensorshipClassifier, hardCensorshipClassifier]

let movie = Movie("Red Jah rising")
for chunk in movie.chunks {
    for classifier in classifiers {
        if classifier.shouldBeCensored(chunk) == true {
            print("Should censor movie chunk: \(chunk), reported by \(classifier)")
        }
   }
}

In general, the solution with an array of classifiers is not so bad, However! Let’s imagine that we cannot create an array, we have the ability to create only one classifier entity, which already determines the type of censorship for a fragment of the film. Such restrictions are possible when developing a library that extends the functionality of the application (plugin).
Let’s use the decorator pattern – add a reference to the next classifier in the chain to the classifier class, and stop the verification process at the first successful classification.
This way we implement the Chain of Responsibility pattern:

import StateOfArtCensorshipHLNNClassifiers

protocol MovieCensorshipClassifier {
    func shouldBeCensored(movieChunk: MovieChunk) -> Bool
}

class CensorshipClassifier: MovieCensorshipClassifier {

    let nextClassifier: CensorshipClassifier?
    let hnnclassifier: StateOfArtCensorshipHLNNClassifier

    init(_ hnnclassifier: StateOfArtCensorshipHLNNClassifier, nextClassifier: CensorshipClassifiers?) {
            self.nextClassifier = nextClassifier
            self.hnnclassifier = hnnclassifier
    }
    
    func shouldBeCensored(_ movieChunk: MovieChunk) -> Bool {
        let result = hnnclassifier.shouldBeCensored(movieChunk)
        
        print("Should censor movie chunk: \(movieChunk), reported by \(self)")
        
        if result == true {
                return true
        }
        else {
                return nextClassifier?.shouldBeCensored(movieChunk) ?? false
        }
    }
}

let censorshipClassifier = CensorshipClassifier(StateOfArtCensorshipHLNNClassifier("light"), nextClassifier: CensorshipClassifier(StateOfArtCensorshipHLNNClassifier("normal", nextClassifier: CensorshipClassifier(StateOfArtCensorshipHLNNClassifier("hard")))))

let movie = Movie("Red Jah rising")
for chunk in movie.chunks {
    censorshipClassifier.shouldBeCensored(chunk)
}

References

https://refactoring.guru/ru/ design-patterns/chain-of-responsibility

Source Code

https://gitlab.com/demensdeum/patterns/< /p>

Pattern Decorator

The Decorator pattern is a structural design pattern.

Decorator is used as an alternative to inheritance to extend the functionality of classes.
There is a task to expand the functionality of the application depending on the type of product. The customer needs three types of product – Basic, Professional, Ultimate.
Basic – counts the number of characters, Professional – Basic + capabilities prints text in capital letters, Ultimate – Basic + Professional + prints text with the inscription ULTIMATE.
We implement it using inheritance:

protocol Feature {
	func textOperation(text: String)
}

class BasicVersionFeature: Feature {
	func textOperation(text: String) {
		print("\(text.count)")
	}
}

class ProfessionalVersionFeature: BasicVersionFeature {
	override func textOperation(text: String) {
		super.textOperation(text: text)
		print("\(text.uppercased())")
	}
}

class UltimateVersionFeature: ProfessionalVersionFeature {
	override func textOperation(text: String) {
		super.textOperation(text: text)
		print("ULTIMATE: \(text)")
	}
}

let textToFormat = "Hello Decorator"

let basicProduct = BasicVersionFeature()
basicProduct.textOperation(text: textToFormat)

let professionalProduct = ProfessionalVersionFeature()
professionalProduct.textOperation(text: textToFormat)

let ultimateProduct = UltimateVersionFeature()
ultimateProduct.textOperation(text: textToFormat)

Now there is a requirement to implement the product “Ultimate Light” – Basic + Ultimate but without the capabilities of the Professional version. The first OUCH! happens, because you will have to create a separate class for such a simple task, duplicate the code.
Let’s continue the implementation using inheritance:

protocol Feature {
	func textOperation(text: String)
}

class BasicVersionFeature: Feature {
	func textOperation(text: String) {
		print("\(text.count)")
	}
}

class ProfessionalVersionFeature: BasicVersionFeature {
	override func textOperation(text: String) {
		super.textOperation(text: text)
		print("\(text.uppercased())")
	}
}

class UltimateVersionFeature: ProfessionalVersionFeature {
	override func textOperation(text: String) {
		super.textOperation(text: text)
		print("ULTIMATE: \(text)")
	}
}

class UltimateLightVersionFeature: BasicVersionFeature {
	override func textOperation(text: String) {
		super.textOperation(text: text)
		print("ULTIMATE: \(text)")	
	}
}

let textToFormat = "Hello Decorator"

let basicProduct = BasicVersionFeature()
basicProduct.textOperation(text: textToFormat)

let professionalProduct = ProfessionalVersionFeature()
professionalProduct.textOperation(text: textToFormat)

let ultimateProduct = UltimateVersionFeature()
ultimateProduct.textOperation(text: textToFormat)

let ultimateLightProduct = UltimateLightVersionFeature()
ultimateLightProduct.textOperation(text: textToFormat)

The example can be developed further for clarity, but even now the complexity of supporting a system based on inheritance is visible – it is cumbersome and lacks flexibility.
A decorator is a set of protocols describing functionality, an abstract class containing a reference to a child concrete instance of the decorator class that extends the functionality.
Let’s rewrite the example above using the pattern:

protocol Feature {
	func textOperation(text: String)
}

class FeatureDecorator: Feature {
	private var feature: Feature?
	
	init(feature: Feature? = nil) {
		self.feature = feature
	}
	
	func textOperation(text: String) {
		feature?.textOperation(text: text)
	}
}

class BasicVersionFeature: FeatureDecorator {
	override func textOperation(text: String) {
		super.textOperation(text: text)
		print("\(text.count)")
	}
}

class ProfessionalVersionFeature: FeatureDecorator {
	override func textOperation(text: String) {
		super.textOperation(text: text)
		print("\(text.uppercased())")
	}
}

class UltimateVersionFeature: FeatureDecorator {
	override func textOperation(text: String) {
		super.textOperation(text: text)
		print("ULTIMATE: \(text)")
	}
}

let textToFormat = "Hello Decorator"

let basicProduct = BasicVersionFeature(feature: UltimateVersionFeature())
basicProduct.textOperation(text: textToFormat)

let professionalProduct = ProfessionalVersionFeature(feature: UltimateVersionFeature())
professionalProduct.textOperation(text: textToFormat)

let ultimateProduct = BasicVersionFeature(feature: UltimateVersionFeature(feature: ProfessionalVersionFeature()))
ultimateProduct.textOperation(text: textToFormat)

let ultimateLightProduct = BasicVersionFeature(feature: UltimateVersionFeature())
ultimateLightProduct.textOperation(text: textToFormat)

Now we can create variations of any type of product – it is enough to initialize the combined types at the stage of application launch, the example below is the creation of the Ultimate + Professional version:

ultimateProfessionalProduct.textOperation(text: textToFormat)

Sources

https://refactoring.guru/ru/design-patterns/decorator

Source code

https://gitlab.com/demensdeum/patterns

Pattern Mediator

The Mediator pattern is a behavioral design pattern.

One day you receive an order to develop a joke app – the user presses a button in the middle of the screen and a funny duck quacking sound is heard.
After uploading to the app store, the app becomes a hit: everyone quacks through your app, Elon Musk quacks on his Instagram at the latest launch of a super-high-speed tunnel on Mars, Hillary Clinton quacks Donald Trump at the debates and wins the elections in Ukraine, success!
A naive implementation of the application looks like this:

class DuckButton {
    func didPress() {
        print("quack!")
    }
}

let duckButton = DuckButton()
duckButton.didPress()

Next you decide to add the sound of a dog barking, for this you need to show two buttons for selecting the sound – with a duck and a dog. Create two button classes DuckButton and DogButton.
Change the code:

class DuckButton {
    func didPress() {
        print("quack!")
    }
}

class DogButton {
    func didPress() {
        print("bark!")
    }
}

let duckButton = DuckButton()
duckButton.didPress()

let dogButton = DogButton()
dogButton.didPress()

After another success, we add the sound of a pig squeal, now three classes of buttons:

class DuckButton {
    func didPress() {
        print("quack!")
    }
}

class DogButton {
    func didPress() {
        print("bark!")
    }
}

class PigButton {
    func didPress() {
        print("oink!")
    }
}

let duckButton = DuckButton()
duckButton.didPress()

let dogButton = DogButton()
dogButton.didPress()

let pigButton = PigButton()
pigButton.didPress()

Users complain that sounds overlap each other.
We add a check to prevent this from happening, and at the same time introduce the classes to each other:

class DuckButton {
    var isMakingSound = false
    var dogButton: DogButton?
    var pigButton: PigButton?
    func didPress() {
        guard dogButton?.isMakingSound ?? false == false &&
                pigButton?.isMakingSound ?? false == false else { return }
        isMakingSound = true
        print("quack!")
        isMakingSound = false
    }
}

class DogButton {
    var isMakingSound = false
    var duckButton: DuckButton?
    var pigButton: PigButton?
    func didPress() {
        guard duckButton?.isMakingSound ?? false == false &&
                pigButton?.isMakingSound ?? false == false else { return }
        isMakingSound = true
        print("bark!")
        isMakingSound = false
    }
}

class PigButton {
    var isMakingSound = false
    var duckButton: DuckButton?
    var dogButton: DogButton?
    func didPress() {
        guard duckButton?.isMakingSound ?? false == false && 
                dogButton?.isMakingSound ?? false == false else { return }
        isMakingSound = true
        print("oink!")
        isMakingSound = false
    }
}

let duckButton = DuckButton()
duckButton.didPress()

let dogButton = DogButton()
dogButton.didPress()

let pigButton = PigButton()
pigButton.didPress()

Based on the success of your app, the government decides to make a law that allows quack, bark and grunt on mobile devices only from 9:00 am to 3:00 pm on weekdays; at other times, the user of your app risks going to prison for 5 years for indecent sound production using personal electronic devices.
Change the code:

import Foundation

extension Date {
    func mobileDeviceAllowedSoundTime() -> Bool {
        let hour = Calendar.current.component(.hour, from: self)
        let weekend = Calendar.current.isDateInWeekend(self)
        
        let result = hour >= 9 && hour <= 14 && weekend == false
        
        return result
    }
}

class DuckButton {
    var isMakingSound = false
    var dogButton: DogButton?
    var pigButton: PigButton?
    func didPress() {
        guard dogButton?.isMakingSound ?? false == false &&
                pigButton?.isMakingSound ?? false == false &&
                 Date().mobileDeviceAllowedSoundTime() == true else { return }
        isMakingSound = true
        print("quack!")
        isMakingSound = false
    }
}

class DogButton {
    var isMakingSound = false
    var duckButton: DuckButton?
    var pigButton: PigButton?
    func didPress() {
        guard duckButton?.isMakingSound ?? false == false &&
                pigButton?.isMakingSound ?? false == false &&
                 Date().mobileDeviceAllowedSoundTime() == true else { return }
        isMakingSound = true
        print("bark!")
        isMakingSound = false
    }
}

class PigButton {
    var isMakingSound = false
    var duckButton: DuckButton?
    var dogButton: DogButton?
    func didPress() {
        guard duckButton?.isMakingSound ?? false == false && 
                dogButton?.isMakingSound ?? false == false &&
                 Date().mobileDeviceAllowedSoundTime() == true else { return }
        isMakingSound = true
        print("oink!")
        isMakingSound = false
    }
}

let duckButton = DuckButton()
let dogButton = DogButton()
let pigButton = PigButton()

duckButton.dogButton = dogButton
duckButton.pigButton = pigButton

dogButton.duckButton = duckButton
dogButton.pigButton = pigButton

pigButton.duckButton = duckButton
pigButton.dogButton = dogButton

duckButton.didPress()
dogButton.didPress()
pigButton.didPress()

Suddenly a flashlight app starts to push ours out of the market, let's not let it defeat us and add a flashlight by pressing the "oink-oink" button, and so-no to the other buttons:

import Foundation

extension Date {
    func mobileDeviceAllowedSoundTime() -> Bool {
        let hour = Calendar.current.component(.hour, from: self)
        let weekend = Calendar.current.isDateInWeekend(self)
        
        let result = hour >= 9 && hour <= 14 && weekend == false
        
        return result
    }
}

class Flashlight {

    var isOn = false

    func turn(on: Bool) {
        isOn = on
    }
}

class DuckButton {
    var isMakingSound = false
    var dogButton: DogButton?
    var pigButton: PigButton?
    var flashlight: Flashlight?
    func didPress() {
        flashlight?.turn(on: true)
        guard dogButton?.isMakingSound ?? false == false &&
                pigButton?.isMakingSound ?? false == false &&
                 Date().mobileDeviceAllowedSoundTime() == true else { return }
        isMakingSound = true
        print("quack!")
        isMakingSound = false
    }
}

class DogButton {
    var isMakingSound = false
    var duckButton: DuckButton?
    var pigButton: PigButton?
    var flashlight: Flashlight?
    func didPress() {
        flashlight?.turn(on: true)
        guard duckButton?.isMakingSound ?? false == false &&
                pigButton?.isMakingSound ?? false == false &&
                 Date().mobileDeviceAllowedSoundTime() == true else { return }
        isMakingSound = true
        print("bark!")
        isMakingSound = false
    }
}

class PigButton {
    var isMakingSound = false
    var duckButton: DuckButton?
    var dogButton: DogButton?
    var flashlight: Flashlight?
    func didPress() {
        flashlight?.turn(on: true)
        guard duckButton?.isMakingSound ?? false == false && 
                dogButton?.isMakingSound ?? false == false &&
                 Date().mobileDeviceAllowedSoundTime() == true else { return }
        isMakingSound = true
        print("oink!")
        isMakingSound = false
    }
}

let flashlight = Flashlight()
let duckButton = DuckButton()
let dogButton = DogButton()
let pigButton = PigButton()

duckButton.dogButton = dogButton
duckButton.pigButton = pigButton
duckButton.flashlight = flashlight

dogButton.duckButton = duckButton
dogButton.pigButton = pigButton
dogButton.flashlight = flashlight

pigButton.duckButton = duckButton
pigButton.dogButton = dogButton
pigButton.flashlight = flashlight

duckButton.didPress()
dogButton.didPress()
pigButton.didPress()

As a result, we have a huge application that contains a lot of copy-paste code, the classes inside are connected to each other by a dead link - there is no weak coupling, such a miracle is very difficult to maintain and change in the future due to the high chances of making a mistake.

Using Mediator

Let's add an intermediate class mediator - ApplicationController. This class will provide weak coupling of objects, ensure separation of class responsibilities, and eliminate duplicate code.
Let's rewrite:

import Foundation

class ApplicationController {

    private var isMakingSound = false
    private let flashlight = Flashlight()
    private var soundButtons: [SoundButton] = []

    func add(soundButton: SoundButton) {
        soundButtons.append(soundButton)
    }
    
    func didPress(soundButton: SoundButton) {
        flashlight.turn(on: true)
        guard Date().mobileDeviceAllowedSoundTime() && 
                isMakingSound == false else { return }
        isMakingSound = true
        soundButton.didPress()
        isMakingSound = false
    }
}

class SoundButton {
    let soundText: String
    
    init(soundText: String) {
        self.soundText = soundText
    }
    
    func didPress() {
        print(soundText)
    }
}

class Flashlight {
    var isOn = false

    func turn(on: Bool) {
        isOn = on
    }
}

extension Date {
    func mobileDeviceAllowedSoundTime() -> Bool {
        let hour = Calendar.current.component(.hour, from: self)
        let weekend = Calendar.current.isDateInWeekend(self)
        
        let result = hour >= 9 && hour <= 14 && weekend == false
        
        return result
    }
}

let applicationController = ApplicationController()
let pigButton = SoundButton(soundText: "oink!")
let dogButton = SoundButton(soundText: "bark!")
let duckButton = SoundButton(soundText: "quack!")

applicationController.add(soundButton: pigButton)
applicationController.add(soundButton: dogButton)
applicationController.add(soundButton: duckButton)

pigButton.didPress()
dogButton.didPress()
duckButton.didPress()

Many articles devoted to the architecture of applications with a user interface describe the MVC pattern and its derivatives. The model is used to work with business logic data, the view or presentation shows information to the user in the interface/provides interaction with the user, the controller is a mediator providing interaction between system components.

Sources

https://refactoring.guru/ru/design-patterns/ mediator

Source code

https://gitlab.com/demensdeum/patterns/< /p>

Strategy pattern

The Strategy pattern allows you to select the type of algorithm that implements a common interface, right while the application is running. This pattern refers to the behavioral design patterns.

Sun Tzu

Suppose we are developing a music player with embedded codecs. The built-in codecs imply reading music formats without using external sources of the operating system (codecs), the player should be able to read tracks of different formats and play them. VLC player has such capabilities, it supports various types of video and audio formats, it runs on popular and not very operating systems.

Imagine what a naive player implementation looks like:

var player: MusicPlayer?

func play(filePath: String) {
    let extension = filePath.pathExtension

    if extension == "mp3" {
        playMp3(filePath)
    }
    else if extension == "ogg" {
        playOgg(filePath)
    }
}

func playMp3(_ filePath: String) {
    player = MpegPlayer()
    player?.playMp3(filePath)
}

func playOgg(_ filePath: String) {
    player = VorbisPlayer()
    player?.playMusic(filePath)
}

Next, we add several formats, which leads to the need to write additional methods. Plus, the player must support plug-in libraries, with new audio formats that will appear later. There is a need to switch the music playback algorithm, the Strategy pattern is used to solve this problem.

Let’s create a common protocol MusicPlayerCodecAlgorithm, write the implementation of the protocol in two classes MpegMusicPlayerCodecAlgorithm and VorbisMusicPlayerCodecAlgorithm, to play mp3 and ogg files with-but. Create a class MusicPlayer, which will contain a reference for the algorithm that needs to be switched, then by the file extension we implement codec type switching:

import Foundation

class MusicPlayer {
    var playerCodecAlgorithm: MusicPlayerCodecAlgorithm?
    
	func play(_ filePath: String) {
            playerCodecAlgorithm?.play(filePath)
	}
}

protocol MusicPlayerCodecAlgorithm {
    func play(_ filePath: String)
}

class MpegMusicPlayerCodecAlgorithm: MusicPlayerCodecAlgorithm {
	func play(_ filePath: String) {
		debugPrint("mpeg codec - play")
	}
}

class VorbisMusicPlayerCodecAlgorithm: MusicPlayerCodecAlgorithm {
	func play(_ filePath: String) {
		debugPrint("vorbis codec - play")	
	}
}

func play(fileAtPath path: String) {
	guard let url = URL(string: path) else { return }
	let fileExtension = url.pathExtension
		
	let musicPlayer = MusicPlayer()
	var playerCodecAlgorithm: MusicPlayerCodecAlgorithm? 
		
	if fileExtension == "mp3" {
                playerCodecAlgorithm = MpegMusicPlayerCodecAlgorithm()
	}
	else if fileExtension == "ogg" {
                playerCodecAlgorithm = VorbisMusicPlayerCodecAlgorithm()
	}
		
	musicPlayer.playerCodecAlgorithm = playerCodecAlgorithm
	musicPlayer.playerCodecAlgorithm?.play(path)
}

play(fileAtPath: "Djentuggah.mp3")
play(fileAtPath: "Procrastinallica.ogg")

The above example also shows the simplest example of a factory (switching the codec type from the file extension) It is important to note that the Strategy strategy does not create objects, it only describes how to create a common interface for switching the family of algorithms.

Documentation

https://refactoring.guru/en/design-patterns/strategy

Source code

https://gitlab.com/demensdeum/patterns/

Iterator pattern

In this article I will describe the Iterator pattern.
This pattern refers to the behavioral design patterns.

Print it

Suppose we need to print a list of tracks from the album “Procrastinate them all” of the group “Procrastinallica”.
The naive implementation (Swift) looks like this:

for i=0; i < tracks.count; i++ {
    print(tracks[i].title)
}

Suddenly during compilation, it is detected that the class of the tracks object does not give the number of tracks in the count call, and moreover, its elements cannot be accessed by index. Oh…

Filter it

Suppose we are writing an article for the magazine “Wacky Hammer”, we need a list of tracks of the group “Djentuggah” in which bpm exceeds 140 beats per minute. An interesting feature of this group is that its records are stored in a huge collection of underground groups, not sorted by albums, or for any other grounds. Let’s imagine that we work with a language without functionality:

var djentuggahFastTracks = [Track]()

for track in undergroundCollectionTracks {
    if track.band.title == "Djentuggah" && track.info.bpm == 140 {
        djentuggahFastTracks.append(track)
    }
}

Suddenly, a couple of tracks of the group are found in the collection of digitized tapes, and the editor of the magazine suggests finding tracks in this collection and writing about them. A Data Scientist friend suggests to use the Djentuggah track classification algorithm, so you don’t need to listen to a collection of 200 thousand tapes manually. Try:

var djentuggahFastTracks = [Track]()

for track in undergroundCollectionTracks {
    if track.band.title == "Djentuggah" && track.info.bpm == 140 {
        djentuggahFastTracks.append(track)
    }
}

let tracksClassifier = TracksClassifier()
let bpmClassifier = BPMClassifier()

for track in cassetsTracks {
    if tracksClassifier.classify(track).band.title == "Djentuggah" && bpmClassifier.classify(track).bpm == 140 {
        djentuggahFastTracks.append(track)
    }
}

Mistakes

Now, just before sending to print, the editor reports that 140 beats per minute are out of fashion, people are more interested in 160, so the article should be rewritten by adding the necessary tracks.
Apply changes:

var djentuggahFastTracks = [Track]()

for track in undergroundCollectionTracks {
    if track.band.title == "Djentuggah" && track.info.bpm == 160 {
        djentuggahFastTracks.append(track)
    }
}

let tracksClassifier = TracksClassifier()
let bpmClassifier = BPMClassifier()

for track in cassetsTracks {
    if tracksClassifier.classify(track).band.title == "Djentuggah" && bpmClassifier.classify(track).bpm == 140 {
        djentuggahFastTracks.append(track)
    }
}

The most attentive ones noticed an error; the bpm parameter was changed only for the first pass through the list. If there were more passes through the collections, then the chance of a mistake would be higher, that is why the DRY principle should be used. The above example can be developed further, for example, by adding the condition that you need to find several groups with different bpm, by the names of vocalists, guitarists, this will increase the chance of error due to duplication of code.

Behold the Iterator!

In the literature, an iterator is described as a combination of two protocols / interfaces, the first is an iterator interface consisting of two methods – next(), hasNext(), next() returns an object from the collection, and hasNext() reports that there is an object and the list is not over. However in practice, I observed iterators with one method – next(), when the list ended, null was returned from this object. The second is a collection that should have an interface that provides an iterator – the iterator() method, there are variations with the collection interface that returns an iterator in the initial position and in end – the begin() and end() methods are used in C ++ std.
Using the iterator in the example above will remove duplicate code, eliminate the chance of mistake due to duplicate filtering conditions. It will also be easier to work with the collection of tracks on a single interface – if you change the internal structure of the collection, the interface will remain old and the external code will not be affected.
Wow!

let bandFilter = Filter(key: "band", value: "Djentuggah")
let bpmFilter = Filter(key: "bpm", value: 140)
let iterator = tracksCollection.filterableIterator(filters: [bandFilter, bpmFilter])

while let track = iterator.next() {
    print("\(track.band) - \(track.title)")
}

Changes

While the iterator is running, the collection may change, thus causing the iterator’s internal counter to be invalid, and generally breaking such a thing as “next object”. Many frameworks contain a check for changing the state of the collection, and in case of changes they return an error / exception. Some implementations allow you to remove objects from the collection while the iterator is running, by providing the remove() method in the iterator.

Documentation

https://refactoring.guru/en/design-patterns/iterator

Source code

https://gitlab.com/demensdeum/patterns/

Pattern “Snapshot”

In this note I will describe the pattern “Snapshot” or “Memento”

This pattern refers to “Behavioural” design patterns.

Let’s say we are developing a graphical editor, and we need to add the ability to roll back actions on user command. It is also very important that the system components do not have access to the internal state of the rolled back “actions”, when implementing this pattern, other system components have access only to the snapshot object without the ability to change its internal state, with the provision of a clear, simple external interface. To solve this problem, the “Snapshot” or “Keeper” pattern is used.

An example of the operation of the “Snapshot” is presented below:


When clicked, the sprite appears, when clicked on the twisted arrow, the action is canceled – the sprite disappears. The example consists of three classes:

  1. Canvas on which sprites and graphical interface are displayed.
  2. Screen controller, it handles clicks and manages the logic of the screen.
  3. Canvas states that are saved on every change are rolled back when needed by the screen controller.

In the context of the pattern “Snapshot”, the classes are:

  1. Canvas is the source, the states of this class are saved as snapshots, for subsequent rollback on request. Also, the source must be able to restore the state when a snapshot is passed to it.
  2. Controller – the keeper, this class knows how and when to save/roll back states.
  3. State is a snapshot, a class that stores the state of the source, plus date information or an index that can be used to accurately determine the order of rollback.

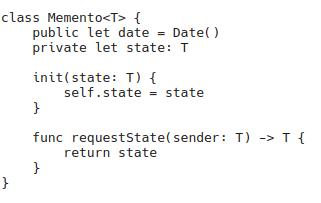
An important feature of the pattern is that only the source should have access to the internal fields of the saved state in the snapshot, this is necessary to protect snapshots from changes from the outside (from handy developers who want to change something bypassing encapsulation, breaking the logic of the system). To implement encapsulation, embedded classes are used, and in C++, the ability to specify friend classes is used. Personally, I implemented a simple version without encapsulation for Rise, and using Generic when implementing for Swift. In my version, – Memento gives its internal state only to entities of the same class as the state:

Sources

https://refactoring.guru/design-patterns/memento

Source code

https://gitlab.com/demensdeum/patterns/< /p>

Visitor pattern

In this note I will describe a design pattern called “Visitor” or “Visitor”
This pattern belongs to the group of Behavioral patterns.

Let’s think of a problem

This pattern is mainly used to work around the single dispatch limitation in early-binding languages.

Alice X by NFGPhoto (CC-2.0)
Let’s create an abstract class/protocol Band, make a subclass MurpleDeep, create a class Visitor with two methods – one for outputting to the console any descendant of Band, the second for outputting any MurpleDeep, the main thing is that the names (signatures) of the methods are the same, and the arguments differ only in the class. Through the intermediate method printout with the argument Band, create an instance of Visitor and call the visit method for MurpleDeep.
Next is the code in Kotlin:

The output will be “This is Band class

How is that possible?!

Why this happens is described in clever words in many articles, including in Russian, but I suggest you imagine how the compiler sees the code, perhaps everything will become clear right away:

Solving the problem

There are many solutions to this problem, below we will consider a solution using the Visitor pattern.
In the abstract class/protocol we add the accept method with the Visitor argument, inside the method we call visitor.visit(this), after that we add an override/implementation of the accept method to the MurpleDeep class, decisively and calmly violating DRY, we write visitor.visit(this) again.
Final code:

Sources

https://refactoring.guru/ru/ design-patterns/visitor-double-dispatch

Source code

https://gitlab.com/demensdeum/patterns

Flyweight pattern

In this note I will describe the structural pattern “Flyweight” or “Opportunist” (Flyweight)
This pattern belongs to the group of Structural patterns.

Let’s look at an example of the pattern below:


Why is it needed? To save RAM. I agree that in times of widespread use of Java (which consumes CPU and memory for no reason), this is no longer so important, but it is worth using.
The example above only displays 40 objects, but if we increase the number to 120,000, the memory consumption will increase accordingly.
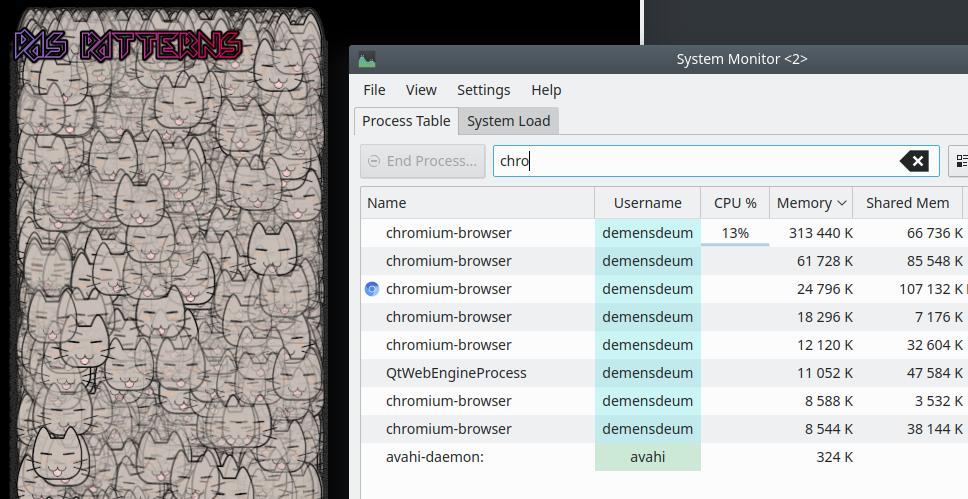
Let’s look at memory consumption without using the flyweight pattern in the Chromium browser:

Without using the pattern, memory consumption is ~300 megabytes.

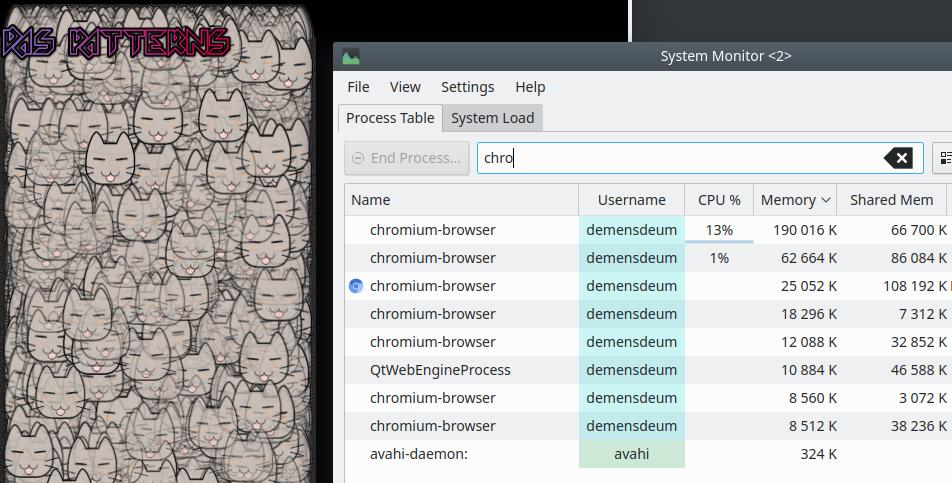
Now let’s add a pattern to the application and see the memory consumption:

Using the pattern, memory consumption is ~200 megabytes, so we saved 100 megabytes of memory in the test application, in serious projects the difference can be much greater.

How does it work?

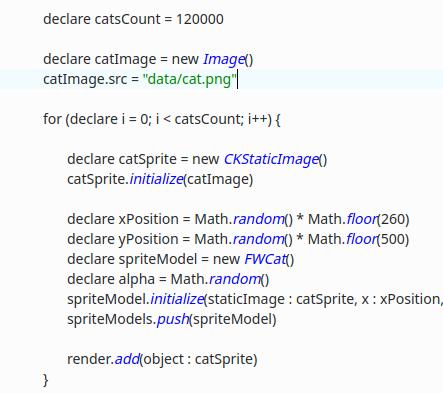
In the example above, we draw 40 cats, or 120 thousand for clarity. Each cat is loaded into memory as a png image, then in most renderers it is converted to a bitmap for drawing (actually bmp), this is done for speed, since compressed png takes a very long time to draw. Without using a pattern, we load 120 thousand cat pictures into RAM and draw, but when using the “lightweight” pattern, we load one cat into memory and draw it 120 thousand times with different positions and transparency. All the magic is that we implement the coordinates and transparency separately from the cat image, when drawing, the renderer takes only one cat and uses an object with coordinates and transparency for correct drawing.

What does it look like in code?

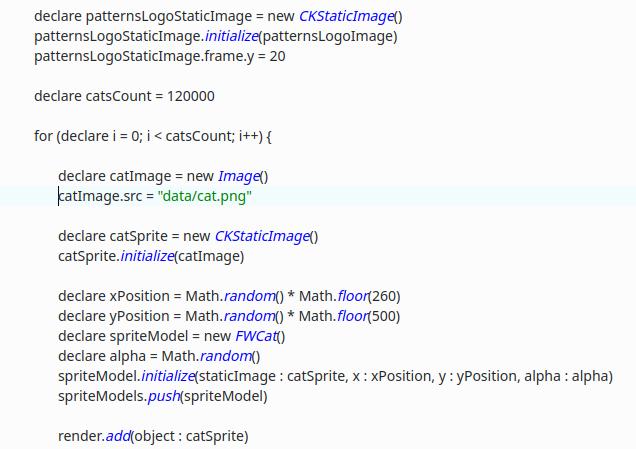
Below are examples for the Rise

language.

Without using a pattern:


The cat image is loaded for each object in the loop separately – catImage.

Using the pattern:

One picture of a cat is used by 120 thousand objects.

Where is it used?

Used in GUI frameworks, for example in Apple’s “reuse” system for UITableViewCell table cells, which raises the entry threshold for beginners who don’t know about this pattern. It is also widely used in game development.

Source code

https://gitlab.com/demensdeum/patterns/< /p>

Sources

https://refactoring.guru/ru/design-patterns/ flyweight
http://gameprogrammingpatterns.com/flyweight.html

С++ Application Plugins

In this post I will describe an example of adding functionality to a C ++ application using plugins. The practical part of the implementation for Linux is described; the theory can be found at the links at the end of the article.

Composition over inheritance!

To begin with, we will write a plugin – a function that we will call:

#include "iostream"

using namespace std;

extern "C" void extensionEntryPoint() {
	cout << "Extension entry point called" << endl;
};

Next, we will build the plugin as a dynamic library “extension.so”, which we will connect in the future:
clang++ -shared -fPIC extension.cpp -o extension.so

Next we write the main application that will load the file “extension.so”, look for a pointer to the function “extensionEntryPoint” there, and call it, typing errors if necessary:

#include "iostream"
#include "dlfcn.h"

using namespace std;

typedef void (*VoidFunctionPointer)();	

int main (int argc, char *argv[]) {

	cout << "C++ Plugins Example" << endl;

	auto extensionHandle = dlopen("./extension.so", RTLD_LAZY);
	if (!extensionHandle) {
		string errorString = dlerror();
		throw runtime_error(errorString);
	}

	auto functionPointer = VoidFunctionPointer();
	functionPointer = (VoidFunctionPointer) dlsym(extensionHandle, "extensionEntryPoint");
	auto dlsymError = dlerror();
 	if (dlsymError) {
		string errorString = dlerror();
		throw runtime_error(errorString);
 	}

	functionPointer();

	exit(0);
} 

The dlopen function returns a handler for working with a dynamic library; dlsym function returns a pointer to the required function by string; dlerror contains a pointer to the string with the error text, if any.

Next, build the main application, copy the file of the dynamic library in the folder with it and run. The output should be the “Extension entry point called”

Difficult moments include the lack of a single standard for working with dynamic libraries, because of this there is a need to export the function to a relatively global scope with extern C; the difference in working with different operating systems associated with this subtlety of work; the lack of a C ++ interface to implement OOP approach to working with dynamic libraries, however, there are open-source wrappers, for example m-renaud/libdlibxx

Example Source Code

https://gitlab.com/demensdeum/cpppluginsexample

Documents

http://man7.org/linux/man-pages/man3/dlopen.3.htm
https://gist.github.com/tailriver/30bf0c943325330b7b6a
https://stackoverflow.com/questions/840501/how-do-function-pointers-in-c-work

Float like Michelle

[Feel the power of Artificial Intelligence]
In this article, I will tell you how to predict the future.

In statistics, there is a class of problems – time series analysis. Given a date and a value of a variable, you can predict the value of this variable in the future.
At first, I wanted to implement a solution to this problem on TensorFlow, but I found the library Prophet from Facebook.
Prophet allows you to make a forecast based on data (csv) containing date (ds) and variable (y) columns. You can find out how to work with it in the documentation on the official website in the section Quick Start
As a dataset, I used the csv download from the site https://www.investing.com, during the implementation I used R language and Prophet API for it. I really liked R, because its syntax simplifies working with large arrays of data, allows you to write simpler, make fewer mistakes than when working with regular languages ​​(Python), since you would have to work with lambda expressions, and in R everything is lambda expressions.
In order not to prepare the data for processing, I used the anytime package, which can convert strings to dates, without preliminary processing. Converting currency strings to numbers is done using the readr package.

As a result, I received a forecast that Bitcoin will cost $8,400 by the end of 2019, and the dollar exchange rate will be 61 rubles. Should I believe these forecasts? Personally, I think that I shouldn’t, because you can’t use mathematical methods without understanding their essence.

Sources

https:// facebook.github.io/prophet
https://habr.com/company/ods/blog/323730/
https://www.r-project.org/

Source code

https://gitlab.com/demensdeum/MachineLearning/tree/master/4prophet

Tesla speaking

In this post I will describe the process of creating a quote generator.

TL;DR

For training and text generation – use the library textgenrnn, to filter phrases you need to use spell checking with the utility hunspell and its C/python library. After training in Colaboratory, you can start generating text. About 90% of the text will be completely unreadable, but the remaining 10% will contain a bit of meaning, and with manual refinement, the phrases will look quite good.
The easiest way to run a ready-made neural network is in Colaboratory:
https://colab.research.google.com/drive/1-wbZMmxvsm3SoclJv11villo9VbUesbc(opens in a new tab)”>https://colab.research.google.com/drive/1-wbZMmxvsm3SoclJv11villo9VbUesbc

Source code

https://gitlab.com/demensdeum/MachineLearning/tree/master/3quotesGenerator

Sources

https://karpathy.github.io/2015/05/21/rnn-effectiveness/https://medium.com/deep-learning-turkey/google-colab-free-gpu-tutorial-e113627b9f5dhttps://minimaxir.com/2018/05/text-neural-networks/
https://github.com/wooorm/dictionaries (opens in a new tab)” href=”https://minimaxir.com/2018/05/text-neural-networks/” target=”_blank”>https://minimaxir.com/2018/05/text-neural-networks/
https://karpathy.github.io/2015/05/21/rnn-effectiveness/
https://medium.com/deep-learning-turkey/google-colab-free-gpu-tutorial-e113627b9f5d
https://karpathy.github.io/2015/05/21/rnn-effectiveness/ (opens in a new tab)” href=”https://karpathy.github.io/2015/05/21/rnn-effectiveness/” target=”_blank”>https://karpathy.github.io/2015/05/21/rnn-effectiveness/
https://medium.com/deep-learning-turkey/google-colab-free-gpu-tutorial-e113627b9f5d
https://karpathy.github.io/2015/05/21/rnn-effectiveness/https://medium.com/deep-learning-turkey/google-colab-free-gpu-tutorial-e113627b9f5dhttps://github.com/wooorm/dictionaries

” rel=”noopener” target=”_blank”>https://github.com/wooorm/dictionaries (opens in a new tab)”>https://github.com/wooorm/dictionaries

How many mistakes do you have there?

On Hacker News I found a very interesting article in which the author suggests using the Petersen-Lincoln method, which is used by biologists to count the population of birds, monkeys and other animals, to *drumroll* count bugs in an application.

A Bug in the Wild – Bigfoot Sighting by Derek Hatfield

The method is very simple, we take two ornithologists, they find birds of a certain species, their task is to determine the population size of these birds. The found birds are marked by both ornithologists, then the number of common ones is calculated, substituted into the Lincoln index formula and we get the approximate population size.
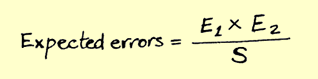
Now for applications – the method is also very simple, we take two QA and they find bugs in the application. Let’s say one tester found 10 bugs (E1), and the second 20 bugs (E2), now we take the number of common bugs – 3 (S), then according to the formula we get the Lincoln index:

This is the forecast for the number of bugs in the entire application, in the given example ~66 bugs.

Swift Example

I have implemented a test stand to check the method, you can see it here:
https://paiza.io/projects/AY_9T3oaN9a-xICAx_H4qw?language=swift

Parameters that can be changed:

let aliceErrorFindProbability = 20 – percentage of bugs found by QA Alice (20%)
let bobErrorFindProbability = 60 – percentage of bugs found by QA Bob (60%)
let actualBugsCount = 200 – how many bugs the app actually has

In the last run I got the following data:
Estimation bugs count: 213
Actual bugs count: 200

That is, there are 200 bugs in the application, the Lincoln index gives a forecast of -213:
“Alice found 36 bugs”
“Bob found 89 bugs”
“Common bugs count: 15”

Estimation bugs count: 213
Actual bugs count: 200

Weaknesses

This method can be used to estimate the number of errors in an application, at all stages of development, ideally, the number of bugs should decrease. I can attribute the human factor to the weak points of the method, since the number of bugs found by two testers should be different and different bugs should be found, however common should also be found, otherwise the method will not work (zero common bugs – division by zero)
Also, such a concept as common bugs requires the presence of an expert to understand their commonality.

Sources

How many errors are left to find? – John D. Cook, PhD, President
The thrill of the chase – Brian Hayes

Source code

https://paiza.io/projects/AY_9T3oaN9a-xICAx_H4qw ?language=swift
https://gitlab.com/demensdeum/statistics/tree/master/1_BugsCountEstimation/src

We beat Malevich, black squares Opengl

Malevich periodically comes to any developer on OpenGL. This happens unexpectedly and boldly, you just start the project and see a black square instead of a wonderful render:

Today I will describe for what reason I was visited by a black square, the problems found because of which Opengl does not draw anything on the screen, and sometimes even makes the window transparent.

Use tools

For debugging Opengl, two tools helped me: renderdoc and and apitrace . Renderdoc – tool for debugging the OpenGL rendering process, you can view everything – Vertexes, shaders, textures, debt messages from the driver. Apitrace – A tool for tracing challenges of a graphic API, makes a dump calls and shows arguments. There is also a great opportunity to compare two dumps via WDIFF (or without, but not so convenient)

Check with whom you work

I have an operating system Ubuntu 16.10 with old dependencies SDL2, GLM, Assimp, Glew. In the latest version of Ubuntu 18.04, I get the assembly of the game Death-Mask which does not show anything on the screen (only a black square). When using Chroot and assembly at 16.10 I I get a working assembly of the game with graphics .

It seems something broke in Ubuntu 18.04

LDD showed the linkka to identical libraries SDL2, GL. Driving a non -working build in Renderdoc, I saw garbage at the entrance to the vertex shader, but I needed a more solid confirmation. In order to understand the difference between the binarics, I drove them both through apitrace . Comparison of dumps showed me that the assembly on a fresh Ubunta breaks the program of the prospects in OpenGL, actually sending garbage there:

Matrices gather in the GLM library. After copying GLM from 16.04 – I got the working build of the game again. The problem was the difference in the initialization of a single matrix in GLM 9.9.0, it is necessary to clearly indicate the MAT4 (1.0F) argument in it in the constructor. Having changed the initialization and by writing off the author of the library, I began to do tests for fsgl . In the process of writing which I found flaws in FSGL, I will describe them further.

Determine who is in life

For the correct work with OpenGL, you need to voluntarily forcibly request the context of a certain version. So it looks for SDL2 (you need to put the version strictly before initializing the context):


 sdl_gl_seettrtribute (sdl_gl_context_major_version,  3 );
SDL_GL_SETTRIBUTE (SDL_GL_CONTEXT_MINOR_VERSION, 2 );
SDL_GL_SETTRIBUTE (SDL_GL_CONTEXT_PROFILE_MASK, SDL_GL_CONTEXT_PROFILE_CORE);

For example, Renderdoc does not work with contexts below 3.2. I would like to note that after switching the context there is a high probability of seeing the same black screen . Why?

Because the context of Opengl 3.2 must require the presence of VAO buffer , without which 99% of graphic drivers do not work. Add it easy:


 Glgenvertexarrays ( 1 ,  &  vao);
GLBINDVERTEXARAY (VAO);

Do not sleep, freeze

I also met an interesting problem on Kubuntu, instead of a black square I was displayed transparent, and sometimes everything was rendered correctly. I found the solution to this problem at Stack Overflow:
https://stackoverflow.com/questions/38411515/sdl2-opengl-window-appears-semi-transparent-sometimes

The FSGL test render code was also present Sleep (2S) ; So on the Xubuntu and Ubuntu I received the correct render and sent the application to sleep, but on Kubuntu I received a transparent screen in 80% of the launch of Dolphin and 30% of launches and terminal. To solve this problem, I added rendering in each frame, after a SDlevent survey, as recommended in the documentation.

Test code:
https://gitlab.com/demensdeum/FSGLtests/blob/master/renderModelTest/

Talk to the driver

Opengl supports the communication channel between the application and the driver, to activate it, you need to turn on the flags Gl_debug_outPut, GL_DEBUG_OUTPUT_SYNCHRONUS, affix the warning GLDEBUGMESSAGECONTROL and tie the calback through GLDEBUGMESSAGECALLBACK .

An example of initialization can be taken here:
https://github.com/rock-core/gui-vizkit3d/blob/master/src/EnableGLDebugOperation.cpp

Don’t be afraid, look how it grows

In this note, I will tell you about my misadventures with smart pointers shared_ptr. After implementing the generation of the next level in my game Death-Mask, I noticed a memory leak. Each new level gave an increase of + 1 megabyte to the consumed RAM. Obviously some objects remained in memory and did not release it. To correct this fact, it was necessary to implement the correct implementation of resources when overloading the level, which apparently was not done. Since I used smart pointers, there were several options for solving this problem, the first was to manually review the code (long and boring), the second involved investigating the capabilities of the lldb debugger, the source code of libstdc++ for the possibility of automatically tracking changes to the counter.

On the Internet, all the advice boiled down to manually reviewing the code, fixing it, and beating yourself with whips after finding the problematic line of code. It was also suggested to implement your own system for working with memory, as all large projects developed since the 90s and 00s have done, before smart pointers came to the C++11 standard. I attempted to use breakpoints on the constructor of a copy of all shared_ptr, but after several days nothing useful came of it. There was an idea to add logging to the libstdc++ library, but the labor costs (o)turned out to be monstrous.


Cowboy Bebop (1998)

The solution came to me suddenly in the form of tracking changes to the private variable shared_ptr – use_count. This can be done using watchpoints built into lldb. After creating a shared_ptr via make_shared, changes to the counter in lldb can be tracked using the line:

watch set var camera._M_refcount._M_pi->_M_use_count

Where “camera” is a shared_ptr object whose counter state needs to be tracked. Of course, the insides of shared_ptr will differ depending on the version of libstdc++, but the general principle is clear. After setting the watchpoint, we launch applications and read the stack trace of each counter change, then we look through the code (sic!), find the problem and fix it. In my case, objects were not released from cache tables and game logic tables. I hope this method will help you deal with leaks when working with shared_ptr, and love this memory management tool even more. Happy debugging.

Simple TensorFlow Example

I present to your attention the simplest example of working with the framework for working with Deep Learning – TensorFlow. In this example, we will teach the neural network to determine positive, negative numbers and zero. I entrust the installation of TensorFlow and CUDA to you, this task is really not easy)

To solve classification problems, classifiers are used. TensorFlow has several ready-made high-level classifiers that require minimal configuration to work. First, we train the DNNClassifier using a dataset with positive, negative, and zero numbers – with the correct “labels”. At a human level, the dataset is a set of numbers with the classification result (labels):

10 – positive
-22 – negative
0 – zero
42 – positive
… other numbers with classification

Next, training starts, after which you can feed in numbers that weren’t even included in the dataset – the neural network must correctly identify them.
Below is the complete code for the classifier with the training dataset generator and input data:

import tensorflowimport itertoolsimport randomfrom time import timeclass ClassifiedNumber:__number = 0__classifiedAs = 3def __init__(self, number):self.__number =numberif number == 0:self.__classifiedAs = 0 # zeroelif number > 0:self.__classifiedAs = 1 # positiveelif number < 0:self.__classifiedAs = 2 # negativedef number(self):return self.__numberdef classifiedAs(self):return self.__classifiedAsdef classifiedAsString(classifiedAs):if classifiedAs == 0:return "Zero"elif classifiedAs == 1:return "Positive"elif classifiedAs == 2:return "Negative"def trainDatasetFunction():trainNumbers = []trainNumberLabels = []for i in range(-1000, 1001):number = ClassifiedNumber(i)trainNumbers.append(number.number())trainNumberLabels.append(number.classifiedAs())return ( {"number" : trainNumbers } , trainNumberLabels)def inputDatasetFunction():global randomSeedrandom.seed(randomSeed) # to get same resultnumbers = []for i in range(0, 4):numbers.append(random.randint(-9999999, 9999999))return {"number" : numbers }def main():print("TensorFlow Positive-Negative-Zero numbers classifier test by demensdeum 2017 (demensdeum@gmail. com)")maximalClassesCount = len(set< /span>(trainDatasetFunction()[1])) + 1numberFeature = tensorflow.feature_column. numeric_column("number")classifier = tensorflow.estimator. DNNClassifier(feature_columns = [numberFeature], hidden_units = [10, 20, 10], n_classes = maximalClassesCount)generator = classifier.train(input_fn = trainDatasetFunction, steps = 1000).predict(input_fn =  inputDatasetFunction)inputDataset = inputDatasetFunction()results = list(itertools. islice(generator, len(inputDatasetFunction()["number"])))i = 0for result in results:print("number: %d classified as %s" % (inputDataset["number"][i], classifiedAsString(result["class_ids"][0 ])))i += 1randomSeed = time()main()

It all starts in the main() method, we set the numeric column that the classifier will work with – tensorflow.feature_column.numeric_column(“number”) then the classifier parameters are set. It is useless to describe the current initialization arguments, since the API changes every day, and it is imperative to look at the documentation of the installed version of TensorFlow, not rely on outdated manuals.

Next, training is started with an indication of the function that returns a dataset of numbers from -1000 to 1000 (trainDatasetFunction), with the correct classification of these numbers by the sign of positive, negative or zero. Next, we feed in numbers that were not in the training dataset – random numbers from -9999999 to 9999999 (inputDatasetFunction) for their classification.

In the end, we run iterations on the number of input data (itertools.islice), print the result, run it and be surprised:

number: 4063470 classified as Positivenumber: 6006715 classified as Positivenumber: -5367127 classified as Negativenumber: -7834276 classified as Negative

iT’S ALIVE

To be honest, I’m still a little surprised that the classifier *understands* even those numbers that I didn’t teach it. I hope that in the future I’ll understand the topic of machine learning in more detail and there will be more tutorials.

GitLab:
https://gitlab.com/demensdeum/MachineLearning

Links:
https://developers.googleblog.com/2017/09/introducing-tensorflow-datasets.html
https://www.tensorflow.org/versions/master/api_docs/python/tf/estimator/DNNClassifier

Breaking Bitcoin

This note is not a call to action, here I will describe the weaknesses and potentially dangerous aspects of Bitcoin and blockchain technology.

Vulnerable center

The principle of Bitcoin and blockchain is to store and change a common database, a full copy of which is stored by each network participant. The system looks decentralized, since there is no single organization/server on which the database is stored. Also, decentralization is given out as the main advantage of the blockchain, it guarantees that nothing will happen to your bitcoins without your knowledge.


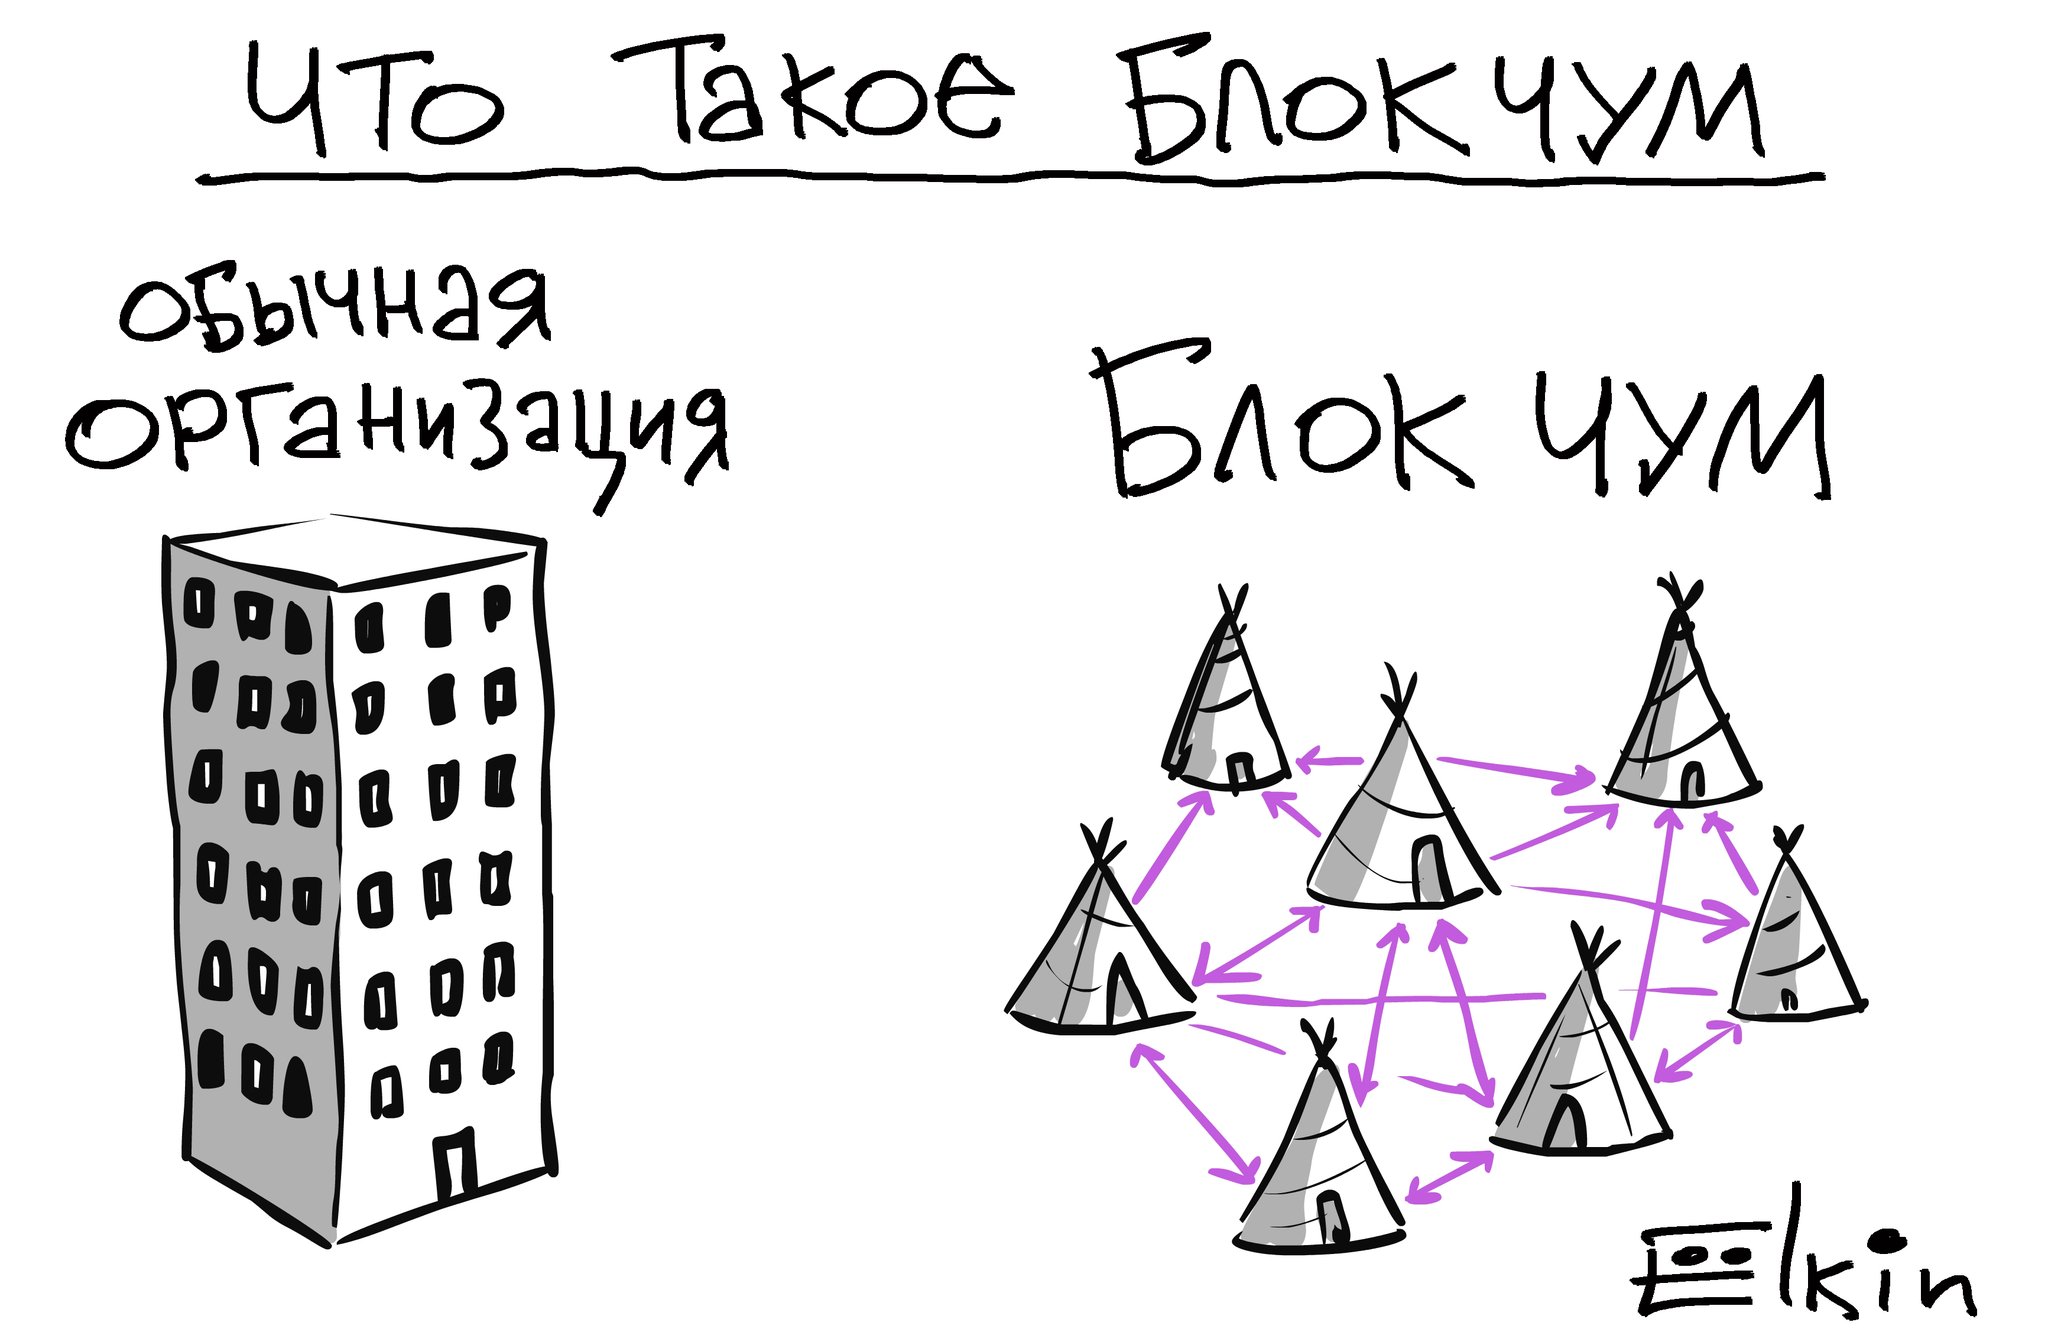
The Block-Plague Principle by Elkin

In order for the blockchain to work, it is necessary to make sure that each user downloads the latest copy of the blockchain database and works with it according to certain rules. These rules include the implementation of the Bitcoin mining principle, receiving a percentage of each transaction upon confirmation (transaction fee) of the transfer of funds from one wallet to another. A user cannot draw 1,000,000 bitcoins for himself and buy something with them, since the amount of money in his account for other users will be unchanged. Also excluded is the option of withdrawing funds from someone else’s wallet only within your database, since this change will not be reflected in other Bitcoin users and will be ignored.
The vulnerability of the current implementation is that the bitcoin wallet is located on the server github, which completely covers the advertising slogans about decentralization. Without downloading the wallet from a single center – the developer’s site, it is impossible to work with bitcoin, that is, at any time, the developers have full control over the network. Thus, the blockchain technology itself is decentralized, but the client for working with the network is downloaded from a single center.
Attack scenario – let’s say a code is added to the wallet to withdraw all funds and cash out to a third party account, after which any user of the latest version of the wallet will lose all bitcoins automatically (without the possibility of recovery). I doubt that many wallet owners check and assemble it from the source code, so the consequences of such an attack will affect most users.

The majority decides

Blockchain is a decentralized p2p network, all transactions are confirmed automatically by the users themselves. Attack scenario – it is necessary to obtain 51% of the network in order to ignore confirmations of the remaining 49%, after which the attacker gains full control over bitcoin/blockchain. This can be achieved by connecting computing power that overlaps the rest. This attack scenario is known as 51% attack.

Guess me if you can

When you first launch the wallet, the computer generates a pair of – private and public keys to ensure its correct operation. The uniqueness of these keys is extremely high, but there is an option to generate keys using the code word – the so-called – brain wallet – . A person stores the keys in his head, he does not need to make a backup of the wallet.dat file, because at any time the keys can be regenerated using this code word. Attack scenario – the attacker selects or learns the code word, generates a private-public key pair and gains control over the wallet.

Just copy

The private-public key pair is contained in the wallet.dat file. Any software that has access to this file has access to the Bitcoin wallet. The defense against such an attack is to add a code word that the user must remember and enter for all operations with the wallet. After adding the code word, the attacker will need to have wallet.dat and the code word to gain full control.
It is also worth adding that when you enter a code word, it goes into the computer’s memory, so any hardware and/or software vulnerabilities that allow you to read *someone else’s* memory will allow this code word to be read by virus software.

System error

Hacking Bitcoin’s encryption algorithms will instantly lead to its death. Let’s say there is an error in the implementation of the algorithms, the attacker who finds it gets either full or partial control over the blockchain. Also, the encryption algorithms used in Bitcoin are not protected from hacking with the help of future quantum computers, their appearance and implementation of quantum algorithms – will put an end to the current implementation of Bitcoin. However, this can be solved by switching to post-quantum encryption algorithms.

WebGL + SDL + Emscript

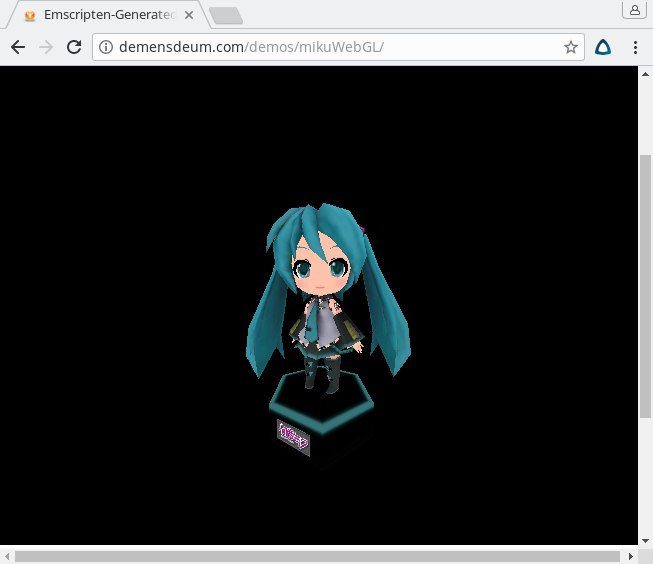
I ended up porting Mika to WebGL using SDL 1 and Emscripten.

Next I will describe what needed to be changed in the code so that the assembly in JavaScript would complete successfully.

  1. Use SDL 1 instead of SDL 2. There is currently a port of SDL 2 for emscripten, but I found it more appropriate to use the built-in emscripten SDL 1. The context is initialized not in the window, but with SDL_SetVideoMode and the SDL_OPENGL flag. The buffer is drawn with the SDL_GL_SwapBuffers() command
  2. Due to the peculiarities of execution of cycles in JavaScript – rendering is moved to a separate function and its periodic call is set using the function emscripten_set_main_loop
  3. Also, the assembly must be carried out with the key “-s FULL_ES2=1
  4. I had to abandon the assimp library, loading the model from the file system, loading the texture from the disk. All the necessary buffers were loaded onto the desktop version, and passed to the c-header file for assembly using emscripten.

Code:
https://github.com/demensdeum/OpenGLES3-Experiments/tree/master/9-sdl-gles-obj-textured-assimp-miku-webgl/mikuWebGL

Articles:
http://blog.scottlogic.com/2014/03/12/native-code-emscripten-webgl-simmer-gently.html
https://kripken.github.io/emscripten-site/docs/porting/multimedia_and_graphics/OpenGL-support.html

Model:
https://sketchfab.com/models/7310aaeb8370428e966bdcff414273e7

There is only Miku

Result of work on FSGL library with OpenGL ES and code:

Next I will describe how all this was programmed, and how various interesting problems were solved.

First we initialize the OpenGL ES context, as I wrote in the previous note. Further we will consider only rendering, a brief description of the code.

The Matrix is ​​watching you

This Miku figure in the video is made up of triangles. To draw a triangle in OpenGL, you need to specify three points with x, y, z coordinates in the 2D coordinates of the OpenGL context.
Since we need to draw a figure containing 3D coordinates, we need to use the projection matrix. We also need to rotate, zoom, or do anything with the model – for this, the model matrix is used. There is no concept of a camera in OpenGL, in fact, objects rotate around a static camera. For this, the view matrix is used.

To simplify the implementation of OpenGL ES – it does not have matrix data. You can use libraries that add missing functionality, such as GLM.

Shaders

In order to allow the developer to draw whatever and however he wants, it is necessary to implement vertex and fragment shaders in OpenGL ES. A vertex shader must receive rendering coordinates as input, perform transformations using matrices, and pass the coordinates to gl_Position. A fragment or pixel shader – already draws the color/texture, applies overlay, etc.

I wrote the shaders in GLSL. In my current implementation, the shaders are embedded directly into the main application code as C strings.

Buffers

The vertex buffer contains the coordinates of the vertices (vertices), this buffer also receives coordinates for texturing and other data necessary for shaders. After generating the vertex buffer, you need to bind a pointer to the data for the vertex shader. This is done with the glVertexAttribPointer command, where you need to specify the number of elements, a pointer to the beginning of the data and the step size that will be used to walk through the buffer. In my implementation, the binding of vertex coordinates and texture coordinates for the pixel shader is done. However, it is worth mentioning that the transfer of data (texture coordinates) to the fragment shader is carried out through the vertex shader. For this, the coordinates are declared using varying.

In order for OpenGL to know in what order to draw the points for triangles – you need an index buffer (index). The index buffer contains the number of the vertex in the array, with three such indices you get a triangle.

Textures

First, you need to load/generate a texture for OpenGL. For this, I used SDL_LoadBMP, the texture is loaded from a bmp file. However, it is worth noting that only 24-bit BMPs are suitable, and the colors in them are not stored in the usual RGB order, but in BGR. That is, after loading, you need to replace the red channel with blue.
Texture coordinates are specified in the UV format, i.e. it is necessary to transmit only two coordinates. The texture is output in the fragment shader. To do this, it is necessary to bind the texture to the fragment shader.

Nothing extra

Since, according to our instructions, OpenGL draws 3D via 2D – then to implement depth and sampling of invisible triangles – we need to use sampling (culling) and a depth buffer (Z-Buffer). In my implementation, I managed to avoid manual generation of the depth buffer using two commands glEnable(GL_DEPTH_TEST); and sampling glEnable(GL_CULL_FACE);
Also, be sure to check that the near plane for the projection matrix is ​​greater than zero, since depth checking with a zero near plane will not work.

Rendering

To fill the vertex buffer, index buffer with something conscious, for example the Miku model, you need to load this model. For this, I used the assimp library. Miku was placed in a Wavefront OBJ file, loaded using assimp, and data conversion from assimp to vertex, index buffers was implemented.

Rendering takes place in several stages:

  1. Rotate Miku using the model matrix rotation
  2. Clearing the screen and depth buffer
  3. Drawing triangles using the glDrawElements command.

The next step is to implement WebGL rendering using Emscripten.

Source code:
https://github.com/demensdeum/OpenGLES3-Experiments/tree/master/8-sdl-gles-obj-textured-assimp-miku
Model:
https://sketchfab.com/models/7310aaeb8370428e966bdcff414273e7


Project it

Having drawn a red teapot in 3D, I consider it my duty to briefly describe how it is done.

Modern OpenGL does not draw 3D, it only draws triangles, points, etc. in 2D screen coordinates.
To output anything with OpenGL, you need to provide a vertex buffer, write a vertex shader, add all the necessary matrices (projection, model, view) to the vertex shader, link all the input data to the shader, call the rendering method in OpenGL. Seems simple?


Ok, what is a vertex buffer? A list of coordinates to draw (x, y, z)
The vertex shader tells the GPU what coordinates to draw.
A pixel shader tells what to draw (color, texture, blending, etc.)
Matrices translate 3D coordinates into 2D coordinates OpenGL can render

In the following articles I will provide code examples and the result.

SDL2 – OpenGL ES

I love Panda3D game engine. But right now this engine is very hard to compile and debug on Microsoft Windows operation system. So as I said some time ago, I begin to develop my own graphics library. Right now it’s based on OpenGL ES and SDL2.
In this article I am going to tell how to initialize OpenGL ES context and how SDL2 helps in this task. We are going to show nothing.

King Nothing

First of all you need to install OpenGL ES3 – GLES 3 libraries. This operation is platform dependant, for Ubuntu Linux you can just type sudo apt-get install libgles2-mesa-dev. To work with OpenGL you need to initialize OpenGL context. There is many ways to do that, by using one of libraries – SDL2, GLFW, GLFM etc. Actually there is no one right way to initialize OpenGL context, but I chose SDL2 because it’s cross-platform solution, code will look same for Windows/*nix/HTML5/iOS/Android/etc.

To install sdl2 on Ubuntu use this command sudo apt-get install libsdl2-dev

So here is OpenGL context initialization code with SDL2:

    SDL_Window *window = SDL_CreateWindow(
            "SDL2 - OGLES",
            SDL_WINDOWPOS_UNDEFINED,
            SDL_WINDOWPOS_UNDEFINED,
            640,
            480,
            SDL_WINDOW_OPENGL
            );
	    

    SDL_GLContext glContext = SDL_GL_CreateContext(window);

After that, you can use any OpenGL calls in that context.

Here is example code for this article:
https://github.com/demensdeum/OpenGLES3-Experiments/tree/master/3sdl-gles
https://github.com/demensdeum/OpenGLES3-Experiments/blob/master/3sdl-gles/sdlgles.cpp

You can build and test it with command cmake . && make && ./SDLGles

Quantum hacking of RSA

The other day I wrote my implementation of the RSA public key encryption algorithm. I also did a simple hack of this algorithm, so I wanted to write a short note on this topic. RSA’s resistance to hacking is based on the factorization problem. Factorization… What a scary word.

It’s not all that bad

In fact, at the first stage of creating keys, we take two random numbers, but the numbers should only be divisible by themselves and one – prime numbers.
Let’s call them p and q. Next, we should get the number n = p *q. It will be used for further key generation, the keys in turn will be used for encryption, decryption of messages. In the final version of the private and public key, the number n will be transmitted unchanged.
Let’s say we have one of the RSA keys and an encrypted message. We extract the number n from the key and start hacking it.

Factorize n

Factorization – decomposition of a number into prime factors. First, we extract the number n from the key (on real keys, this can be done using openssl), let’s say n = 35. Then we decompose into prime factors n = 35 = 5 * 7, this is our p and q. Now we can regenerate keys using the obtained p, q, decrypt the message and encrypt, ensuring the visibility of the original author.

Qubits are not that simple

Is it really possible to break any RSA so easily? Actually, no, the numbers p, q are taken deliberately large so that the factorization task on classical computers would take a very long time (10 years to some degree)
However, using Shor’s quantum algorithm, it is possible to factor a number in a very short time. At the moment, articles on this topic state the time of multiplication of this number, i.e., practically instantly. For Shor’s algorithm to work, it is necessary to implement quantum computers with a large number of qubits. In 2001, IBM factored the number 15 into prime factors using 7 qubits. So we will have to wait a long time for this moment, by which time we will have switched to post-quantum encryption algorithms.

Touch Shor

Peter Shor talks about his factorization algorithm

To try out Shor’s algorithm on a quantum simulator, you can install ProjectQ, whose examples include an implementation of shor.py that allows you to factorize a number entered by the user. On the simulator, the execution time is depressing, but it seems to simulate the work of a quantum computer in a fun and playful way.

Articles:
http://www.pagedon.com/rsa-explained-simply/my_programming/
http://southernpacificreview.com/2014/01/06/rsa-key-generation-example/
https://0day.work/how-i-recovered-your-private-key-or-why-small-keys-are-bad/

RSA implementation in Python:
https://github.com/demensdeum/RSA-Python

Russian Quantum Hack and Number Generator

[Translation may be, some day]

Эта заметка увеличит длину вашего резюме на 5 см!

Без лишних слов о крутости квантовых компьютеров и всего такого, сегодня я покажу как сделать генератор чисел на реальном квантовом процессоре IBM.
Для этого мы будем использовать всего один кубит, фреймворк для разработки квантового ПО для python – ProjectQ, и 16 кубитовый процессор от IBM, онлайн доступ к которому открыт любому желающему по программе IBM Quantum Experience.

Установка ProjectQ

Для начала у вас должен быть Linux, Python и pip. Какие либо инструкции по установке этих базовых вещей приводить бесполезно, т.к. в любом случае инструкции устареют через неделю, поэтому просто найдите гайд по установке на официальном сайте. Далее устанавливаем ProjectQ, гайд по установке приведен в документации. На данный момент все свелось к установке пакета ProjectQ через pip, одной командой: python -m pip install –user projectq

Ставим кубит в суперпозицию

Создаем файл quantumNumberGenerator.py и берем пример генератора бинарного числа из документации ProjectQ, просто добавляем в него цикл на 32 шага, собираем бинарную строку и переводим в 32-битное число:

import projectq.setups.ibm
from projectq.ops import H, Measure
from projectq import MainEngine
from projectq.backends import IBMBackend

binaryString = ""

eng = MainEngine()

for i in range(1, 33):

 qubit = eng.allocate_qubit()

 H | qubit

 Measure | qubit

 eng.flush()

 binaryString = binaryString + str(int(qubit))

 print("Step " + str(i))

number = int(binaryString, 2)

print("\n--- Quantum 32-Bit Number Generator by demensdeum@gmail.com (2017) ---\n")
print("Binary: " + binaryString)
print("Number: " + str(number))
print("\n---")

Запускаем и получаем число из квантового симулятора с помощью команды python quantumNumberGenerator.py

Незнаю как вы, но я получил вывод и число 3974719468:

--- Quantum 32-Bit Number Generator by demensdeum@gmail.com (2017) ---

Binary: 11101100111010010110011111101100
Number: 3974719468

---

Хорошо, теперь мы запустим наш генератор на реальном квантовом процессоре IBM.

Хакаем IBM

Проходим регистрацию на сайте IBM Quantum Experience, подтверждаем email, в итоге должен остаться email и пароль для доступа.
Далее включаем айбиэмовский движок, меняем строку eng = MainEngine() -> eng = MainEngine(IBMBackend())
В теории после этого вы запускаете код снова и теперь он работает на реальном квантовом процессоре, используя один кубит. Однако после запуска вам придется 32 раза набрать свой email и пароль при каждой аллокации реального кубита. Обойти это можно прописав свой email и пароль прямо в библиотеки ProjectQ.

Заходим в папку где лежит фреймворк ProjectQ, ищем файл с помощью grep по строке IBM QE user (e-mail).
В итоге я исправил строки в файле projectq/backends/_ibm/_ibm_http_client.py:

email = input_fun('IBM QE user (e-mail) > ') -> email = "quantumPsycho@aport.ru"

password = getpass.getpass(prompt='IBM QE password > ') -> password = "ilovequbitsandicannotlie"

Напишите свой email и password со-но.

После этого IBM будет отправлять результаты работы с кубитом онлайн прямо в ваш скрипт, процесс генерации занимает около 20 секунд.

Возможно в дальнейшем я доберусь до работы квантового регистра, и возможно будет туториал, но это не обязательно.
Да прибудет с вами запутанность.

Статья на похожую тему:
Introducing the world’s first game for a quantum computer

Bad Robots on WebGL based on ThreeJS

Today, a version of the Bad Robots game is released on an experimental WebGL renderer based on the library ThreeJS.
This is the first OpenGL (WebGL) game on the Flame Steel Engine.
You can play it at the link:
http://demensdeum.com/games/BadRobotsGL/

The source code for IOSystem based on ThreeJS is available here:
https://github.com/demensdeum/FlameSteelEngineGameToolkitWeb

Porting SDL C++ Game to HTML5 (Emscripten)

[Translation may be some day]

За последний год я написал простейший движок Flame Steel Engine и набор классов для игровой разработки Flame Steel Engine Game Toolkit. В данной статье я опишу как производил портирование движка и SDL игры Bad Robots на HTML 5, с использованием компилятора Emscripten.

Установка Hello World – Emscripten

Для начала нужно установить Emscripten. Простейшим вариантом оказалось использование скрипта emsdk для Linux. На официальном сайте данный тип установки называется как “Portable Emscripten SDK for Linux and OS X“. Внутри архива есть инструкция по установке с использованием скрипта. Я производил установку в директорию ~/emsdk/emsdk_portable.

После установки emscripten нужно проверить корректность работы компилятора, для этого создаем простейший hello_world.cpp и собираем его в hello_world.html с помощью команд:

source ~/emsdk/emsdk_portable/emsdk_env.sh
emcc hello_world.cpp -o hello_world.html

После компиляции в папке появится hello_world.html и вспомогательные файлы, откройте его в лучшем браузере Firefox, проверьте что все работает корректно.

Портирование кода игры

В javascript нежелательно вызывать бесконечный цикл – это приводит к зависанию браузера. На данный момент корректная стратегия – запрашивать один шаг цикла у браузера с помощью вызова window.requestAnimationFrame(callback)

В Emscripten данное обстоятельство решено с помощью вызова:

emscripten_set_main_loop(em_callback_func func, int fps, int simulate_infinite_loop);

Таким образом, нужно изменить код игры для корректного вызова метода emscripten. Для этого я сделал глобальный метод GLOBAL_fsegt_emscripten_gameLoop, в котором вызываю шаг цикла игрового контроллера. Главный игровой контроллер также вынесен в глобальную видимость:

#ifdef __EMSCRIPTEN__

void GLOBAL_fsegt_emscripten_gameLoop() {

GLOBAL_fsegt_emscripten_gameController->gameLoop();

}
#endif

Также для обработки специфических для Emscripten моментов, нужно использовать макрос __EMSCRIPTEN__.

Ресурсы и оптимизация

Emscripten поддерживает ресурсы и сборку с оптимизацией.

Для добавления изображений, музыки и прочего, положите все файлы в одну папку, например data. Далее в скрипт сборки добавьте:

emcc <файлы для сборки> –use-preload-plugins –preload-file data

Флаг –use-preload-plugins включает красивый прелоадер в углу экрана, –preload-file добавляет указанный ресурс в файл <имя проекта>.data
Код постоянно останавливался с ошибками доступа к ресурсам, пока я не включил оба этих флага. Также стоит заметить что для корректного доступа к ресурсам, желательно запускать игру на https (возможно и http) сервере, или отключить защиту локального доступа к файлам в вашем браузере.

Для включения оптимизации добавьте флаги:

-s TOTAL_MEMORY=67108864 -O3 -ffast-math

TOTAL_MEMORY – оперативная память в байтах(?) необходимая для корректной работы игры. Вы можете использовать флаг для динамического выделения памяти, но тогда часть оптимизаций работать не будет.

Производительность

Код javascript из C++ работает гораздо медленнее, даже со включенными оптимизациями. Поэтому если ваша цель это разработка для HTML5, то приготовьтесь к ручной оптимизации алгоритмов игры, паралелльному тестированию, также к написанию javascript кода вручную в особо узких местах. Для написания javascript кода используется макрос EM_ASM. Во время реализации рейкастера на emscripten, мне удалось добиться повышения fps с 2-4 до 30 с помощью прямого использования методов canvas.drawImage, в обход обертки SDL->Canvas, что почти приравнялось к написанию всего на javascript.

Поддержка SDL

На данный момент почти не работает SDL_TTF, поэтому отрисовка шрифта для Game Score в BadRobots очень проста. SDL_Image, SDL_Mixer работают корректно, в mixer я проверил только проигрывание музыки.

Исходный код Flame Steel Engine, Flame Steel Engine Game Toolkit, игры Bad Robots:

https://github.com/demensdeum/BadRobots
https://github.com/demensdeum/FlameSteelEngine
https://github.com/demensdeum/FlameSteelEngineGameToolkit

Статья на эту тему:

https://hacks.mozilla.org/2012/04/porting-me-my-shadow-to-the-web-c-to-javascriptcanvas-via-emscripten/

Diluting ECS


Commission: Mad Scientist by Culpeo-Fox on DeviantArt

In this article I will roughly describe the ECS pattern and my implementation in the Flame Steel Engine Game Toolkit. The Entity Component System pattern is used in games, including the Unity engine. Each object in the game is an Entity, which is filled with Components. Why is this necessary if there is OOP?
Then to change the properties, behavior, display of objects directly during the game execution. Such things are not found in real-world applications, the dynamics of changing parameters, properties of objects, display, sound, are more inherent in games than in accounting software.


We didn’t go through bananas

Let’s say we have a banana class in our game. And the game designer wanted bananas to be used as weapons. Let’s say in the current architecture bananas are not related to weapons. Make a banana a weapon? Make all objects weapons?
ECS offers a solution to this pressing problem – all objects in the game must consist of components. Previously, a banana was a Banana class, now we will make it, and all other objects, an Entity class, and add components to them. Let’s say a banana now consists of components:

  1. Position component (coordinates in the game world – x, y, z)
  2. Rotation component (x, y, z coordinates)
  3. The calorie content of a banana (the main character can’t get too fat)
  4. Banana picture component

We are now adding a new component to all bananas, which is a flag that it can be used as a weapon – Weapon Component. Now when the game system sees that a player has approached a banana, it checks whether the banana has a weapon component, and if it does, it arms the player with a banana.
In my game Flame Steel Call Of The Death Mask, the ECS pattern is used everywhere. Objects consist of components, components themselves can contain components. In general, the separation of object < – > component is absent in my implementation, but this is even a plus.

screenshot_2016-09-24_14-33-43

The shotgun in this screenshot is a player component, while the second shotgun is just hanging on the game map like a normal object.
In this screenshot, there are two Systems running – the scene renderer and the interface renderer. The scene renderer is working with the shotgun image component on the map, the interface renderer is working with the shotgun image component in the player’s hands.

Related links:
https://habrahabr.ru/post/197920/
https://www.youtube.com/watch?v=NTWSeQtHZ9M

Flame Steel Engine Game Toolkit Architecture

Today I will talk about the architecture of the game development toolkit Flame Steel Engine Game Toolkit.
Flame Steel Engine Game Toolkit allows you to create games based on the Flame Steel Engine:
flamesteelgametoolkitschematics

All classes of the Flame Steel Engine engine start with the FSE prefix (Flame Steel Engine), and FSEGT (Flame Steel Engine Game Toolkit) for the toolkit.
Game scene, objects, buttons, all these are subclasses of FSEObject and must be inside the FSEGTGameData class. Each FSEObject must implement the FSESerialize interface, this will allow saving/loading game data, providing a saving mechanism.
FSEController class works with objects of the FSEObject class. The toolkit has a base game scene controller class – FSEGTGameSceneController, you can inherit this class to implement your game logic.
IOSystem is an object of FSEGTIOSystem interface, this interface contains FSEGTRenderer, FSEGTInputController, FSEGTUIRenderer.
FSEGTIOSystem must implement a renderer, receive data from the keyboard, joysticks (input devices) and provide rendering of interface elements for the input-output system of this platform.
At the moment, a renderer and keyboard controller based on the SDL library have been implemented, it is available in the FSEGTIOSDLSystem class.

Flame Steel Engine Raycaster Demo

Future plans to create an IOSystem based on OpenGL, the class will be called FSEGTIOGLSystem. If you want to create an IOSystem based on any platform, then you need to use the FSEGTIOSystem interface and implement the FSEGTRenderer renderer, FSEGTInputController input controller for this platform.

Source code of Flame Steel Engine, toolkit, game:
https://github.com/demensdeum/FlameSteelCallOfTheDeathMask