In this note I will describe how to load colors into the Sega palette in assembler.
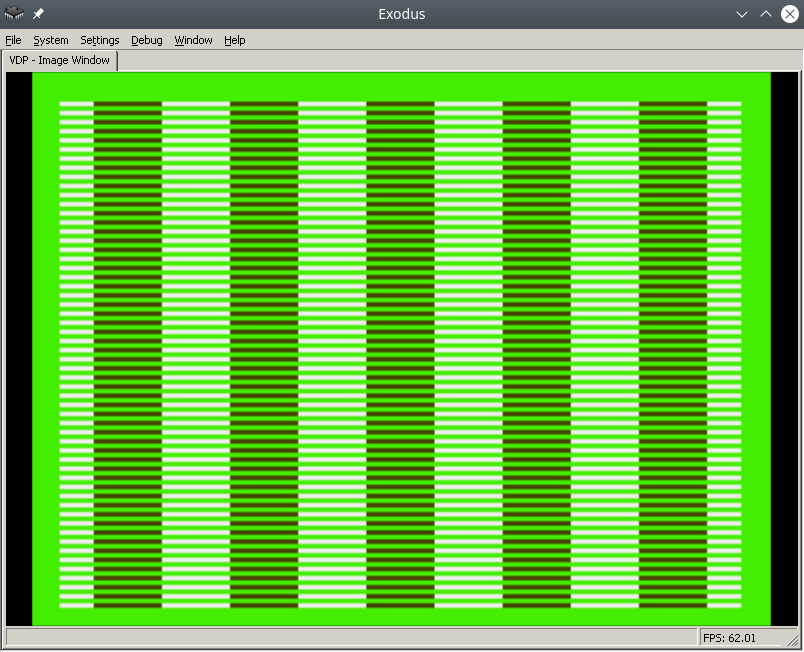
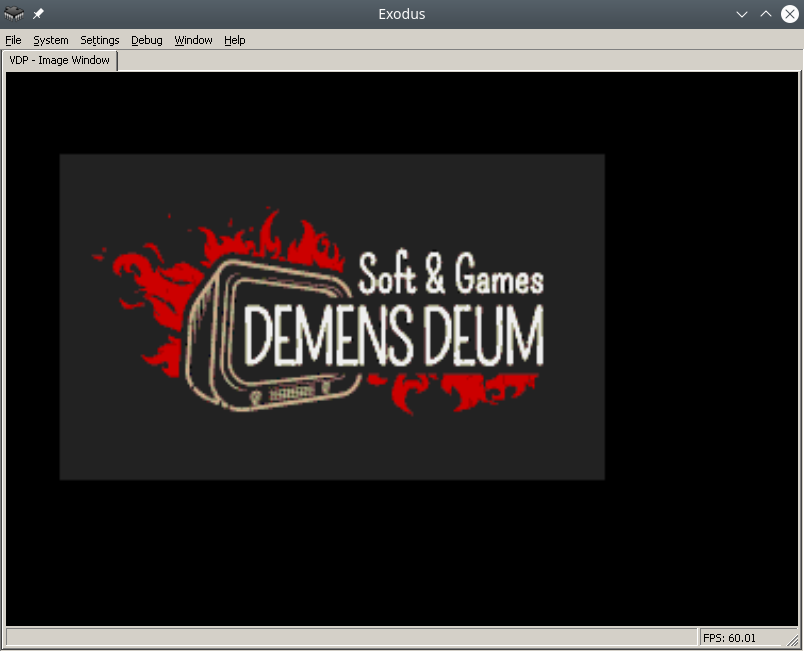
The final result in the Exodus emulator will look like this:
To make the process easier, find a pdf online called Genesis Software Manual (1989), it describes the whole process in great detail, in fact, this note is a commentary on the original manual.
In order to write colors to the VDP chip of the Sega emulator, you need to do the following:
For assembly we will use vasmm68k_mot and a favorite text editor, for example echo. Assembly is carried out by the command:
Порты VDP
VDP чип общается с M68K через два порта в оперативной памяти – порт контроля и порт данных.
По сути:
- Через порт контроля можно выставлять значения регистрам VDP.
- Также порт контроля является указателем на ту часть VDP (VRAM, CRAM, VSRAM etc.) через которую передаются данные через порт данных
Интересная информация: Сега сохранила совместимость с играми Master System, на что указывает MODE 4 из мануала разработчика, в нем VDP переключается в режим Master System.
Объявим порты контроля и данных:
vdp_data_port = $C00000
Отключить систему защиты TMSS
Защита от нелицензионных игр TMSS имеет несколько вариантов разблокировки, например требуется чтобы до обращения к VDP в адресном регистре A1 лежала строка “SEGA”.
MOVE.B A1,D0; Получаем версию хардвары цифрой из A1 в регистр D0
ANDI.B 0x0F,D0; По маске берем последние биты, чтобы ничего не сломать
BEQ.B SkipTmss; Если версия равна 0, скорее всего это японка или эмулятор без включенного TMSS, тогда идем в сабрутину SkipTmss
MOVE.L "SEGA",A1; Или записываем строку SEGA в A1
Write the correct parameters to the VDP registers
Why set the correct parameters in the VDP registers at all? The idea is that the VDP can do a lot, so before drawing you need to initialize it with the necessary features, otherwise it simply won't understand what you want from it.
Each register is responsible for a specific setting/operating mode. The Sega manual specifies all the bits/flags for each of the 24 registers, and a description of the registers themselves.
Let's take ready-made parameters with comments from the bigevilcorporation blog:
VDPReg0: dc.b $14 ; 0: H interrupt on, palettes on
VDPReg1: dc.b $74 ; 1: V interrupt on, display on, DMA on, Genesis mode on
VDPReg2: dc.b $30 ; 2: Pattern table for Scroll Plane A at VRAM $C000
; (bits 3-5 = bits 13-15)
VDPReg3: dc.b $00 ; 3: Pattern table for Window Plane at VRAM $0000
; (disabled) (bits 1-5 = bits 11-15)
VDPReg4: dc.b $07 ; 4: Pattern table for Scroll Plane B at VRAM $E000
; (bits 0-2 = bits 11-15)
VDPReg5: dc.b $78 ; 5: Sprite table at VRAM $F000 (bits 0-6 = bits 9-15)
VDPReg6: dc.b $00 ; 6: Unused
VDPReg7: dc.b $00 ; 7: Background colour - bits 0-3 = colour,
; bits 4-5 = palette
VDPReg8: dc.b $00 ; 8: Unused
VDPReg9: dc.b $00 ; 9: Unused
VDPRegA: dc.b $FF ; 10: Frequency of Horiz. interrupt in Rasters
; (number of lines travelled by the beam)
VDPRegB: dc.b $00 ; 11: External interrupts off, V scroll fullscreen,
; H scroll fullscreen
VDPRegC: dc.b $81 ; 12: Shadows and highlights off, interlace off,
; H40 mode (320 x 224 screen res)
VDPRegD: dc.b $3F ; 13: Horiz. scroll table at VRAM $FC00 (bits 0-5)
VDPRegE: dc.b $00 ; 14: Unused
VDPRegF: dc.b $02 ; 15: Autoincrement 2 bytes
VDPReg10: dc.b $01 ; 16: Vert. scroll 32, Horiz. scroll 64
VDPReg11: dc.b $00 ; 17: Window Plane X pos 0 left
; (pos in bits 0-4, left/right in bit 7)
VDPReg12: dc.b $00 ; 18: Window Plane Y pos 0 up
; (pos in bits 0-4, up/down in bit 7)
VDPReg13: dc.b $FF ; 19: DMA length lo byte
VDPReg14: dc.b $FF ; 20: DMA length hi byte
VDPReg15: dc.b $00 ; 21: DMA source address lo byte
VDPReg16: dc.b $00 ; 22: DMA source address mid byte
VDPReg17: dc.b $80 ; 23: DMA source address hi byte,
; memory-to-VRAM mode (bits 6-7)
Okay, now let's go to the control port and write all the flags to the VDP registers:
move.l #VDPRegisters,a0 ; Пишем адрес таблицы параметров в A1
move.l #$18,d0 ; Счетчик цикла - 24 = 18 (HEX) в D0
move.l #$00008000,d1 ; Готовим команду на запись в регистр VDP по индексу 0, по мануалу - 1000 0000 0000 0000 (BIN) = 8000 (HEX)
FillInitialStateForVDPRegistersLoop:
move.b (a0)+,d1 ; Записываем в D1 итоговое значение регистра VDP из таблицы параметров, на отправку в порт контроля VDP
move.w d1,vdp_control_port ; Отправляем итоговую команду + значение из D1 в порт контроля VDP
add.w #$0100,d1 ; Поднимаем индекс регистра VDP на 1 (бинарное сложение +1 к индексу по мануалу Сеги)
dbra d0,FillInitialStateForVDPRegistersLoop ; Уменьшаем счетчик регистров, продолжаем цикл если необходимо
Самое сложное это прочитать мануал и понять в каком формате подаются данные на порт контроля, опытные разработчики разберутся сразу, а вот неопытные… Немного подумают и поймут, что синтаксис для записи регистров такой:
0B100(5 бит – индекс регистра)(8 бит/байт – значение)
0B1000001001000101 – записать в регистр VDP 2 (00010), значение флажков 01000101.
Записать нужные цвета в CRAM
Далее идем писать два цвета в память цветов CRAM (Color RAM). Для этого пишем в порт контроля команду на доступ к цвету по индексу 0 в CRAM и отправляем по дата порту цвет. Все!
Пример:
move.l #$C0000000,vdp_control_port ; Доступ к цвету по индексу 0 в CRAM через порт контроля
move.w #228,d0; Цвет в D0
move.w d0,vdp_data_port; Отправляем цвет в порт данных
After building and running in the emulator in Exodus, you should have a screen filled with color 228.
Let's fill it with a second color, at the last byte 127.
move.l #$C07f0000,vdp_control_port ; Доступ к цвету по байту 127 в CRAM через порт контроля
move.w #69,d0; Цвет в D0
move.w d0,vdp_data_port; Отправляем цвет в порт данных
Links
https://gitlab.com/demensdeum/segagenesissamples
https://www.exodusemulator.com/
http://sun.hasenbraten.de/vasm/
https://tomeko.net/online_tools/bin_to_32bit_hex.php?lang=en
Sources
https://namelessalgorithm.com/genesis/blog/genesis/
https://plutiedev.com/vdp-commands
https://huguesjohnson.com/programming/genesis/palettes/
https://www.chibiakumas.com/68000/helloworld.php#LessonH5
https://blog.bigevilcorporation.co.uk/2012/03/09/sega-megadrive-3-awaking-the-beast/
The first article dedicated to writing games for the classic Sega Genesis console in Motorola 68000 Assembler.
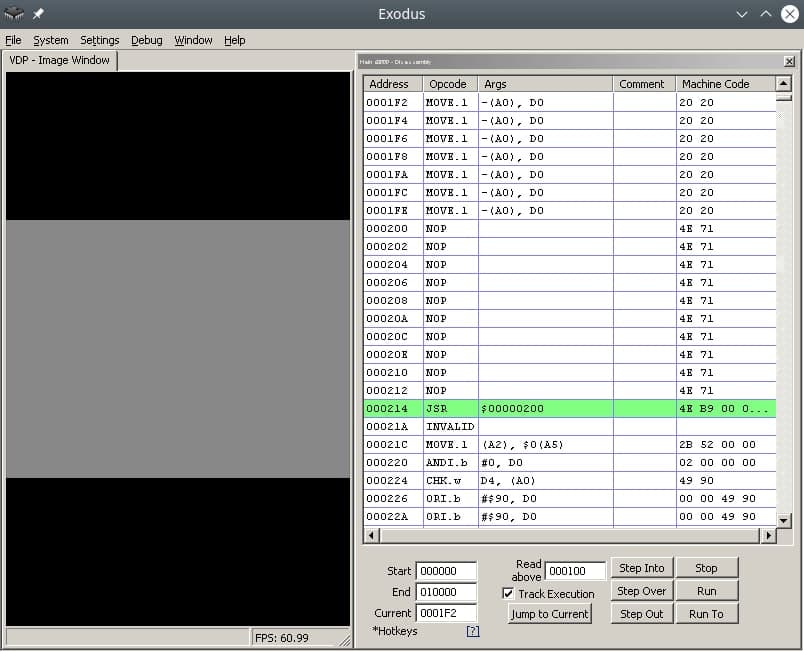
Let’s write the simplest infinite loop for Sega. For this we will need: assembler, emulator with disassembler, favorite text editor, basic understanding of Sega ROM structure.
For development, I use my own assembler/Dizassembler GEN68KRYBABY:
https://gitlab.com/demensdeum/gen68krybaby/
The tool is developed in Python 3, for assembly a file with the extension .asm or .gen68KryBabyDisasm is fed to the input, the output is a file with the extension .gen68KryBabyAsm.bin, which can be run in an emulator or on a real console (be careful, move away, the console may explode!)
ROM disassembly is also supported, for this you need to supply a ROM file to the input, without the .asm or .gen68KryBabyDisasm extensions. Opcode support will increase or decrease depending on my interest in the topic, the participation of contributors.
Structure
The Sega ROM header takes up the first 512 bytes. It contains information about the game, the title, supported peripherals, checksum, and other system flags. I assume that without the header, the console won’t even look at the ROM, thinking that it’s invalid, like “what are you giving me here?”
After the header comes the Reset subroutine/subprogram, with it the m68K processor starts working. Okay, now it’s a small matter – find the opcodes (operation codes), namely, doing nothing(!) and jumping to the subroutine at the address in memory. Googling, you can find the NOP opcode, which does nothing, and the JSR opcode, which performs an unconditional jump to the argument address, that is, it simply moves the carriage where we ask it to, without any whims.
Putting it all together
The title donor for the ROM was one of the games in the Beta version, currently written as hex data.
00 ff 2b 52 00 00 02 00 00 00 49 90 00 00 49 90 00 00 49 90 00...и т.д.
Код программы со-но представляет из себя объявление сабрутины Reset/EntryPoint в 512 (0x200) байте, NOP, возврат каретки к 0x00000200, таким образом мы получим бесконечный цикл.
Ассемблерный код сабрутины Reset/EntryPoint:
NOP
NOP
NOP
NOP
NOP
JSR 0x00000200
Full example with rom title:
https://gitlab.com /demensdeum/segagenesisamples/-/blob/main/1InfiniteLoop/1infiniteloop.asm
Next we collect:
In this note I will write about the importance of architectural decisions in the development, support of the application, in the conditions of team development.
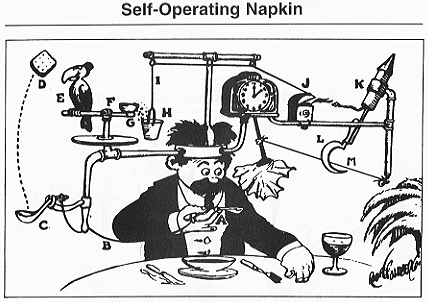
Professor Lucifer Gorgonzola’s Self-Operating Napkin. Rube Goldberg
In my youth, I worked on an app for ordering a taxi. In the program, you could choose a pickup point, a drop point, calculate the cost of the trip, the type of tariff, and, in fact, order a taxi. I got the application at the last stage of pre-launch, after adding several fixes, the application was released in the AppStore. Already at that stage, the whole team understood that it was implemented very poorly, design patterns were not used, all components of the system were tightly connected, in general, it could have been written into one large solid class (God object), nothing would have changed, since the classes mixed their boundaries of responsibility and, in general, overlapped each other with a dead link. Later, the management decided to write the application from scratch, using the correct architecture, which was done and the final product was implemented to several dozen B2B clients.
However, I will describe a funny incident from the previous architecture, from which I sometimes wake up in a cold sweat in the middle of the night, or suddenly remember in the middle of the day and start laughing hysterically. The thing is that I couldn’t hit the guy on the pole the first time, and this brought down most of the application, but first things first.
It was a normal working day, one of the customers gave me a task to slightly improve the design of the application – just move the icon in the center of the pickup address selection screen up a few pixels. Well, having professionally estimated the task at 10 minutes, I moved the icon up 20 pixels, completely unsuspecting, I decided to check the taxi order.
What? The app doesn’t show the order button anymore? How did that happen?
I couldn’t believe my eyes, after raising the icon by 20 pixels the app stopped showing the continue order button. After reverting the change I saw the button again. Something was wrong here. After sitting in the debugger for 20 minutes I got a little tired of unwinding the spaghetti of overlapping class calls, but I found that *moving the image really changes the logic of the app*
The whole thing was in the icon in the center – a man on a pole, when the map was moved, he jumped up to animate the camera movement, this animation was followed by the disappearance of the button at the bottom. Apparently, the program thought that the man, moved by 20 pixels, was jumping, so according to internal logic, it hid the confirmation button.
How can this happen? Does the *state* of the screen depend not on the pattern of the state machine, but on the *representation* of the position of the man on the pole?
That’s exactly what happened, every time the map was drawn, the application *visually poked* the middle of the screen and checked what was there, if there was a guy on a pole, it meant that the map shift animation had ended and the button needed to be shown. If there was no guy there, it meant that the map was shifting and the button needed to be hidden.
Everything is great in the example above, firstly it is an example of a Goldberg Machine (smart machines), secondly it is an example of a developer’s unwillingness to somehow interact with other developers in the team (try to figure it out without me), thirdly you can list all the problems with SOLID, patterns (code smells), violation of MVC and much, much more.
Try not to do this, develop in all possible directions, help your colleagues in their work. Happy New Year to all)
Links
https://ru.wikipedia.org/wiki/Goldberg_Machine
https://ru.wikipedia.org/wiki/SOLID
https://refactoring.guru/ru/refactoring/smells
https://ru.wikipedia.org/wiki/Model -View-Controller
https://refactoring.guru/ru/design-patterns/state
In this note I will describe working with the fasttext text classifier.
Fasttext is a machine learning library for text classification. Let’s try to teach it to identify a metal band by the title of a song. To do this, we will use supervised learning using a dataset.
Let’s create a dataset of songs with band names:
__label__metallica fuel
__label__metallica escape
__label__black_sabbath gypsy
__label__black_sabbath snowblind
__label__black_sabbath am i going insane
__label__anthrax anthrax
__label__anthrax i'm alive
__label__anthrax antisocial
[и т.д.]
Формат обучающей выборки:
Обучим fasttext и сохраним модель:
model.save_model("model.bin")
Let's load the trained model and ask it to identify the band by the song title:
predictResult = model.predict("Bleed")
print(predictResult)
В результате мы получим список классов на которые похож данный пример, с указанием уровня похожести цифрой, в нашем случае похожесть названия песни Bleed на одну из групп датасета.
Для того чтобы модель fasttext умела работать с датасетом выходящим за границы обучающей выборки, используют режим autotune с использованием файла валидации (файл тест). Во время автотюна fasttext подбирает оптимальные гиперпараметры модели, проводя валидацию результата на выборке из тест файла. Время автотюна ограничивается пользователем в самостоятельно, с помощью передачи аргумента autotuneDuration.
Пример создания модели с использованием файла тест:
In this note I will describe the process of calling C functions from assembler.
Let’s try calling printf(“Hello World!\n”); and exit(0);
message: db "Hello, world!", 10, 0
section .text
extern printf
extern exit
global main
main:
xor rax, rax
mov rdi, message
call printf
xor rdi, rdi
call exit
Everything is much simpler than it seems, in the .rodata section we will describe static data, in this case the string “Hello, world!”, 10 is the newline character, also do not forget to zero it.
In the code section, we will declare external functions printf, exit of the stdio, stdlib libraries, and also declare the entry function main:
extern printf
extern exit
global main
We pass 0 to the return register from the rax function, you can use mov rax, 0; but to speed it up, use xor rax, rax; Next, we pass a pointer to a string to the first argument:
In this note I will describe the process of setting up the IDE, writing the first Hello World in x86_64 assembler for the Ubuntu Linux operating system.
Let’s start with installing the SASM IDE, nasm assembler:
Далее запустим SASM и напишем Hello World:
section .text
main:
mov rbp, rsp ; for correct debugging
mov rax, 1 ; write(
mov rdi, 1 ; STDOUT_FILENO,
mov rsi, msg ; "Hello, world!\n",
mov rdx, msglen ; sizeof("Hello, world!\n")
syscall ; );
mov rax, 60 ; exit(
mov rdi, 0 ; EXIT_SUCCESS
syscall ; );
section .rodata
msg: db "Hello, world!"
msglen: equ $-msg
The Hello World code is taken from James Fisher's blog, adapted for assembly and debugging in SASM. The SASM documentation states that the entry point must be a function named main, otherwise debugging and compilation of the code will be incorrect.
What did we do in this code? We made a syscall call - an appeal to the Linux operating system kernel with the correct arguments in the registers, a pointer to a string in the data section.
Under the magnifying glass
Let's look at the code in more detail:
global – директива ассемблера позволяющая задавать глобальные символы со строковыми именами. Хорошая аналогия – интерфейсы заголовочных файлов языков C/C++. В данном случае мы задаем символ main для функции входа.
section – директива ассемблера позволяющая задавать секции (сегменты) кода. Директивы section или segment равнозначны. В секции .text помещается код программы.
Обьявляем начало функции main. В ассемблере функции называются подпрограммами (subroutine)
Первая машинная команда mov – помещает значение из аргумента 1 в аргумент 2. В данном случае мы переносим значение регистра rbp в rsp. Из комментария можно понять что эту строку добавил SASM для упрощения отладки. Видимо это личные дела между SASM и дебаггером gdb.
Далее посмотрим на код до сегмента данных .rodata, два вызова syscall, первый выводит строку Hello World, второй обеспечивает выход из приложения с корректным кодом 0.
Представим себе что регистры это переменные с именами rax, rdi, rsi, rdx, r10, r8, r9. По аналогии с высокоуровневыми языками, перевернем вертикальное представление ассемблера в горизонтальное, тогда вызов syscall будет выглядеть так:
Тогда вызов печати текста:
Вызов exit с корректным кодом 0:
Рассмотрим аргументы подробнее, в заголовочном файле asm/unistd_64.h находим номер функции __NR_write – 1, далее в документации смотрим аргументы для write:
ssize_t write(int fd, const void *buf, size_t count);
Первый аргумент – файловый дескриптор, второй – буфер с данными, третий – счетчик байт для записи в дескриптор. Ищем номер файлового дескриптора для стандартного вывода, в мануале по stdout находим код 1. Далее дело за малым, передать указатель на буфер строки Hello World из секции данных .rodata – msg, счетчик байт – msglen, передать в регистры rax, rdi, rsi, rdx корректные аргументы и вызвать syscall.
Обозначение константных строк и длины описывается в мануале nasm:
A hash table allows you to implement an associative array (dictionary) data structure, with an average performance of O(1) for insert, delete, and search operations.
Below is an example of the simplest implementation of a hash map on nodeJS:
How does it work? Let’s watch the hands:
- There is an array inside the hash map
- Inside the array element is a pointer to the first node of the linked list
- Memory is allocated for an array of pointers (for example 65535 elements)
- Implement a hash function, the input is a dictionary key, and the output can do anything, but in the end it returns the index of the array element
How does the recording work:
- The input is a key – value pair
- The hash function returns an index by key
- Get a linked list node from an array by index
- We check if it matches the key
- If it matches, then replace the value
- If it doesn’t match, then we move on to the next node until we either find a node with the required key.
- If the node is not found, then we create it at the end of the linked list
How does keyword search work:
- The input is a key – value pair
- The hash function returns an index by key
- Get a linked list node from an array by index
- We check if it matches the key
- If it matches, then return the value
- If it doesn’t match, then we move on to the next node until we either find a node with the required key.
Why do we need a linked list inside an array? Because of possible collisions when calculating the hash function. In this case, several different key-value pairs will be located at the same index in the array, in which case the linked list is traversed to find the required key.
Sources
https://ru.wikipedia.org/wiki/Hash table
https://www.youtube.com/watch?v=wg8hZxMRwcw
Source code
https://gitlab.com/demensdeum/datastructures
There are several options for working with resources in Android via ndk – C++:
- Use access to resources from an apk file using AssetManager
- Download resources from the Internet and unpack them into the application directory, use them using standard C++ methods
- Combined method – get access to the archive with resources in apk via AssetManager, unpack them into the application directory, then use them using standard C++ methods
Next I will describe the combined access method used in the Flame Steel Engine.
When using SDL, you can simplify access to resources from apk, the library wraps calls to AssetManager, offering interfaces similar to stdio (fopen, fread, fclose, etc.)
SDL_RWops *io = SDL_RWFromFile("files.fschest", "r");
After loading the archive from apk to the buffer, you need to change the current working directory to the application directory, it is available for the application without obtaining additional permissions. To do this, we will use a wrapper on SDL:
chdir(SDL_AndroidGetInternalStoragePath());
Next, we write the archive from the buffer to the current working directory using fopen, fwrite, fclose. After the archive is in a directory accessible to C++, we unpack it. Zip archives can be unpacked using a combination of two libraries – minizip and zlib, the first one can work with the archive structure, while the second one unpacks the data.
For more control, ease of porting, I have implemented my own zero-compression archive format called FSChest (Flame Steel Chest). This format supports archiving a directory with files, and unpacking; There is no support for folder hierarchy, only files can be worked with.
We connect the FSChest library header, unpack the archive:
#include "fschest.h"
FSCHEST_extractChestToDirectory(archivePath, SDL_AndroidGetInternalStoragePath());
After unpacking, the C/C++ interfaces will have access to the files from the archive. Thus, I did not have to rewrite all the work with files in the engine, but only add file unpacking at the startup stage.
Sources
https://developer.android.com/ndk/ reference/group/asset
Source Code
https://gitlab.com/demensdeum/space- jaguar-action-rpg
https://gitlab.com/demensdeum/fschest
Let’s say we need to implement a simple bytecode interpreter. What approach should we choose to implement this task?
The Stack data structure provides the ability to implement the simplest bytecode machine. Features and implementations of stack machines are described in many articles on the Western and domestic Internet, I will only mention that the Java virtual machine is an example of a stack machine.
The principle of the machine is simple: a program containing data and operation codes (opcodes) is fed to the input, and the necessary operations are implemented using stack manipulations. Let’s look at an example of a bytecode program for my stack machine:
The output will be the string “Hello StackVM”. The stack machine reads the program from left to right, loading the data into the stack symbol by symbol, and when the opcode appears in the – symbol, it implements the command using the stack.
Example of stack machine implementation on nodejs:
Reverse Polish Notation (RPN)
Stack machines are also easy to use for implementing calculators, using Reverse Polish Notation (postfix notation).
Example of a normal infix notation:
2*2+3*4
Converts to RPN:
22*34*+
To calculate the postfix notation we use a stack machine:
2 – to top of stack (stack: 2)
2 – to top of stack (stack: 2,2)
* – get the top of the stack twice, multiply the result, push to the top of the stack (stack: 4)
3 – to top of stack (stack: 4, 3)
4 – on top of stack (stack: 4, 3, 4)
* – get the top of the stack twice, multiply the result, push to the top of the stack (stack: 4, 12)
+ – get the top of the stack twice, add the result, push to the top of the stack (stack: 16)
As you can see, the result of operations 16 remains on the stack, it can be printed by implementing stack printing opcodes, for example:
p22*34*+P
П – opcode to start printing the stack, п – opcode to finish printing the stack and sending the final line for rendering.
To convert arithmetic operations from infix to postfix, Edsger Dijkstra’s algorithm called “Sorting Yard” is used. An example of the implementation can be seen above, or in the repository of the stack machine project on nodejs below.
Sources
https://tech.badoo.com/ru/article/579/interpretatory-bajt-kodov-svoimi-rukami/
https://ru.wikipedia.org/wiki/Обратная_польская_запись
Source code
https://gitlab.com/demensdeum/stackvm/< /p>
I continue to describe the skeletal animation algorithm as it is implemented in the Flame Steel Engine.
Since this is the most complex algorithm I’ve ever implemented, there may be errors in the development notes. In the previous article about this algorithm, I made a mistake: the bone array is passed to the shader for each mesh separately, not for the entire model.
Hierarchy of nodes
For the algorithm to work correctly, the model must contain a connection between the bones (graph). Let’s imagine a situation in which two animations are played simultaneously – a jump and raising the right hand. The jump animation must raise the model along the Y axis, while the animation of raising the hand must take this into account and rise together with the model in the jump, otherwise the hand will remain in place on its own.
Let’s describe the node connection for this case – the body contains a hand. When the algorithm is processed, the bone graph will be read, all animations will be taken into account with correct connections. In the model’s memory, the graph is stored separately from all animations, only to reflect the connectivity of the model’s bones.
Interpolation on CPU
In the previous article I described the principle of rendering skeletal animation – “transformation matrices are passed from the CPU to the shader at each rendering frame.”
Each rendering frame is processed on the CPU, for each bone of the mesh the engine gets the final transformation matrix using interpolation of position, rotation, magnification. During the interpolation of the final bone matrix, the node tree is traversed for all active node animations, the final matrix is multiplied with the parents, then sent to the vertex shader for rendering.
Vectors are used for position interpolation and magnification, quaternions are used for rotation, since they are very easy to interpolate (SLERP) unlike Euler angles, and they are also very easy to represent as a transformation matrix.
How to Simplify Implementation
To simplify debugging of vertex shader operation, I added simulation of vertex shader operation on CPU using macro FSGLOGLNEWAGERENDERER_CPU_BASED_VERTEX_MODS_ENABLED. Video card manufacturer NVIDIA has a utility for debugging shader code Nsight, perhaps it can also simplify development of complex algorithms of vertex/pixel shaders, however I never had a chance to check its functionality, simulation on CPU was enough.
In the next article I plan to describe mixing several animations, fill in the remaining gaps.
Sources
https://www.youtube.com/watch?v= f3Cr8Yx3GGA
In this note I will describe a way to add support for JavaScript scripts to a C++ application using the Tiny-JS library.
Tiny-JS is a library for embedding in C++, providing execution of JavaScript code, with support for bindings (the ability to call C++ code from scripts)
At first I wanted to use popular libraries ChaiScript, Duktape or connect Lua, but due to dependencies and possible difficulties in portability to different platforms, it was decided to find a simple, minimal, but powerful MIT JS lib, Tiny-JS meets these criteria. The only downside of this library is the lack of support/development by the author, but its code is simple enough that you can take on the support yourself if necessary.
Download Tiny-JS from the repository:
https://github.com/gfwilliams/tiny-js
Next, add Tiny-JS headers to the code that is responsible for scripts:
#include "tiny-js/TinyJS.h"
#include "tiny-js/TinyJS_Functions.h"
Add TinyJS .cpp files to the build stage, then you can start writing scripts to load and run.
An example of using the library is available in the repository:
https://github.com/gfwilliams/tiny-js/blob/master/Script.cpp
https://github.com/gfwilliams/tiny-js/blob/wiki/CodeExamples.md
An example of the implementation of the handler class can be found in the SpaceJaguar project:
https://gitlab.com/demensdeum/space-jaguar-action-rpg/-/blob/master/project/src/Controllers/SpaceJaguarScriptController/SpaceJaguarScriptController.h
https://gitlab.com/demensdeum/space-jaguar-action-rpg/-/blob/master/project/src/Controllers/SpaceJaguarScriptController/SpaceJaguarScriptController.cpp
Example of a game script added to the application:
https://gitlab.com/demensdeum/space-jaguar-action-rpg/-/blob/master/project/resources/com.demensdeum.spacejaguaractionrpg.scripts.sceneController.js
Sources
https://github.com/gfwilliams/tiny-js
https://github.com/dbohdan/embedded-scripting-languages
https://github.com/AlexKotik/embeddable-scripting-languages
We use cookies on our website. By clicking “Accept”, you consent to the use of ALL the cookies. Мы используем куки на сайте. Нажимая "ПРИНЯТЬ" вы соглашаетесь с этим.
Manage consent





.gif)