The first article dedicated to writing games for the classic Sega Genesis console in Motorola 68000 Assembler.
Let’s write the simplest infinite loop for Sega. For this we will need: assembler, emulator with disassembler, favorite text editor, basic understanding of Sega ROM structure.
For development, I use my own assembler/Dizassembler GEN68KRYBABY:
https://gitlab.com/demensdeum/gen68krybaby/
The tool is developed in Python 3, for assembly a file with the extension .asm or .gen68KryBabyDisasm is fed to the input, the output is a file with the extension .gen68KryBabyAsm.bin, which can be run in an emulator or on a real console (be careful, move away, the console may explode!)
ROM disassembly is also supported, for this you need to supply a ROM file to the input, without the .asm or .gen68KryBabyDisasm extensions. Opcode support will increase or decrease depending on my interest in the topic, the participation of contributors.
Structure
The Sega ROM header takes up the first 512 bytes. It contains information about the game, the title, supported peripherals, checksum, and other system flags. I assume that without the header, the console won’t even look at the ROM, thinking that it’s invalid, like “what are you giving me here?”
After the header comes the Reset subroutine/subprogram, with it the m68K processor starts working. Okay, now it’s a small matter – find the opcodes (operation codes), namely, doing nothing(!) and jumping to the subroutine at the address in memory. Googling, you can find the NOP opcode, which does nothing, and the JSR opcode, which performs an unconditional jump to the argument address, that is, it simply moves the carriage where we ask it to, without any whims.
Putting it all together
The title donor for the ROM was one of the games in the Beta version, currently written as hex data.
00 ff 2b 52 00 00 02 00 00 00 49 90 00 00 49 90 00 00 49 90 00...и т.д. Код программы со-но представляет из себя объявление сабрутины Reset/EntryPoint в 512 (0x200) байте, NOP, возврат каретки к 0x00000200, таким образом мы получим бесконечный цикл.
Ассемблерный код сабрутины Reset/EntryPoint:
    NOP
    NOP
    NOP
    NOP
    NOP
    JSR 0x00000200
Full example with rom title:
https://gitlab.com /demensdeum/segagenesisamples/-/blob/main/1InfiniteLoop/1infiniteloop.asm
Next we collect:
Запускаем ром 1infiniteloop.asm.gen68KryBabyAsm.bin в режиме дебаггера эмулятора Exodus/Gens, смотрим что m68K корректно считывает NOP, и бесконечно прыгает к EntryPoint в 0x200 на JSR
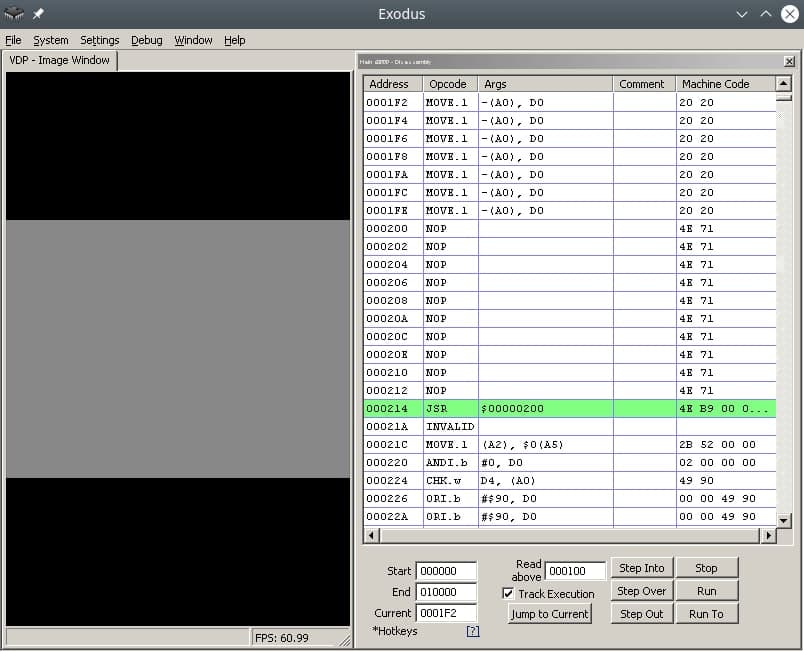
Здесь должен быть Соник показывающий V, но он уехал на Вакен.
Ссылки
https://gitlab.com/demensdeum/gen68krybaby/
https://gitlab.com/demensdeum/segagenesissamples
https://www.exodusemulator.com/downloads/release-archive
Источники
ROM Hacking Demo – Genesis and SNES games in 480i
https://www.chibiakumas.com/68000/genesis.php
https://plutiedev.com/rom-header
https://blog.bigevilcorporation.co.uk/2012/02/28/sega-megadrive-1-getting-started/
https://opensource.apple.com/source/cctools/cctools-836/as/m68k-opcode.h.auto.html
x86_64 Assembler + C = One Love
In this note I will describe the process of calling C functions from assembler.
Let’s try calling printf(“Hello World!\n”); and exit(0);
    message: db "Hello, world!", 10, 0

section .text
    extern printf
    extern exit
    global main

main:
    xor	rax, rax
    mov	rdi, message
    call printf
    xor rdi, rdi
    call exit
Everything is much simpler than it seems, in the .rodata section we will describe static data, in this case the string “Hello, world!”, 10 is the newline character, also do not forget to zero it.
In the code section, we will declare external functions printf, exit of the stdio, stdlib libraries, and also declare the entry function main:
    extern printf
    extern exit
    global main
We pass 0 to the return register from the rax function, you can use mov rax, 0; but to speed it up, use xor rax, rax; Next, we pass a pointer to a string to the first argument:
Далее вызываем внешнюю функцию Си printf:
    xor	rax, rax
    mov	rdi, message
    call printf
    xor rdi, rdi
    call exit


By analogy, we pass 0 to the first argument and call exit:

    call exit


As Americans say:
Who doesn't listen to anyone
That pilaf is eaten by @ Alexander Pelevin
Sources
https://www.devdungeon. com/content/how-mix-c-and-assembly
https://nekosecurity.com/x86-64-assembly/part-3-nasm-anatomy-syscall-passing-argument

https://www.cs.uaf.edu/2017/fall/cs301/reference/x86_64.html
Source code
https://gitlab.com/demensdeum/assembly-playground
Hello World x86_64 assembler
In this note I will describe the process of setting up the IDE, writing the first Hello World in x86_64 assembler for the Ubuntu Linux operating system.
Let’s start with installing the SASM IDE, nasm assembler:
Далее запустим SASM и напишем Hello World:
section .text
main:
mov rbp, rsp ; for correct debugging
mov rax, 1 ; write(
mov rdi, 1 ; STDOUT_FILENO,
mov rsi, msg ; "Hello, world!\n",
mov rdx, msglen ; sizeof("Hello, world!\n")
syscall ; );
mov rax, 60 ; exit(
mov rdi, 0 ; EXIT_SUCCESS
syscall ; );
section .rodata
msg: db "Hello, world!"
msglen: equ $-msg
The Hello World code is taken from James Fisher's blog, adapted for assembly and debugging in SASM. The SASM documentation states that the entry point must be a function named main, otherwise debugging and compilation of the code will be incorrect.
What did we do in this code? We made a syscall call - an appeal to the Linux operating system kernel with the correct arguments in the registers, a pointer to a string in the data section.
Under the magnifying glass
Let's look at the code in more detail:
global – директива ассемблера позволяющая задавать глобальные символы со строковыми именами. Хорошая аналогия – интерфейсы заголовочных файлов языков C/C++. В данном случае мы задаем символ main для функции входа.
section – директива ассемблера позволяющая задавать секции (сегменты) кода. Директивы section или segment равнозначны. В секции .text помещается код программы.
Обьявляем начало функции main. В ассемблере функции называются подпрограммами (subroutine)
Первая машинная команда mov – помещает значение из аргумента 1 в аргумент 2. В данном случае мы переносим значение регистра rbp в rsp. Из комментария можно понять что эту строку добавил SASM для упрощения отладки. Видимо это личные дела между SASM и дебаггером gdb.
Далее посмотрим на код до сегмента данных .rodata, два вызова syscall, первый выводит строку Hello World, второй обеспечивает выход из приложения с корректным кодом 0.
Представим себе что регистры это переменные с именами rax, rdi, rsi, rdx, r10, r8, r9. По аналогии с высокоуровневыми языками, перевернем вертикальное представление ассемблера в горизонтальное, тогда вызов syscall будет выглядеть так:
Тогда вызов печати текста:
Вызов exit с корректным кодом 0:
Рассмотрим аргументы подробнее, в заголовочном файле asm/unistd_64.h находим номер функции __NR_write – 1, далее в документации смотрим аргументы для write:
ssize_t write(int fd, const void *buf, size_t count);
Первый аргумент – файловый дескриптор, второй – буфер с данными, третий – счетчик байт для записи в дескриптор. Ищем номер файлового дескриптора для стандартного вывода, в мануале по stdout находим код 1. Далее дело за малым, передать указатель на буфер строки Hello World из секции данных .rodata – msg, счетчик байт – msglen, передать в регистры rax, rdi, rsi, rdx корректные аргументы и вызвать syscall.
Обозначение константных строк и длины описывается в мануале nasm:
msglen equ $-message
Достаточно просто да?
Источники
https://github.com/Dman95/SASM
https://www.nasm.us/xdoc/2.15.05/html/nasmdoc0.html
http://acm.mipt.ru/twiki/bin/view/Asm/HelloNasm
https://jameshfisher.com/2018/03/10/linux-assembly-hello-world/
http://www.ece.uah.edu/~milenka/cpe323-10S/labs/lab3.pdf
https://c9x.me/x86/html/file_module_x86_id_176.html
https://www.recurse.com/blog/7-understanding-c-by-learning-assembly
https://ru.wikipedia.org/wiki/%D0%9F%D1%80%D0%BE%D0%BB%D0%BE%D0%B3_%D0%BF%D1%80%D0%BE%D1%86%D0%B5%D0%B4%D1%83%D1%80%D1%8B
https://www.tutorialspoint.com/assembly_programming/assembly_basic_syntax.html
https://nekosecurity.com/x86-64-assembly/part-3-nasm-anatomy-syscall-passing-argument
https://man7.org/linux/man-pages/man2/syscall.2.html
https://en.wikipedia.org/wiki/Write_(system_call)
Исходный код
https://gitlab.com/demensdeum/assembly-playground